The Art of Astrophotography Editing: Staying True to Natural Colors
Astrophotography isn’t just about capturing images—editing is one of its most critical parts. Since these celestial objects aren’t something we can see clearly with the naked eye, adding whatever colors we like might make the image look appealing at first glance, but in my opinion, it only works for short-term visual satisfaction rather than authenticity.
When it comes to learning editing, I study the works of well-known photographers, as well as images captured by space telescopes like Hubble Space Telescope and James Webb Space Telescope. I also spend time researching space-related websites to understand what colors are actually emitted by gases in nebulae and galaxies.
From what I’ve learned, green does exist in space—but it’s extremely faint. With typical astrophotography setups, it’s often barely visible in images. Even when it does appear, green should usually be limited to areas around dense gas regions, such as near the core of nebulae and galaxies. That’s why, when editing wide-field images, if green appears in the background, it’s common practice to remove it using tools like SCNR in PixInsight.
For tight-field images, however, there’s usually little to no background space, so any green that appears is often near the nebula’s core and doesn’t necessarily need to be removed. That said, this isn’t always a strict rule. For example, if a nebula has only a small amount of Oxygen (OIII) emission but strong green shows up during processing, it can be considered a “fake color.”
Filters also play a huge role in astrophotography. Depending on the filters used, certain wavelengths (and therefore colors) are blocked or enhanced. That’s one of the reasons why long exposure times are so important—not just to capture faint colors, but also to reduce noise as much as possible.
I’d also strongly recommend using dedicated astrophotography software like PixInsight. The tools available there are far more effective for tasks like color calibration and noise reduction compared to regular editing applications. I’ve personally compared noise reduction between PixInsight and Adobe Photoshop, and the difference is clear.
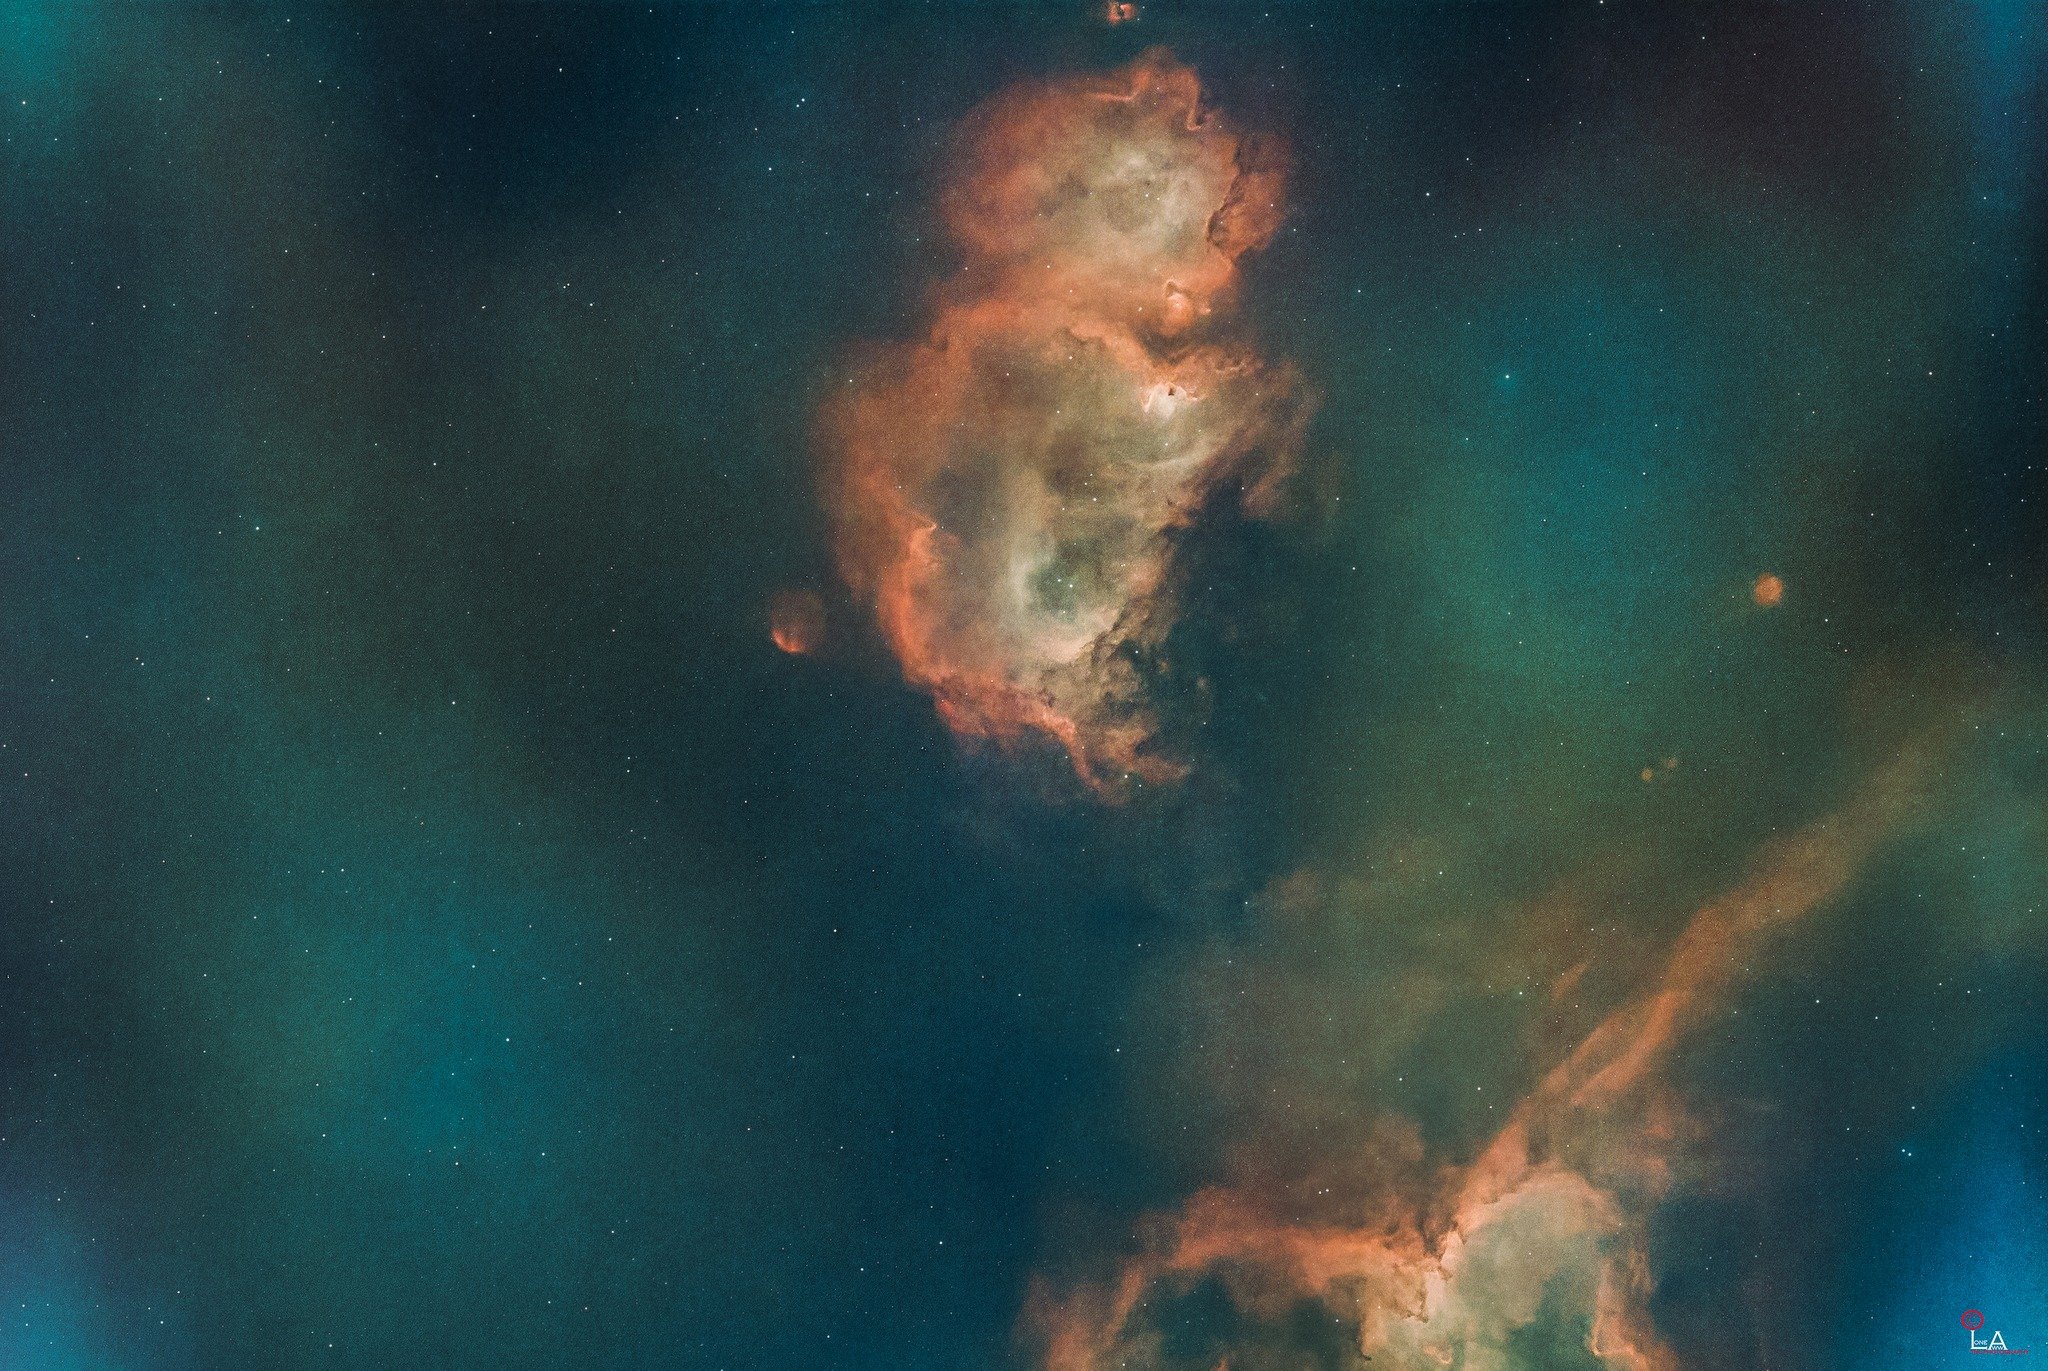
Recently, in my images of the Heart and Soul Nebula, I experimented with adding green tones by adjusting the RGB channels in Photoshop. However, it didn’t sit right with me. Since green is naturally very faint in these objects, I decided to remove it and return the image to a more natural color balance.
Clear skies and happy observing…..

Astrophotography ရဲ့အရေးကြီးတယ့်အပိုင်းတွေအထဲမှာ editing ကလည်းတစ်ခုအပါအဝင်ပါပဲခင်ဗျ။ မျက်လုံးနဲ့ဒီအတိုင်းလှမ်းကြည့်လို့မြင်ရတယ့်အရာတွေမဟုတ်လို့ အရောင်တွေကိုကိုယ်ပြင်ချင်တယ့်အရောင်တွေလျှောက်ထည့်မယ်ဆိုရင်တော့ ရေတိုကြည့်ဖို့အတွက်ပဲအဆင်ပြေမယ်လို့ ကျွန်တော်တော့ယူဆတာပဲခင်ဗျ။
ကျွန်တော် editing အတွက်သင်ယူတယ့်နည်းလမ်းကတော့ Famous ဖြစ်ပြီးသား photographer တွေရယ့်ပုံတွေရယ်၊ NASA ရဲ့ Space Scope တွေဖြစ်တယ့် Hubble တို့ James Webb တို့ကရိုက်ယူထားတယ့်ပုံတွေကို များများလေ့လာပေးဖြစ်တယ်။ နောက်ပြီး space website တွေကနေ Nebula တို့ Galaxies တို့ကနေထွက်တယ့် gas တွေက ဘာအရောင်တွေလဲဆိုတာကိုပါလေ့လာဖြစ်ပါတယ်ခင်ဗျ။
သိရသလောက်ကတော့ Space မှာအစိမ်းရောင်ဆိုတာရှိပေမယ့်အားနည်းလွန်းတယ့်အတွက် ပုံမှန် astrophotography setup တွေနဲ့ရိုက်ရင် ပုံတွေထဲမှာ မမြင်ရသလောက်ပါပဲ။ နောက်ပြီး အစိမ်းရောင်ပါခဲ့မယ်ဆိုရင်လည်း ဓာတ်ငွေ့တွေအများဆုံးရှိတယ့် Nebula နဲ့ Galaxies တို့အနားတစ်ဝိုက်နဲ့သူတို့ရယ့် Core တစ်ဝိုက်မှာပဲရှိသင့်တယ်လို့သိရှိရပါတယ်ခင်ဗျ။ ဒါကြောင့် wide view နဲ့ရိုက်ထားတယ့်ပုံတစ်ပုံကို editing လုပ်တယ့်အခါ background မှာအစိမ်းရောင်ပေါ်လာပြီဆိုရင် PixInsight မှာဆို SCNR ဆိုတယ့် tool နဲ့ရှင်းထုတ်ပေးရပါတယ်။ Tight view နဲ့ရိုက်ထားတယ့်ပုံတွေမှာကတော့ နဂိုကတည်းက background space မပါတာ ဒါမှမဟုတ်မပါသလောက်ဖြစ်သွားတာမို့လို့ အစိမ်းရောင်ပေါ်လာရင်လည်း Nebula ရဲ့ Core တစ်ဝိုက်မှာမို့လို့ ရှင်းထုတ်ပေးစရာမလိုပါဘူး။ ဒါပေမယ့်အဲဒါကလည်းအမြဲမမှန်ပါဘူးခင်ဗျ ဘာဖြစ်လို့လဲဆိုတော့ ကိုယ်ရိုက်တယ့် Nebula ကထွက်တယ့်ဓာတ်ငွေ့ထဲမှာ Oxygen (OIII) ထွက်တယ့်ပမာဏနည်းပေမယ့် ပုံပြင်တယ့်အခါအစိမ်းရောင်တွေထွက်လာတယ်ဆိုရင်တော့ fake color လို့မှတ်ယူလို့ရပါတယ်။ နောက်ပြီး astrophotography မှာသုံးတယ့် filter တွေကအရမ်းအရေးကြီးပါတယ်။ ဘာဖြစ်လို့လဲဆိုတော့ သုံးတယ့် filter အပေါ်မူတည်ပြီးအရောင်တွေကို block လိုက်လို့ပါပဲခင်ဗျ။ ဒါကြောင့်လည်းပုံတစ်ပုံကို အချိန်အကြာကြီးရိုက်ကြတယ်ဆိုတာက အလကားမဟုတ်ပါဘူး။ အားနည်းတယ့်အရောင်တွေကို ပုံထဲမှာပါလာစေချင်တာရယ် noise ကိုနည်းနိုင်သမျှနည်းအောင်လျှော့ချချင်တာတွေရယ်ကြောင့်ပေါ့ခင်ဗျ။
နောက်ပြီး PixInsight လို astrophotography အတွက်ရည်ရွယ်ပြီးထုတ်ထားတယ့် application တွေအထဲက tools တွေကိုပိုပြီးအသုံးပြုဖို့တိုက်တွန်းချင်ပါတယ်။ ဘာဖြစ်လို့လဲဆိုတော့ အရောင်ပြင်တာတို့ Noise တွေပြေလျှော့အောင်လုပ်တယ့်အပိုင်းတွေမှာ တစ်ခြား regular application တွေထွက်ပိုပြီး effectiveness ပိုဖြစ်လို့ပါပဲခင်ဗျ။ ကျွန်တော်ကိုယ်တိုင် PixInsight နဲ့ Adobe Photoshop တို့ကို noise reduction အတွက်ယှဥ်ပြီးသုံးကြည့်ပြီးပြီမို့လို့ သိရတာပါ။
ကျွန်တော်ဒီရက်ပိုင်းရိုက်ထားတယ့် Heart and Soul Nebula တွေမှာအစိမ်းရောင်တွေပါနေတာက Photoshop အထဲက seperate channels (R, G, B) မှာ ကိုယ်လိုချင်တယ့်အရောင်တွေကိုပြောင်းကြည့်ထားလို့ပါ။ ဒါပေမယ့်လည်း စိတ်ထဲမှာလိပ်ပြာသိပ်မသန့်တာမို့လို့ နဂိုကတည်းကအားနည်းလို့သိပ်မပေါ်တယ့်အစိမ်းရောင်ကိုဖယ်ထုတ်ပစ်လိုက်ပြီး natural color အတိုင်းပဲပြန်ထားလိုက်ပါတယ်.....
မိုးသားကင်းစင်ကြည်လင်သောညများ ဖြစ်ပါစေ — အမြင်ကောင်းများနှင့် အောင်မြင်သော observation များရရှိပါစေ.....