Understanding Linear Images in Astrophotography: From Confusion to Clarity
A “linear image” is actually something all of us photography enthusiasts are already familiar with from the moment we start learning photography. However, we don’t usually hear it called “linear”—we know it more commonly as RAW (CR2 / NEF). So when I first started learning astrophotography, the term “linear image” felt quite unfamiliar to me (at least for me personally).
That curiosity pushed me to dig a little deeper, and I realized that it’s directly related to the hobby I’m practicing. That’s why I felt like sharing what I’ve learned through this post.
To be honest, aside from learning shooting techniques and settings for each genre, I haven’t really explored the deeper technical side of photography that much. Back when I was shooting normal photography like wildlife or macro, opening a RAW file would still let me see the image roughly, just with some differences in brightness and contrast. Then I would send the file to Adobe Photoshop or Lightroom and edit it to make it look better.
When I started astrophotography, I initially used beginner-level smartscopes that only output JPEG files, so I didn’t run into any issues. But when I moved to an intermediate smartscope that outputs FITS (RAW), that’s when I came face-to-face with this “linear” concept.
At first, like any photographer, I was excited—“Great, I can finally edit RAW files and get better results!” But the first problem I encountered was finding software that could even open FITS files. Out of many options, I chose PixInsight.
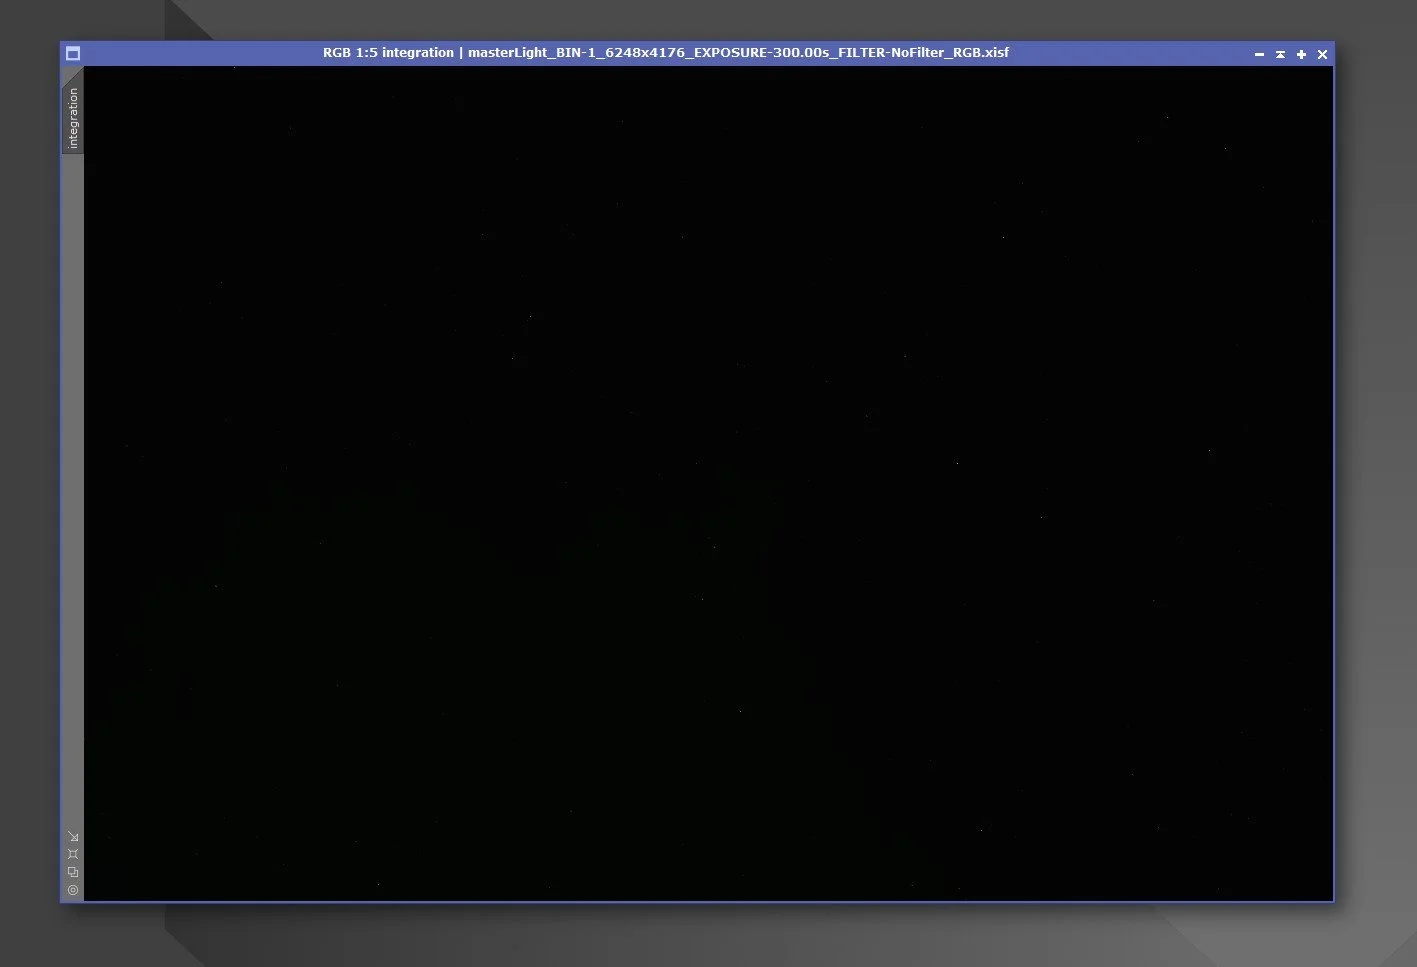
Then came the real surprise. When I loaded my image into the application… it was completely black.
I had assumed it would behave like other apps, where you can preview the image before editing. But instead, I was staring at a black screen, which honestly confused me quite a bit.
Another challenge was noise. Since astrophotography requires stacking many frames (often at least 40) to reduce noise, it already takes a lot of effort. So seeing a black screen when trying to process those images made me question whether I had made a mistake getting into this.
On top of that, my smartscope could also output already-stacked TIFF files. Since I wanted quick results, I initially focused on editing TIFF instead of RAW. But in reality, even though TIFF files are large, they don’t offer the same flexibility as RAW. So I started learning how to properly process FITS files.
That’s when I realized something important: astrophotography editing isn’t just about modifying image data—it also involves using the recorded log data captured during imaging. Because TIFF files are already partially processed, some features don’t work properly, and errors can occur during processing.
In the end, I decided that at least 95% of my editing should be done using FITS files.
Now, let’s get to the main point: Linear Images.
Both normal photography RAW and astrophotography RAW are technically linear images. However, astrophotography RAW is much more “pure”—you could even say 100% linear.
As I mentioned earlier, when you open a normal RAW file, you can still see the image because it already includes slight processing such as white balance metadata, some noise reduction (sometimes hidden), and compression (lossy or lossless).
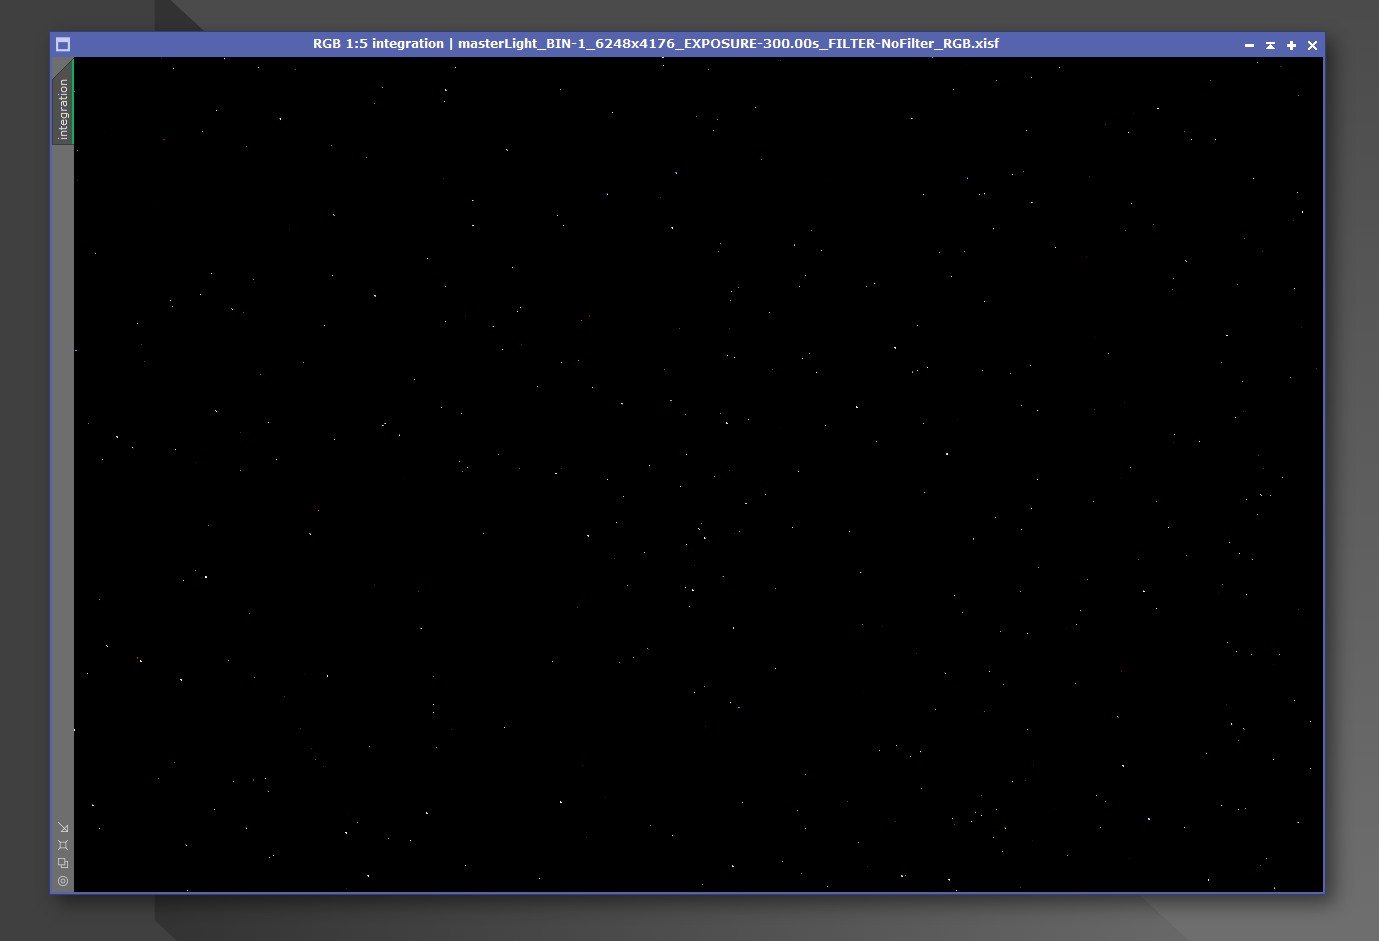
But astrophotography RAW is different. When you open it, it appears completely black. You won’t see anything until you apply a process called “stretching.”
Before editing any astrophotography image, stretching is essential. Without it, you can’t fully utilize the data contained in the image.
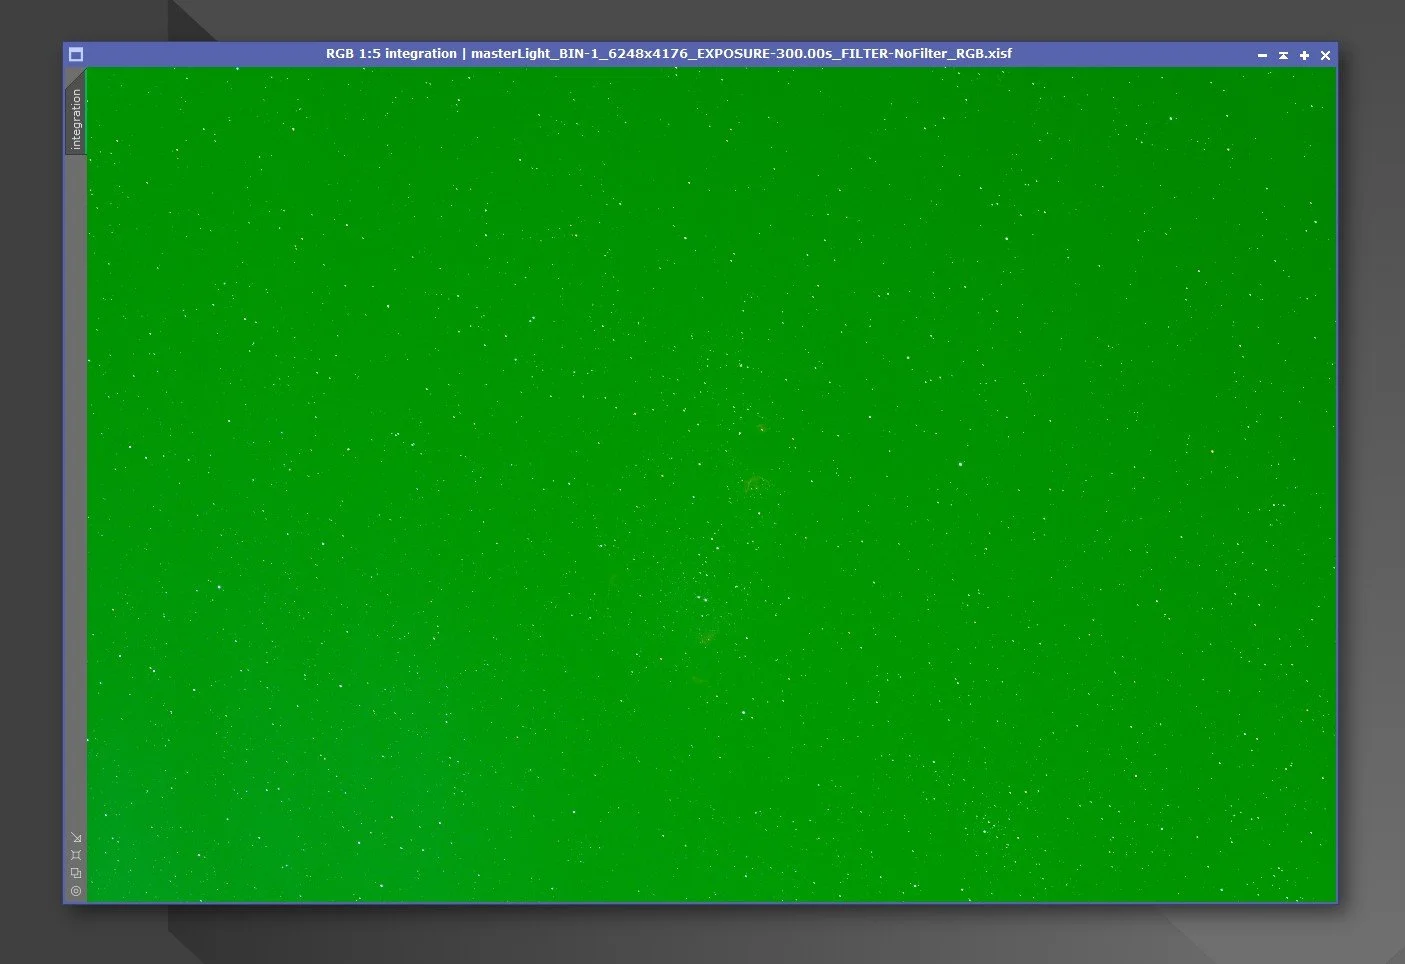
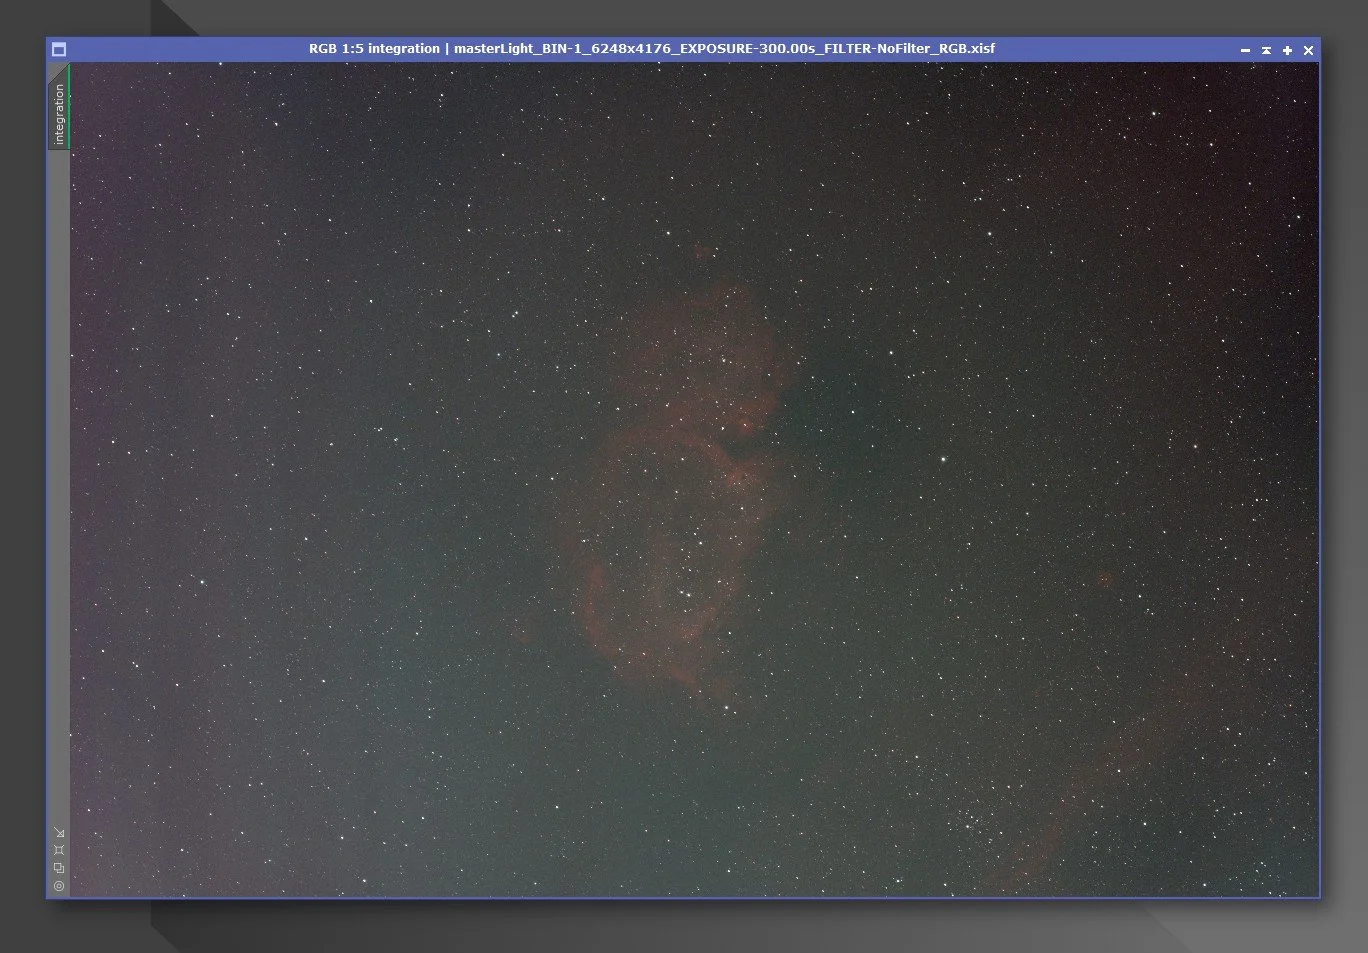
Even after stretching, the image still looks faint. That’s when you use dedicated tools in PixInsight to further enhance colors and brightness. Each processing step is very sensitive—small mistakes can easily lead to unnatural or “crazy” colors.
The histogram is extremely important when editing FITS files. If you look at a RAW histogram, most of the data is compressed toward the left side. That’s why beginners often feel confused—after stretching, the image still looks very faded.
Also, during shooting, the preview image looks good because it’s a JPEG. But when you start editing the actual data, the image doesn’t immediately look as impressive as expected.
Another key difference is in pixel values:
FITS stores true photon counts (actual signal)
DSLR RAW may include a slight interpretation
In terms of tone curves:
FITS is completely flat and linear (no gamma applied)
DSLR RAW already has some curve applied
So why is FITS widely used in astronomy research?
Because accuracy matters.
When you convert DSLR RAW into TIFF, you’re typically limited to 16-bit. But FITS supports much higher bit depths—32-bit unsigned or even 64-bit IEEE.
This means FITS preserves far more data.
You can clearly see the advantage when you process a FITS file in PixInsight, convert it to TIFF, and continue editing in Photoshop—you still have a lot of flexibility to work with.
That’s why images captured with professional-level equipment look so stunning… no surprise there.
Clear skies and happy observing…..

Linear image ဆိုတာကို ကျွန်တော်တို့လိုဓာတ်ပုံဝါသနာရှင်တွေအားလုံး ဓာတ်ပုံပညာကိုစပြီးလေ့လာသင်ယူကတည်းက ရင်းနှီးပြီးသားပါ။ ဒါပေမယ့် Linear ဆိုတယ့်စကားလုံးနဲ့မဟုတ်ပဲ RAW (CR2 / NEF) ဆိုတယ့်စကားလုံးနဲ့မို့လို့ အခုလိုမျိုး astrophotography ကိုစပြီးလေ့လာတယ့်အချိန်မှာ Linear image ဆိုတယ့်စကားလုံးကကျွန်တော်အတွက်တော့ (ကျွန်တော့်အတွက်နော်) နည်းနည်းမဟုတ်ဘူး တော်တော်စိမ်းနေတယ်လို့ခံစားလိုက်ရတယ်။ အဲဒါနဲ့ပဲနည်းနည်းတော့စပ်စုကြည့်အုန်းမှပါပဲလေဆိုပြီးလေ့လာလိုက်တာ ကိုယ်လုပ်နေတယ့်ဝါသနာနဲ့တိုက်ရိုက်ပတ်သက်နေပါလားဆိုတာကိုသိလိုက်ရပြီး ကိုယ်လေ့လာလို့သိသလောက်လေးကိုလည်း ပြန်လည်မျှဝေပေးချင်စိတ်လေးဖြစ်လာမိလို့ ဒီပိုစ့်လေးကိုရေးဖြစ်တယ်ဆိုပါတော့ခင်ဗျ။
အမှန်ဆို ကျွန်တော်ကကိုယ်ရိုက်တယ့် genre ရယ့် setting နဲ့ဘယ်လိုရိုက်သင့်သလဲဆိုတယ့် နည်းတွေကလွဲလို့ ဓာတ်ပုံနည်းပညာနဲ့ပတ်သက်တာတွေကို ထဲထဲဝင်ဝင်သိပ်ပြီးစပ်စုလေ့မရှိသလောက်ပဲခင်ဗျ။ အရင် normal photography ဖြစ်တယ့် wildlife တို့ macro တို့ရိုက်တုန်းကတော့ RAW file ကိုဖွင့်ကြည့်လိုက်ရင် အလင်းအမှောင်ပြောင်းလွဲသွားတာကလွဲလို့ ပုံတစ်ပုံလုံးကိုအကြမ်းမျင်းတော့ကြည့်လို့ရပါတယ်။ ပြီးတော့မှ file ကို Adobe Photoshop ဒါမှမဟုတ် Adobe Lightroom အထဲကိုပို့ပြီး editing လုပ်ကာပုံကိုလှပအောင်ပြုပြင်ကြတာပါ။
Astrophotography ကိုစပြီးလေ့လာတော့ အစပိုင်းမှာ JPEG format ပဲထုတ်ပေးတယ့် beginner level smartscope တွေနဲ့အသုံးပြုနေတာမို့လို့ ဘာမှပြဿနာမရှိသေးပေမယ့် FITS (RAW) format ထုတ်ပေးတယ့် intermediate level smartscope ကိုစသုံးတယ့်အချိန်မှာတော့ အဲ့ဒီ Linear ဆိုတယ့်အရာကြီးနဲ့နဖူးတွေ့ဒူးတွေ့ တွေ့တော့ပဲခင်ဗျ။ အစတော့ ဓာတ်ပုံဆရာတွေရယ့်ထုံးစံအတိုင်း RAW file ထုတ်လို့ရတယ်ဆိုတော့ ငါတော့ပုံကောင်းကောင်းပြင်လို့ရတော့မယ်ဆိုပြီး ဝမ်းသာနေတာပေါ့ဗျာ။ ပထမဦးဆုံးစပြီးကြုံရတယ့်ပြဿနာကတော့ FITS file ကိုဖွင့်လို့ရမယ့် software ရှာရတာပါပဲခင်ဗျ။ ရှိထားပြီးသား software တွေအများကြီးထဲကမှ PixInsight ဆိုတာကိုရွေးချယ်ဖြစ်ခဲ့ပါတယ်။ စပြီးသုံးတယ့်အချိန်မှာကြုံရတယ့်အခက်အခဲကတော့ ပုံကို application ထဲကိုထည့်ပြီးကြည့်လိုက်တယ့်အချိန်မှာ ပုံထဲမှာဘာမှပေါ်မနေပဲ လုံးဝ black screen ကြီးဖြစ်နေတာပါပဲ။ ကျွန်တော်ထင်ထားတာက အရင်သုံးနေကြ application တွေလိုပဲပုံကိုမပြင်ခင်အကြမ်းမျင်းကြည့်လို့ရမယ်လို့ထင်ထားခဲ့တာလေ။ တကယ်တမ်းကြတော့ ကိုယ့်ရှေ့မှာပေါ်လာတာက black screen ဆိုတော့စိတ်တော့နည်းနည်းရှုပ်သွားရိုးအမှန်ပါခင်ဗျ။ နောက်တစ်ခုက noise များတယ့်ပုံတွေမို့လို့ noise သက်သာအောင် အချိန်တစ်ခုပေးပြီးပုံများများရိုက်ကာ stacking ပြန်လုပ်ရတာမို့လို့ ပုံတစ်ပုံအတွက်အနည်းဆုံး frame 40 လောက်ရှိတယ့်ပုံတွေကို ပြင်ရမယ့်အချိန်မှာအခုလိုမျိုး ဘာလုပ်ရမယ်မှန်းမသိတယ့် black screen နဲ့ပုံတွေကိုတွေ့လိုက်ရတာ အမှန်အတိုင်းပြောရမယ်ဆိုရင် ငါလျှာရှည်ပြီးစမိတာမှားများသွားပြီလားဆိုပြီးတောင် တွေးလိုက်မိတာ။ နောက်တစ်ခုက သုံးနေတယ့် smartscope က TIFF file ကိုလည်း stacked လုပ်ပြီးသားထုတ်ပေးလို့ ကိုယ်ကလည်းကိုယ်ရိုက်ထားတယ့်ပုံတွေကို ဖြစ်နိုင်ရင် edit မြန်မြန်လုပ်ပြီးကြည့်ချင်နေပြီမို့လို့ RAW ကိုပြင်ဖို့မလုပ်သေးပဲ TIFF file ကိုပဲဦးစားပေးပြင်ဖြစ်နေခဲ့တာလေ။ တကယ်တမ်းကြတော့ TIFF က file size ကြီးတယ်ဆိုပေမယ့်လည်း RAW လောက်တော့သိပ်ပြင်လို့မကောင်းလို့ FITS (RAW) ကိုဘယ်လိုပြင်ရမလဲဆိုတာကိုလည်းတစ်ဖက်ကလေ့လာနေတာပေါ့ခင်ဗျ။ အဲဒီမှာဘာကိုသိလိုက်ရသလဲဆိုတော့ astrophotography image editing ကပုံရယ့် data သက်သက်ကိုပဲပြင်တာမဟုတ်ပဲ ပုံကိုရိုက်တယ့်အချိန်မှာ record လုပ်ထားတယ့် Log data တွေကိုပါထည့်သုံးပြီးပြင်ရတာမို့လို့ အဲဒါတွေကလည်း partially processed လုပ်ထားပြီးသား TIFF file နဲ့ဆိုတစ်ချို့ feature တွေကိုအသုံးပြုလို့မရသလို process အပိုင်းတွေမှာလည်း error တွေပါတက်တာမို့လို့ နောက်ဆုံးမဖြစ်မနေ အနည်းဆုံး 95% လောက်က FITS file ကိုပဲ editing လုပ်ဖို့ဆုံးဖြတ်လိုက်ရတော့တာပါပဲခင်ဗျ။
ကဲအခုမှပဲကျွန်တော်အဓိကရှင်းပြချင်တယ့် Linear Image အပိုင်းကိုရောက်ပါပြီခင်ဗျ။ Normal photography နဲ့ Astrophotogrphy ရယ့် RAW format နှစ်ခုစလုံးက Linear image ဆိုပေမယ့် Astrophotography ရယ့် RAW ကပိုပြီးတော့ pure ပိုဖြစ်ပါတယ် 100% ဆိုရင်ပိုမှန်ပါလိမ့်မယ်။ ကျွန်တော်ဒီပိုစ့်ရယ့်အစပိုင်းမှာပြောခဲ့သလိုပဲ normal photography ရယ့် RAW file ကိုဖွင့်ကြည့်လိုက်မယ်ဆိုရင် အကြမ်းထည်ကိုမြင်ရတာမို့လို့ ရှင်းအောင်ပြောရမယ်ဆိုရင် white balance metadata ၊ Noise reduction (sometime hidden) ၊ Compression (lossy or lossless) စတာတွေကို အနည်းငယ် processing ပါပြီးသားမို့လို့ပါ။ Astrophotography ရယ့် RAW ကတော့စဖွင့်လိုက်တာနဲ့လုံးဝ black ပါ။ သူ့ကို stretched မလုပ်မချင်းဘာမှမမြင်ရတာမို့လို့ ပုံတစ်ပုံကိုစမပြင်ခင်မှာ stretched အရင်လုပ်ရပါတယ်။ မဟုတ်ရင် သူ့မှာပါတယ့် data အားလုံးကိုအပြည့်အဝသုံးလို့ရမှာမဟုတ်ပါခင်ဗျ။ Stretched လုပ်လိုက်ပြီးရင်ပုံကိုတွေ့ရပြီဆိုပေမယ့် still fade ဖြစ်နေတုန်းမို့လို့ PixInsight ထဲမှာပါတယ့် dedicated tools တွေကိုသုံးပြီးအရောင်နဲ့အလင်းတွေကိုထပ်ပြီးဆွဲထုတ်ရအုန်းမှာပါ။ Process တစ်ဆင့်ချင်းစီက very serious ဖြစ်တာမို့လို့နည်းနည်းလေးမှားသွားတာနဲ့အဓိကကတော့အရောင်နဲ့အလင်းပေါ့နော crazy color တွေဖြစ်သွားတတ်ပါတယ်ခင်ဗျ။ Histogram က FITS format editing အတွက်အရမ်းကိုအရေးပါပါတယ်။ သူ့ရယ့် RAW file histogram ကိုကြည့်လိုက်မယ်ဆိုရင် အစပိုင်းမှာအရာအားလုံးက ဘယ်ဖက်မှာကပ်နေတာကိုတွေ့ရမှာပါ။ ဒါကြောင့်ရိုက်တတ်ခါစက FITS file ကို stretched လုပ်ပြီးတိုင်းပုံကိုကြည့်ပြီး ဘယ်လိုဖြစ်ပြီးငါ့ပုံကအရမ်း fade ဖြစ်နေရတာလဲဆိုပြီးတွေးမိတယ်။ နောက်ပြီး ရိုက်နေတုန်းက preview မှာကြည့်ရင်ပြတယ့်ပုံက JPEG မို့လို့ကြည့်လို့ကောင်းနေပေမယ့် တကယ် editing လုပ်တယ့်အခါအစပိုင်းမှာ ကိုယ်မျှော်လင့်ထားသလိုမျိုးပုံတွေကသိပ်မထင်ရှားသေးပါဘူးခင်ဗျ။ နောက်ပြီး True pixel values မှာ FITS pixel value က actual photon count (signal) ဖြစ်ပြီး DSLR RAW က slight interpretation ပါနိုင်ပါတယ်။ နောက်ပြီး No gamma / tone curve အပိုင်းမှာလည်း FITS က completely flat linear ဖြစ်ပြီး DSLR ကတော့ altready curved ပါ။
FITS ကိုဘာကြောင့် astronomy research တွေမှာသုံးသလဲဆိုတော့ accuracy ကအရေးကြီးလို့ပါပဲ။ နောက်ပြီး DSLR RAW ကို edit လုပ်ပြီး TIFF အနေနဲ့ပြောင်းသိမ်းမယ်ဆိုရင် အများဆုံး 16 bit အထိပဲသိမ်းလို့ရပြီး FITS ကတော့ 32 bit unsigned နဲ့ 64 bit IEEE အထိသိမ်းလို့ရမှာပါ။ ဆိုလိုတာက FITS file က bit depth မြင့်တယ်ဆိုတာပါပဲခင်ဗျ။ ဘယ်မှာအရမ်းသိသာသလဲဆိုတော့ FITS file ကို PixInsight နဲ့ edit လုပ်ပြီး TIFF အနေနဲ့ပြောင်းသိမ်းကာ Adobe photoshop ထဲမှာဆက်ပြီး edit လုပ်တယ့်အခါမှာတောင်အများကြီးဆက်ကစားလို့ရသေးတယ်ဆိုတာပါပဲ။ ဒါကြောင့် Professtional Level gears တွေနဲ့ရိုက်တယ့်ပုံတွေဆိုကြည့်လို့အရမ်းကောင်းနေတာက no wonder ပါပဲခင်ဗျ.....
မိုးသားကင်းစင်ကြည်လင်သောညများ ဖြစ်ပါစေ — အမြင်ကောင်းများနှင့် အောင်မြင်သော observation များရရှိပါစေ.....