How to Maintain the Same Frame Position Across Multiple Nights
To capture a high-quality Astro photo with the least possible noise, you need to take a large number of exposures. And to achieve that, you’ll usually need at least around three nights of shooting time. The reason is that, depending on the weather, location, and surrounding light pollution conditions, each image typically requires an exposure time between 120 seconds and 300 seconds. Because of that, you’ll need to spend at least two to four hours per night shooting. If possible, giving a total integration time of eight hours or more for a single image will almost guarantee a solid final result with very good quality. Okay, while learning about multi-night shooting, there was one main question I really wanted to know the answer to. That question was: which is better — shooting continuously for 8 hours in a single night, or shooting 2 hours per night over 4 different nights? The reason I became curious about this is because I understood that in long exposure photography, the more light you collect, the better and clearer the image becomes. Because of that, I assumed that shooting continuously for 8 hours in one sitting would produce a better result than splitting it into 2 hours across 4 nights. But in reality, the final image quality is almost the same. The reason is that, in astrophotography, image quality mainly depends on how many total photons are collected overall. As long as the total integration time is the same, the result is usually very similar. The main advantage of finishing everything in a single night is that you completely avoid issues like rotation shift, framing shift, and focus drift. However, even with multi-night imaging, those problems can be greatly minimized by using ASIAIR’s reference frame alignment and plate solving features, so multi-night shooting can still work very smoothly and effectively.
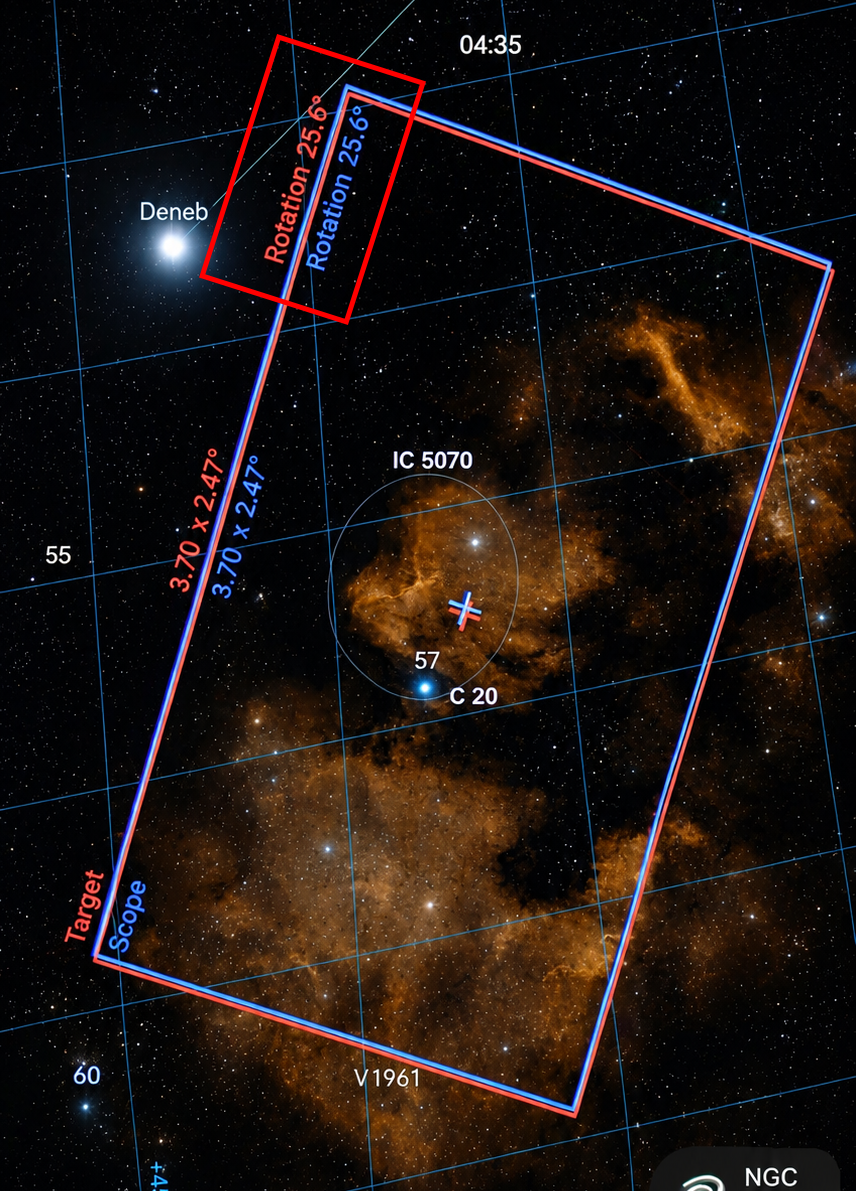
One of the most important things to pay attention to during multi-night shooting is making sure your mount setup position stays exactly the same every night. Some people use a permanently installed mount setup, while others use a portable tripod setup that must be repositioned every session. If the tripod position changes too much between nights, it can create many problems during image stacking later on. That’s why, if you’re using a portable mount setup for multi-night imaging, you need to remember and reproduce the exact tripod position from the first night. But that alone is not enough. The target framing and scope position also need to match the framing from the first night. Otherwise, if the frame position shifts by more than about 5°, it can create major issues during image stacking. To avoid that, you’ll need to reuse the data information from the images taken on the first night. I’ll explain the workflow step by step. First of all, focusing and polar alignment need to be done every night. At this point, telescopes with internal focusers have an advantage. Since the focuser is internal, the telescope tube doesn’t extend outward when focusing. That means even if you store the scope in a bag with limited length, there usually won’t be any problem. With an external focuser, the telescope becomes physically longer, which can create some inconvenience when packing it away. For example, it may no longer fit properly inside the bag, or you may need to remove the camera and other accessories before storing it. Reassembling everything again later can potentially affect your frame position alignment. One useful trick is to check the focus step value in ASIAIR and save it either as a screenshot or as a written note. That can help you return close to the previous focus position later. Of course, how accurate the result will be depends on how precisely you set everything up each time. Another option you can do is to simply leave the entire rig attached to the mount and tripod until the whole project is finished.
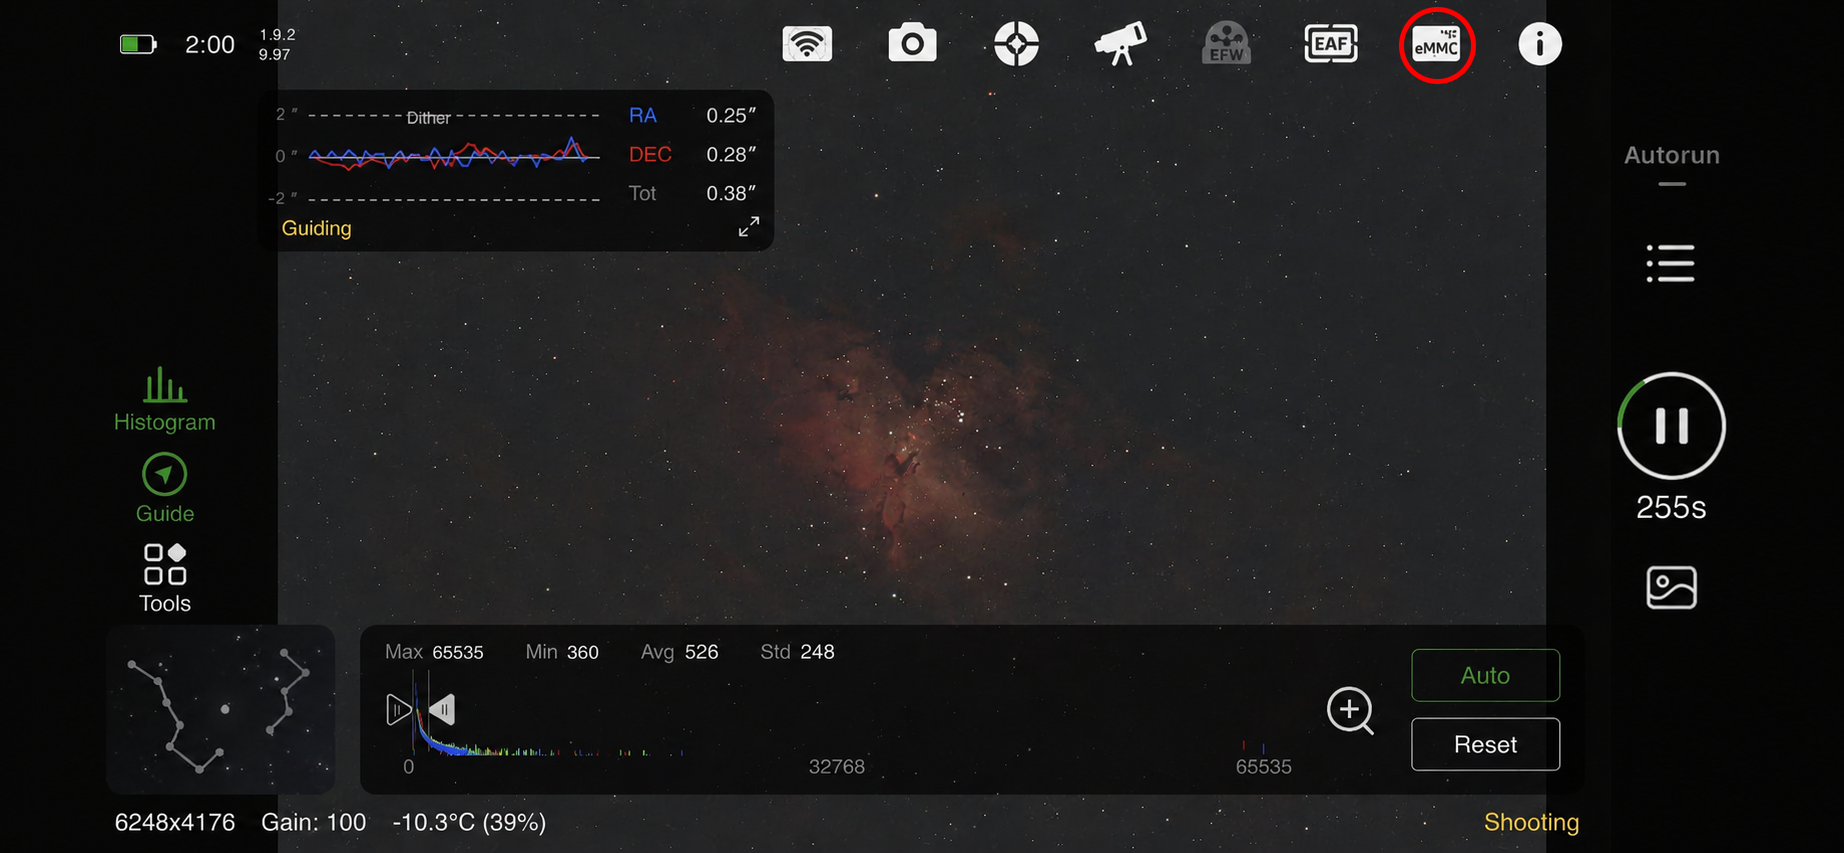
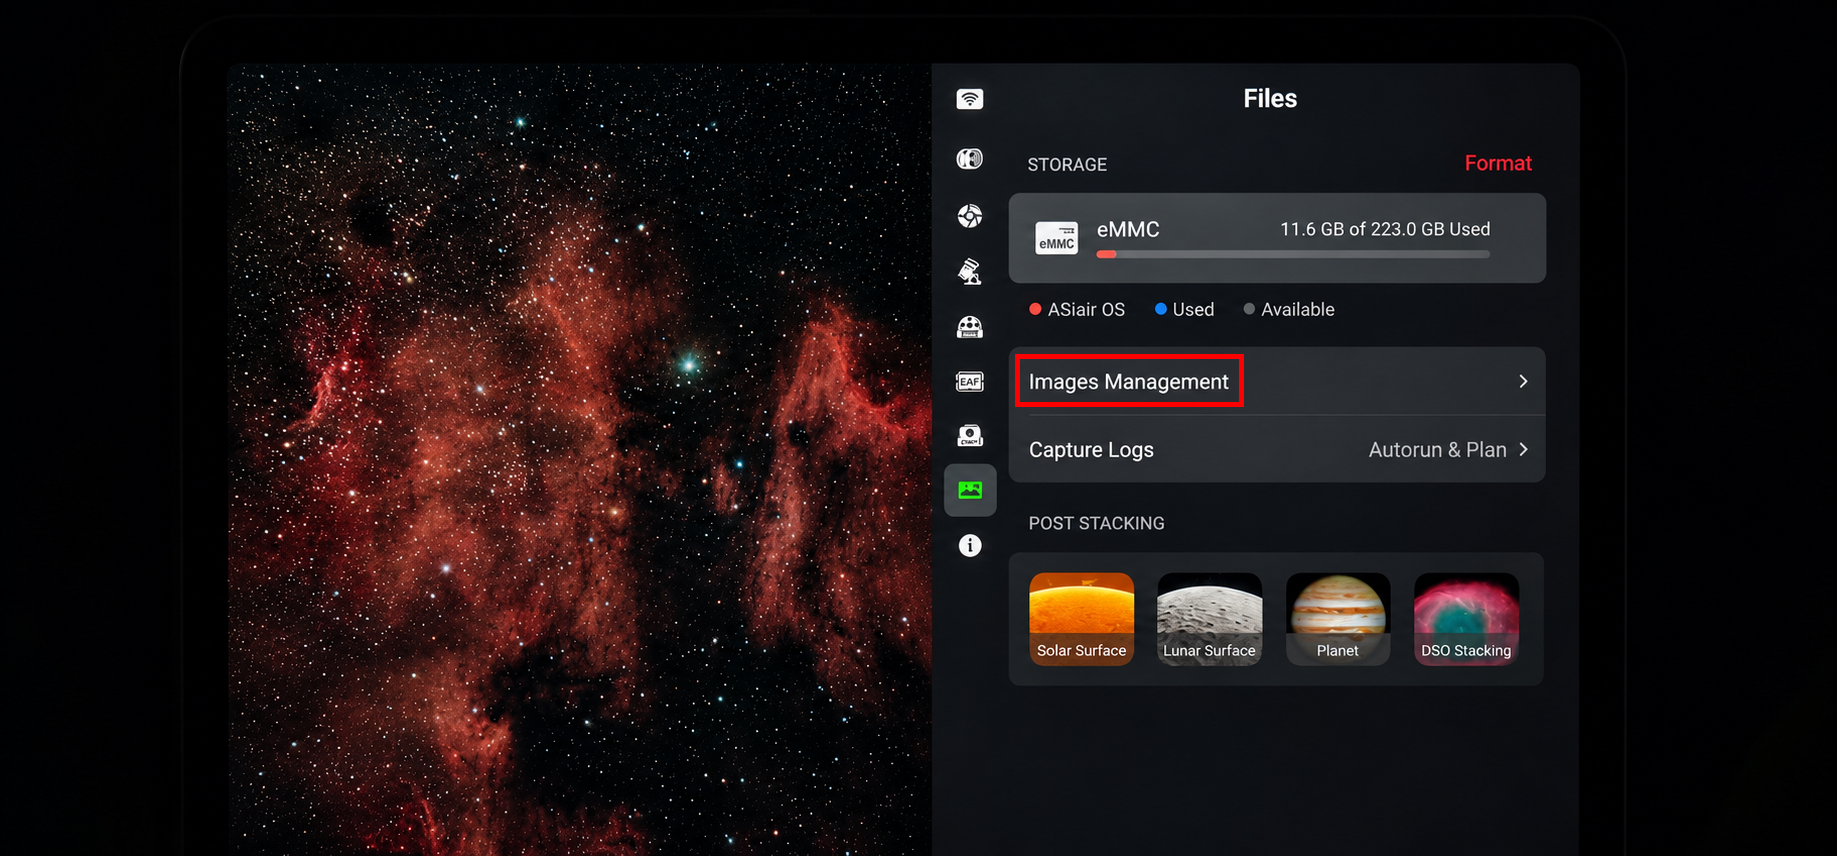
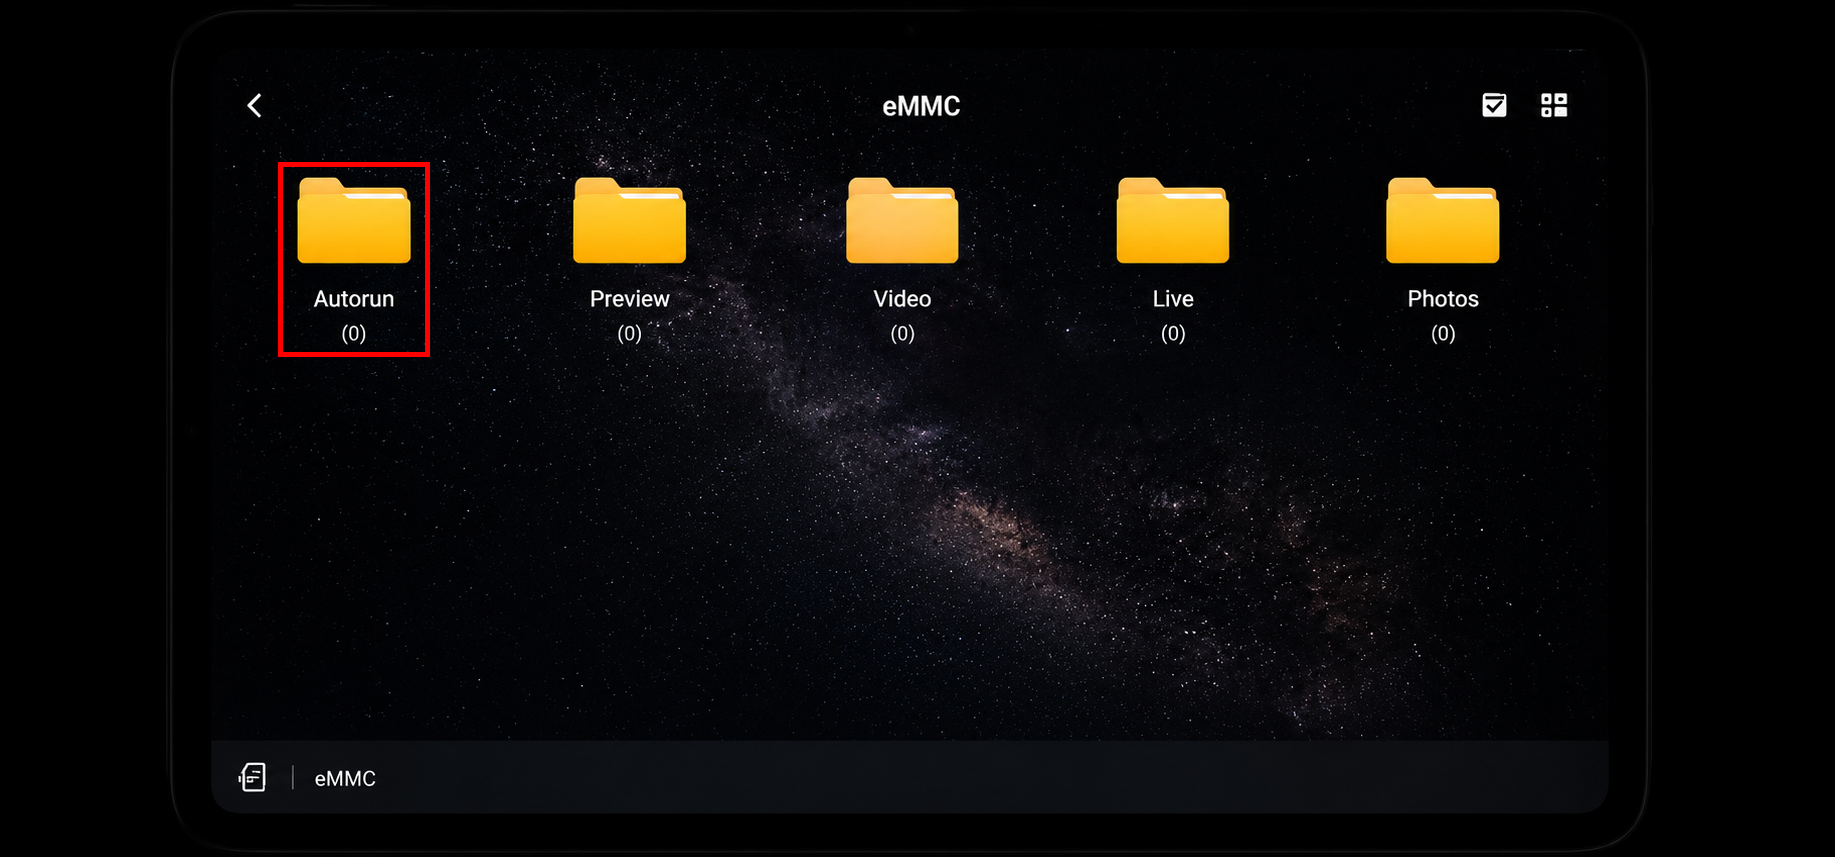
Once focusing and polar alignment are completed, under normal circumstances you would simply go into Sky Atlas and search for your target location. However, for multi-night shooting, the best method is to use the location data from the first night’s image. To do that, first go into the eMMC storage (ASIAIR memory), then enter the Image Management folder. Open the first image from your first night session, and among the three icons that appear, press the “Go To” icon. The mount will automatically slew to the exact position data stored in that image. Although the system automatically performs both positioning and plate solving, I personally run plate solving one more time just to be extra certain. After that, all that’s left is to set up auto-guiding and start imaging again. Before I understood these steps, I kept trying to use the “Go To” icon from the image gallery inside Autorun instead of entering the eMMC storage directly. Because of that, ASIAIR would only keep telling me to return to the preview page to continue the process, and nothing worked properly for me at all.
So in summary, the two most important things to remember for multi-night shooting are:
Reproducing the exact tripod position from the first night.
Matching the exact target framing and scope frame position from the first night.
One more thing I’d like to add and explain is this: back when I was still inexperienced and only spending a few hours capturing a single image, whenever I looked at the incredibly sharp and detailed photos taken by professional Astro photographers, I always wondered, “Are these images even real? Why are they so unbelievably clear and detailed? They probably aren’t real… maybe they were heavily edited with AI or something.” I honestly had a lot of doubts like that.
But after gaining a bit more personal experience and gradually spending more and more hours capturing each image, I finally realized that all those suspicions were completely wrong. The more time you dedicate to capturing a single image, the better the image quality becomes, and the more the noise is reduced and cleaned up.
Clear skies and happy observing…..
Step - 1
Step - 2
Step - 3
Astro ဓာတ်ပုံတစ်ပုံကို noise အနည်းဆုံးနဲ့ quality ကောင်းကောင်းပုံတစ်ပုံအဖြစ်ရိုက်နိုင်ဖို့အတွက်က ပုံအရေအတွက်များများရိုက်ဖို့လို့ပါလိမ့်မယ်။ ပုံအရေအတွက်များများရိုက်ဖို့အတွက်ကလည်း အချိန်အနေနဲ့အနည်းဆုံး သုံးညလောက်တော့ရိုက်ဖို့လိုပါတယ်။ ဘာဖြစ်လို့လဲဆိုတော့ ပုံတစ်ပုံကိုရာသီဥတု၊ နေရာနဲ့ ပတ်ဝန်းကျင်အလင်းရောင်ဖြစ်တည်မှုတွေအပေါ်မူတည်ပြီး exposure time ကိုအနည်းဆုံး 120 seconds ကနေ 300 seconds အထိအချိန်ပေးပြီးရိုက်ရတာမို့လို့ တစ်ညကိုအနည်းဆုံး နှစ်နာရီကနေလေးနာရီအထိအချိန်ပေးဖို့လိုပါလိမ့်မယ်။ ဖြစ်နိုင်ရင်ပုံတစ်ပုံကိုစုစုပေါင်းနာရီ ရှစ်နာရီနဲ့အထက်အချိန်ပေးနိုင်ရင်တော့ solid ဖြစ်တယ့်ပုံကောင်းတစ်ပုံကိုရရှိမယ်ဆိုတာကတော့ အာမခံပြီးပြောရဲပါတယ်ခင်ဗျ။ အိုကေ multi night shooting အကြောင်းကိုလေ့လာတုန်းက ကျွန်တော်အဓိကသိချင်ခဲ့တယ့်မေးခွန်းတစ်ခုရှိခဲ့တယ်ဗျ။ အဲဒါကတော့ တစ်ရက်ထဲရှစ်နာရီတစ်ထိုင်တည်းရိုက်တာနဲ့ တစ်ရက်ကို ၂နာရီနဲ့ လေးရက်ခွဲရိုက်တာမှာ ဘယ်ဟာကပိုကောင်းသလဲဆိုတယ့်မေးခွန်းပါပဲခင်ဗျ။ ဘာဖြစ်လို့အဲ့မေးခွန်းရဲ့အဖြေကိုသိချင်စိတ်ဖြစ်မိတာလဲဆိုတော့ ကျွန်တော်နားလည်ထားတာက long exposure ရိုက်ရင်အလင်းများများပေးဝင်လေပုံကိုကောင်းကောင်းပိုမြင်ရလေဆိုတယ့်အချက်ကြောင့် တစ်ထိုင်တည်း ရှစ်နာရီထိုင်ရိုက်တာက တစ်ရက်ကို ၂နာရီနဲ့လေးရက်ခွဲပြီးထိုင်ရိုက်တာထက် ပိုကောင်းတယ်လို့ ယူဆနေမိလို့ပါပဲ။ အမှန်ကတော့ ရရှိတယ့် image quality ကအတူတူနီးပါးလောက်ပါပဲခင်ဗျ။ ဘာဖြစ်လို့လဲဆိုတော့ astrophotography မှာအရည်အသွေးကိုဆုံးဖြတ်တာက စုစုပေါင်း total photons ဘယ်လောက်စုထားသလဲအပေါ်မူတည်တာမို့လို့ပါပဲ။ တစ်ခုပဲ တစ်ရက်ထဲအပြီးထိုင်ရိုက်တာက rotation shift, framing shift, focus drift ဖြစ်နိုင်တယ့်ပြဿနာလုံးဝမရှိတာပါပဲ။ ဒါပေမယ့် multi night ရိုက်ရင်လည်း အဲဒီ rotation shift, framing shift, focus drift ပြဿနာတွေကို ASIAIR ရဲ့ reference frame alignment နဲ့ plate solving တို့ကတော်တော်ပြေလျှော့အောင်ဖြေရှင်းပေးနိုင်တာမို့လို့ အဆင်ပြေပြေနဲ့ရိုက်လို့ရပါတယ်ခင်ဗျ။
အဲဒီမှာသတိထားရမယ့် အရေးကြီးဆုံးအချက်တစ်ချက်ကဘာလဲဆိုတော့ multi night shooting ဖြစ်တယ့်အတွက် ကိုယ့် mount အထိုင်ကိုနေ့တိုင်းနေရာချတယ့် position ကအတူတူဖြစ်နေဖို့ လိုတာပါပဲခင်ဗျ။ တစ်ချို့ကတော့ permanently အထိုင်ချထားတယ့် mount အထိုင်ကိုသုံးပေမယ့် တစ်ချို့ကတော့အကြိမ်တိုင်းနေရာပြန်ချရတယ့် mount အထိုင် (tripod) နဲ့သုံးတာမို့လို့ကိုယ်အထိုင်ချတယ့်နေရာလွဲသွားတာနဲ့ပုံတွေကို stacking လုပ်တယ့်အခါပြဿနာအများကြီးတက်နိုင်လို့ပါပဲ။ ဒါကြောင့်ကိုယ်က multi night ကို mount အထိုင်အရှင်နဲ့သုံးမယ်ဆိုလို့ရှိရင် ပထမဦးဆုံးအကြိမ်ကိုယ်အထိုင်ချခဲ့တယ့် position ကိုမှတ်မိနေဖို့လိုပါလိမ့်မယ်။ ဒါနဲ့တင်ပြီးသွားပြီလားဆိုတော့ မဟုတ်သေးပါဘူးခင်ဗျ။ ကိုယ်ရိုက်ချင်တယ့် subject ရဲ့ target and scope frame position ကလည်းပထမဦးဆုံးနေ့ရဲ့ target and scope frame position အတိုင်းလည်းဖြစ်ဖို့လိုအပ်ပါတယ်။ မဟုတ်ရင် frame position က 5° နဲ့အထက်ကိုလွဲသွားတာနဲ့ image stacking မှာပြဿနာအများကြီးရှိပါလိမ့်မယ်ခင်ဗျ။ အဲဒီအတွက်ကတော့ ပထမဦးဆုံးရိုက်ထားတယ့်ပုံရဲ့ data အချက်အလက်တွေကိုပြန်ပြီးအသုံးပြုရမှာပါ။ ဘယ်လိုသုံးရမလဲဆိုတာကိုတစ်ဆင့်ချင်းကျွန်တော်ရှင်းပြပေးသွားပါမယ်။ ပထမဦးဆုံးအနေနဲ့ Focus ဖမ်းတာနဲ့ Polar Alignment လုပ်တာကိုတော့နေ့တိုင်းလုပ်ပေးရပါလိမ့်မယ်။ အဲဒီမှာ internal focuser ပါတယ့် telescope ကတစ်ပန်းသာပါတယ်။ ဘာလဲဆိုတော့ internal focuser မို့လို့ scope ကထပ်ပြီးရှည်ထွက်မလာတယ့်အတွက် အကယ်၍ကိုယ်ကအလျား limite ရှိတယ့် အိတ်နဲ့သိမ်းတာဆိုရင်တောင်ပြဿနာမရှိလို့ပါပဲ။ External focuser ဆိုရင်တော့ scope အလျားကရှည်ထွက်လာတာမို့လို့ ပြန်သိမ်းတယ့်အခါပြဿနာလေးအနည်းငယ်ရှိနိုင်ပါတယ်။ ဘာပြဿနာလဲဆိုတော့ အိတ်နဲ့မဆန့်တော့တာတို့၊ အိတ်နဲ့ဆန့်အောင် ကင်မရာနဲ့တစ်ခြားအရာတွေကိုဖြုတ်ပြီးသိမ်းပြန်တော့လည်း frame position မှာသွားပြီးပြဿနာတက်လာတာတို့ဖြစ်နိုင်လို့ပါပဲ။ တစ်ခုတော့ရှိတယ် focus step ကို asiair မှာသွားကြည့်ပြီး screenshot ပဲဖြစ်ဖြစ်၊ note နဲ့ပဲဖြစ်ဖြစ်ယူထားရင်တော့ရပါတယ်။ အဲ့ဒါကလည်း ကိုယ့်အနေနဲ့စိတ်တိုင်းကျနိုင်ပါ့မလားဆိုတာကတော့ ကိုယ်ဘယ်လောက်အထိတိတိကျကျလုပ်သလဲဆိုတယ့်အပေါ်တော့ မူတည်ပါတယ်ခင်ဗျ။ နောက်လုပ်လို့ရတာတစ်ခုက Rig setup တစ်ခုလုံးကိုရိုက်လို့မပြီးမချင်း mount နဲ့ tripod မှာတပ်ထားမယ်ဆိုရင်တော့တစ်မျိုးပေါ့နော။
ကဲ focus ဖမ်းတာနဲ့ polar alignment လုပ်တာပြီးသွားပြီဆိုရင်တော့ ပုံမှန်ဆို sky atlas အထဲကိုသွားပြီး ကိုယ်လိုချင်တယ့် subject location ကိုရှာလိုက်ရုံပဲဆိုပေမယ့် multi night အတွက်ကတော့ ပထမဦးဆုံးပုံရယ့် location data ကိုသုံးတာကအကောင်းဆုံးမို့လို့ အရင်ဆုံး eMMC (asiair memory) ထဲကိုဝင်၊ ပြီးရင် image management folder အထဲကကိုယ်ရိုက်ထားတယ့် ပထမဦးဆုံးညအထဲက ပထမဦးဆုံးပုံကိုထောက်လိုက်ရင်ပေါ်လာတယ့် icon သုံးခုအထဲက Go To ဆိုတယ့် icon ကိုနိုပ်လိုက်တာနဲ့ mount ကအဲဒီပုံရဲ့ position data အတိုင်းနေရာချပေးပါလိမ့်မယ်။ Position နေရာချတာရော plate solving လုပ်တာကိုရော automatic လုပ်ပေးတယ်ဆိုပေမယ့် ကျွန်တော်ကတော့ပိုပြီးကြိမ်းသေအောင် plate solving ကိုနောက်တစ်ကြိမ်ထပ်လုပ်ပါတယ်။ ပြီးရင်တော့ auto-guiding setup လုပ်ပြီးစရိုက်ရုံပါပဲခင်ဗျ။ ကျွန်တော်အဲဒီ step တွေကိုနားမလည်ခင်တုန်းကဆိုရင် eMMC အထဲဝင်ရမယ့်အစား autorun အထဲက gallery မှာရှိတယ့်ပုံရဲ့ Go To icon ကိုပဲသွားသွားထောက်နေတော့ ကျွန်တော့်ကို preview page ကိုပြန်သွားပြီး process ဆက်လုပ်ဖို့ပဲပြပြနေတာမို့လို့ ဘယ်လိုမှအဆင်မပြေခဲ့ဘူးလေ။ အနှစ်ချုပ်အနေနဲ့ပြောချင်တာကတော့ multi night shooting အတွက်အဓိကမဖြစ်မနေမှတ်ထားရမယ့်အချက်နှစ်ချက်ကတော့ ကိုယ်ပထမဦးဆုံးရက်မှာနေရာချထားတယ့် tripod ရဲ့နေရာနဲ့ နောက်တစ်ခုကတော့ target and scope frame position တို့ပါပဲခင်ဗျ.....
ကျွန်တော်တစ်ခုလောက်ထပ်ပေါင်းပြီးရှင်းပြချင်တာကတော့ အရင်သိပ်ပြီးမရိုက်တတ်ခင် ပုံတစ်ပုံကိုနာရီအနည်းငယ်လောက်ပဲရိုက်နေခဲ့တုန်းက professional ဖြစ်နေပြီဖြစ်တယ့် Astro photographer တွေရဲ့ကြည်လင်ပြတ်သားနေတယ့်ပုံတွေကိုလေ့လာတယ့်အခါတိုင်းတွေးမိခဲ့တာတစ်ခုက ဒီလူတွေရဲ့ပုံတွေကအစစ်မှဟုတ်ရဲ့လား ဘာြဖစ်လို့ပုံတွေကဒီလောက်တောင်ကြည်လင်ပြတ်သားနေရတာလဲ အစစ်တော့မဟုတ်လောက်ဘူး AI တွေနဲ့များပြင်ထားတာလားဆိုတယ့် ယုံမှားသံသယကြီးပါပဲခင်ဗျ။ ကျွန်တော်ကိုယ်တိုင်အတွေ့အကြုံလေးနည်းနည်းရလာတယ့်နောက်ပိုင်း ပုံတိုင်းကိုနာရီအချိန်နည်းနည်းထပ်ပေါင်းပြီးရိုက်ကူးလာတယ့်အချိန်ကြတော့မှ ကိုယ်ထင်ထားတယ့်သံသယတွေက လုံးဝအမှားကြီးပဲဆိုတာကိုသိလိုက်ရတာပါပဲ။ ပုံတစ်ပုံကိုအချိန်နာရီများများပေးပြီးရိုက်နိုင်လေ ပုံရဲ့အရည်အသွေးပိုကောင်းလာလေ၊ noise ပိုပြီးရှင်းလာလေပါပဲခင်ဗျ.....
မိုးသားကင်းစင်ကြည်လင်သောညများ ဖြစ်ပါစေ — အမြင်ကောင်းများနှင့် အောင်မြင်သော observation များရရှိပါစေ.....