Lessons Learned from Shooting Astrophotography on a Cloudy Night
My friend once told me one of the “don’ts” in astrophotography: never try to shoot on heavily cloudy nights.
I already understood the reason behind that, but I’m the kind of person who needs to try things out myself to be fully convinced. So last night, I decided to give it a shot anyway.
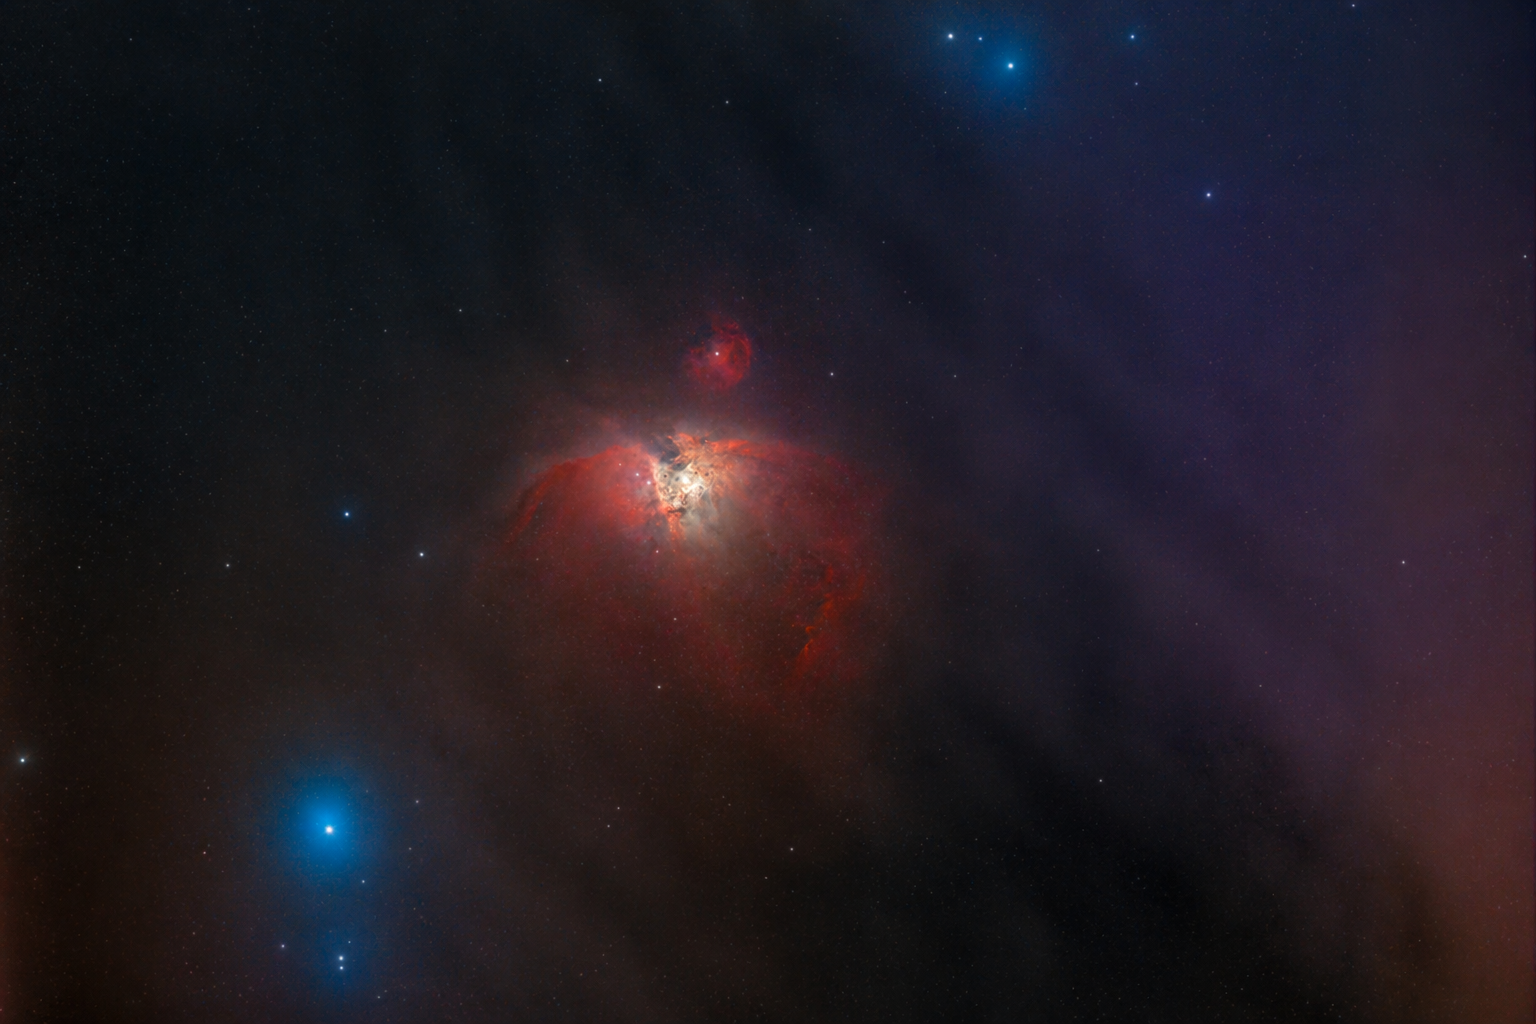
As you can see from the result, even after retouching, the image still has noticeable noise, and the sharpness has clearly dropped. But the worst part came after processing—when I compared it with a previous image of the same target. The colors were different. The stars around the nebula, which used to appear greenish in my earlier shot, were now showing up in bluish tones.
At first, I thought I must have made a mistake somewhere in my retouching workflow. I went back and reprocessed the image three or four times, but the result stayed the same. So I asked my friend, and at the same time, I checked with ChatGPT as well. That’s when I realized this is actually a normal phenomenon in astrophotography.
The final image colors can vary depending on atmospheric conditions at the time of shooting, such as cloud thickness, dust, haze, or smoke in the sky. On top of that, the dominant gases being emitted by the nebula at that moment can also influence how colors are captured by the camera.
I was honestly a bit frustrated at first, wondering why the same subject could produce different colors. But it was a relief to learn that this is completely normal.
Of course, my friend just said, “I told you already—don’t shoot on cloudy nights.”
Another issue I ran into was with my smart scope. On cloudy nights, it struggles with the initialization process—like GPS & location setup, leveling, star alignment, and focusing. Normally, this takes only about 3 to 5 minutes, but this time it dragged on endlessly… not even finishing after one hour, or even two.
Clear skies and happy observing…..
အသိမိတ်ဆွေပြောပြတယ့် Astrophotography နဲ့ပတ်သက်ပြီးမလုပ်သင့်တယ့်အချက်တွေထဲက တစ်ခုကတော့ တိမ်ထူနေတယ့်ရက်တွေဆိုလုံးဝ ဓာတ်ပုံရိုက်ဖို့မကြိုးစားပါနဲ့ဆိုတာပါပဲ။
ကိုယ်ကလည်းဘာကြောင့်လဲဆိုတာသိပေမယ့် နည်းနည်းတော့စမ်းကြည့်လိုက်ရမှကျေနပ်တယ့်သူဆိုတော့လည်း မနေ့ညကစမ်းရိုက်ကြည့်လိုက်တာပေါ့။ ပုံမှာမြင်တယ့်အတိုင်းပဲ retouch လုပ်ပြီးသည့်တိုင်အောင် Noise တွေရှိနေသေးသလို ပုံရယ့် sharpness လည်းကျနေတာကိုတွေ့ရမှာပါ။ အဆိုးဆုံးက ပုံပြင်ပြီးတော့ အရင်ရိုက်ထားတယ့်ပုံနဲ့ကာလာယှဥ်ကြည့်လိုက်တာ nebula ဘေးနားက stars တွေရယ့်ပတ်ပတ်လည်ကအရောင်တွေက အရင်ပုံလိုမျိုးအစိမ်းရောင်မဟုတ်ပဲ အပြာရောင်တွေဖြစ်နေလို့ ငါ retouch လုပ်တယ့် step တွေမှာဘယ်အဆင့်မှာများ မှားနေတာလဲဆိုပြီး သုံးလေးခါလောက်ပြန်လုပ်ကြည့်တော့လဲ ဒီအတိုင်းပဲဖြစ်နေလို့ အသိမိတ်ဆွေကိုလည်းမေး တစ်ဖက်မှာလည်း ChatGPT နဲ့နှစ်ပါးသွားကြည့်လိုက်တော့ ဒါဟာ astrophotography အတွက်သာမန်ကိစ္စတစ်ခုပဲဆိုတာကို သိလိုက်ရတယ်။
ကိုယ်ရိုက်တယ့်နေ့ရယ့်ကောင်းကင်မှာ ဖြစ်တည်နေတယ့် တိမ်အထူအပါး၊ ဖုန့်မှုန့်၊ မြူ၊ မီးခိုးစတာတွေနဲ့ အဲဒီနေ့မှာ nebula ကနေထုတ်တယ့်ဓာတ်ငွေ့တွေထဲကဘယ်ဟာကပိုထွက်နေတယ့်အပေါ်မူတည်ပြီး အရောင်ဟာ ကိုယ့်ကင်မရာရဲ့ပုံရိပ်မှာအမျိုးအမျိုးဖြစ်ပေါ်နိုင်တယ်ဆိုတာကိုပါပဲခင်ဗျ။ ကျွန်တော့်မှာ same subject ကိုရိုက်တာဘာဖြစ်လို့ကာလာတွေကပြောင်းနေရတာလဲဆိုပြီးတော့ စိတ်ကိုညစ်သွားတာပဲ တော်သေးတာပေါ့သာမန်ကိစ္စလေးတစ်ခုပဲဖြစ်မို့လို့။ အသိမိတ်ဆွေကတော့ပြောပါတယ် မင်းကိုငါပြောသားပဲ တိမ်ရှိတယ့်နေ့ဆိုဓာတ်ပုံမရိုက်ပါနဲ့လို့။ နောက်တစ်ခုကလည်းတိမ်ထူတယ့်နေ့တွေဆို ကိုယ့်ရယ့် smartscope ကလည်း initialization process (GPS & Location Setup, Leveling, Star Alignment, Focusing) ကိုကောင်းကောင်းလုပ်လို့မရတာမို့လို့ ပုံမှန်ဆို 3 to 5 မိနစ်လောက်ပဲကြာတယ့် initialization process က တစ်နာရီလည်းမပြီး နှစ်နာရီလည်းမပြီးဖြစ်နေရောဗျ.....
မိုးသားကင်းစင်ကြည်လင်သောညများ ဖြစ်ပါစေ — အမြင်ကောင်းများနှင့် အောင်မြင်သော observation များရရှိပါစေ.....