My First Real Close-Up Moon Photography Experience
In the early days, I only photographed the Moon using smart telescopes. Since they were smart telescopes, I couldn’t really get the resolution exactly the way I wanted. Also, no matter what photography genre I shoot, I personally love close-up images. Because of that, I always wanted detailed close-up shots of the Moon, but it simply wasn’t possible with the smart telescopes I owned at the time. Ever since I started astrophotography, my favorite targets have always been nebulae, so I focused mostly on photographing them. Because of that, I only photographed the Moon occasionally. Still, deep down, I kept telling myself that one day I would definitely capture proper close-up lunar images. Another major reason was that I first wanted to learn how telescopes work and how to properly use them. The reason is simple: different astrophotography categories require different telescopes and accessories. In this post, I’ll only talk about how I photograph the Moon.
To capture the entire Moon fully inside the frame, a focal length of around 250 mm is already sufficient. However, for close-up lunar photography, I personally believe you should start with at least around 1500 mm focal length. I currently use the Sky-Watcher 127 Maksutov-Cassegrain telescope from Sky-Watcher, which has a focal length of 1500 mm. Whenever I want even closer shots, I plan to pair it with a Tele Vue 2x Barlow lens. At the time of writing this post, I still haven’t used the 2x Barlow yet. Even at 1500 mm, I’m still learning and practicing because lunar imaging is already challenging enough. So before jumping to a 3000 mm focal length, I decided to become more comfortable first. After that, I’ll use the 2x Barlow to capture even closer details of the Moon’s craters and valleys. The process of photographing the Moon is quite different from photographing nebulae. For nebula imaging, almost every step is fully controlled through the ASIAIR application. But for lunar photography, I use the SkyAtlas application mainly for harmonic mount tracking. For the camera, I use the ZWO ASI662MC, which is specifically designed for planetary imaging. Unlike nebula or galaxy photography, which usually focuses on single high-resolution photos, planetary and lunar photography mainly rely on high-speed video stacking. Because of that, the camera only has 2.07 megapixels, but it supports very high FPS (frames per second). Why is high FPS important? Because the atmosphere between the camera and the Moon is constantly moving. Some frames become blurry while others remain sharp. By capturing a large number of frames, you increase the chance of getting many sharp frames for stacking later. That’s exactly why high frame rate cameras are preferred, and why high-speed video stacking is used instead of single high-resolution images.
If I explain my workflow step by step, the first thing I do is place the tripod carrying the harmonic mount facing north. Even though lunar photography doesn’t require polar alignment toward Polaris like nebula or galaxy imaging, the harmonic mount still needs to start from its home position facing north. When I first started, I misunderstood this completely. Since people said polar alignment wasn’t necessary for the Moon, I pointed the mount toward the south where the Moon was located. Then, whenever I tried to search for the target, the mount kept rotating in the opposite direction, and I struggled for nearly half an hour. Do you know why that happened? Because the harmonic mount always memorizes the initial position as north during startup. So wherever you point it initially becomes its “north” reference point internally. That’s why target searching behaved incorrectly. After positioning the harmonic mount, I assemble the telescope, red dot sight, harmonic mount hand controller, laptop, camera, connector/power cables, and portable battery power station. Once everything is connected, I use the SkyAtlas application to search for the Moon target. Don’t forget to set the mount tracking mode specifically to “Moon.” Sidereal tracking also works, but Moon tracking is more accurate for lunar imaging. When performing the target search, the telescope usually won’t align perfectly with the Moon automatically. Because of that, I use the red dot sight attached to the telescope for manual alignment correction. For red dot alignment, I stop using SkyAtlas and instead use the harmonic mount hand controller. One reason I prefer a red dot sight over the original 6x30 finder scope is that it’s much easier to use. A finder scope alone usually displays the image upside down (inverted/reversed image). If you want the image to appear correctly oriented, you can attach a Correct Image Prism. Although inverted images are completely normal for astronomical use, I personally don’t feel comfortable using them. That’s why I switched to a red dot sight instead. After aligning the Moon using the red dot sight, you may notice inside SkyAtlas that the telescope target center isn’t perfectly centered on the Moon anymore. That’s completely fine — just be careful not to press the GoTo button again. Otherwise, you’ll need to redo the entire alignment process from the beginning.
One additional thing I want to mention is about connecting the harmonic mount with applications. There are two connection methods: Wi-Fi and Bluetooth. Bluetooth works without any issue, but if you want to use Wi-Fi, the hand controller must also be connected to the mount. Otherwise, the Wi-Fi connection process may not work properly. Whether you actually need the hand controller or not also depends slightly on the workflow you plan to use with the harmonic mount.
After completing the red dot alignment, I start the actual capture process using software applications such as SharpCap or FireCapture on my laptop. Personally, I prefer using SharpCap because it feels more user-friendly. FireCapture is more advanced, so I decided to use it later once I gain more experience. After recording, I stack the footage using AutoStakkert! and then enhance the image sharpness with RegiStax. I have also explained the step-by-step usage of SharpCap, AutoStakkert!, and RegiStax using images for guidance.
Clear skies and happy observing…..
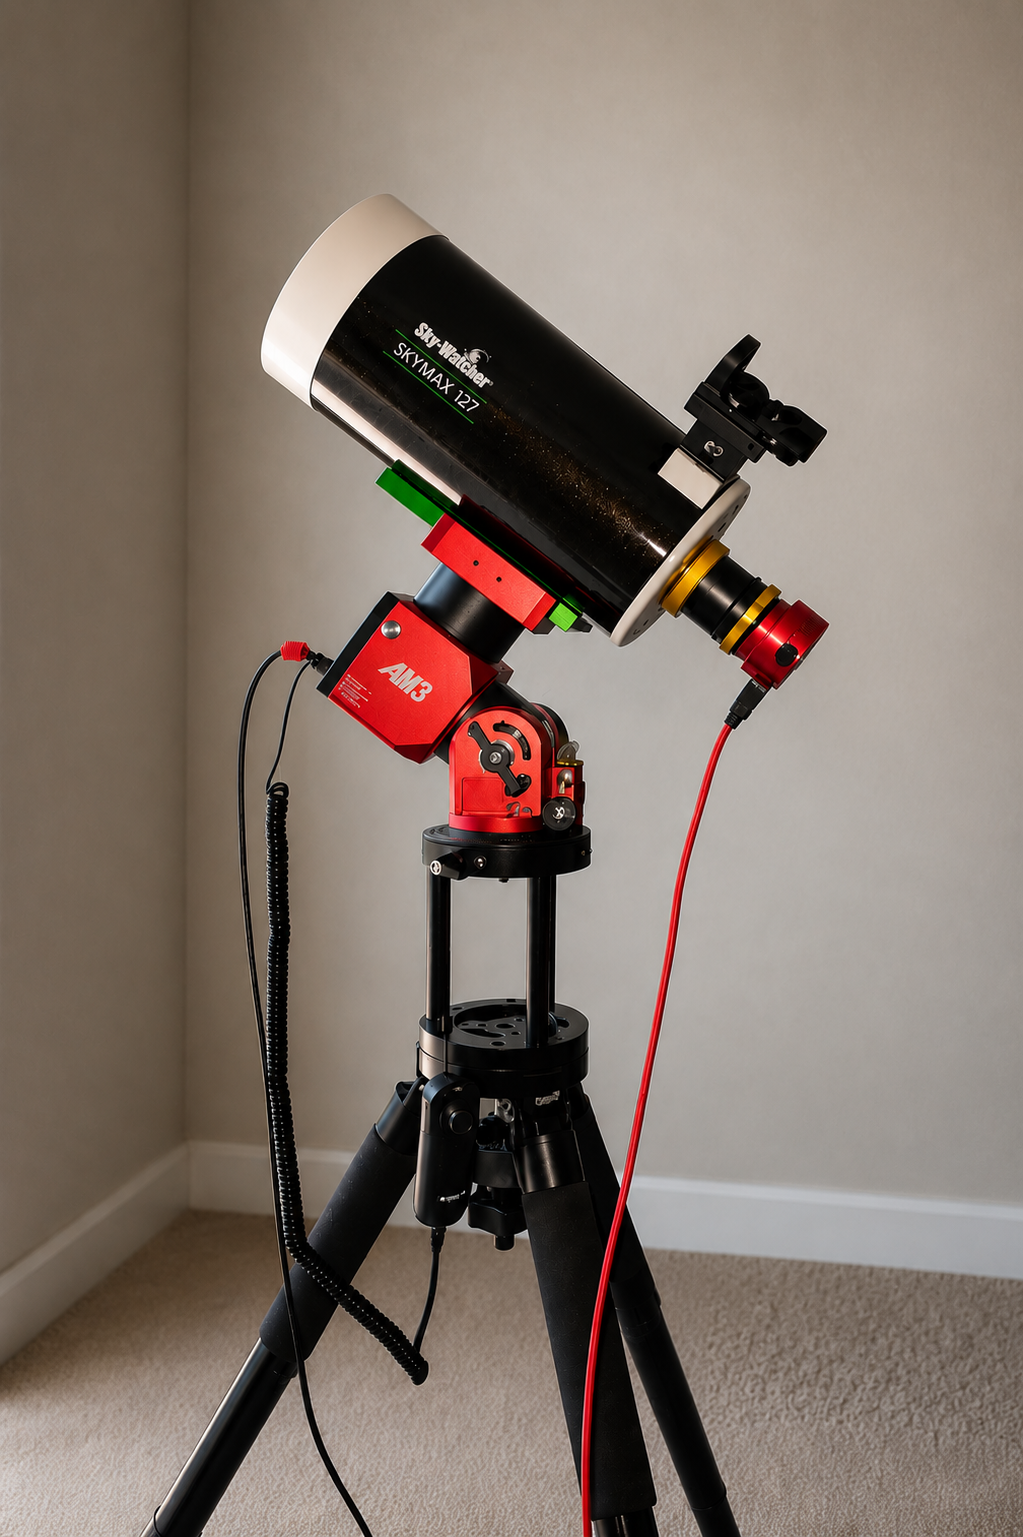
Modular Setup for Luna Shooting
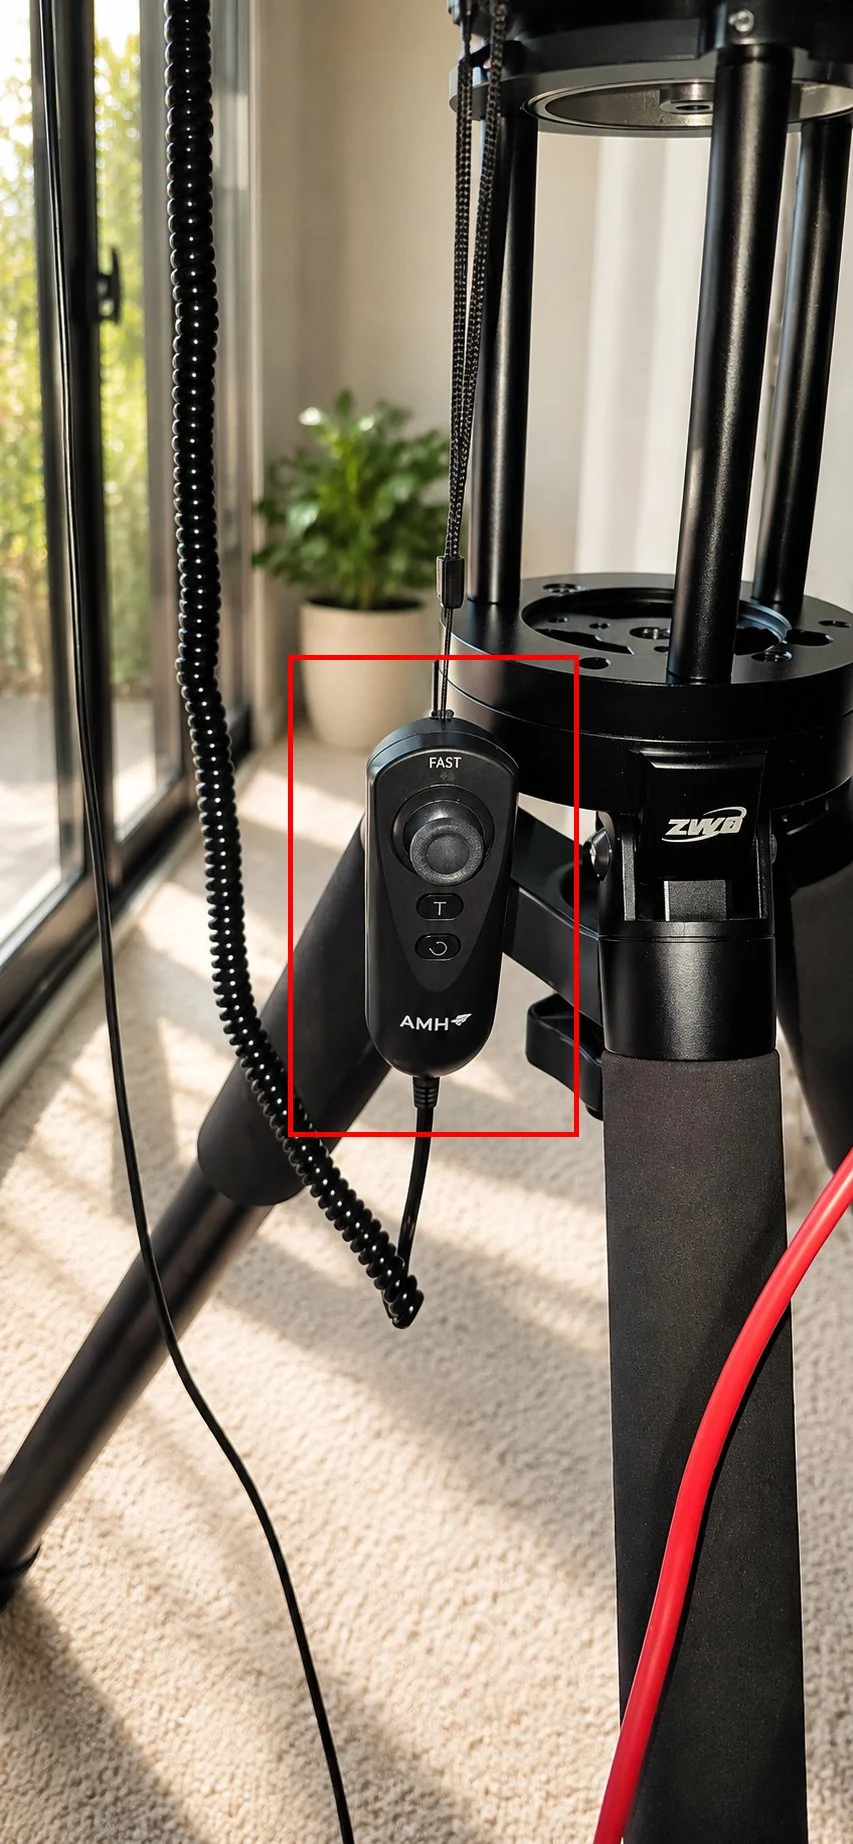
Hand Controller for AM3N Mount
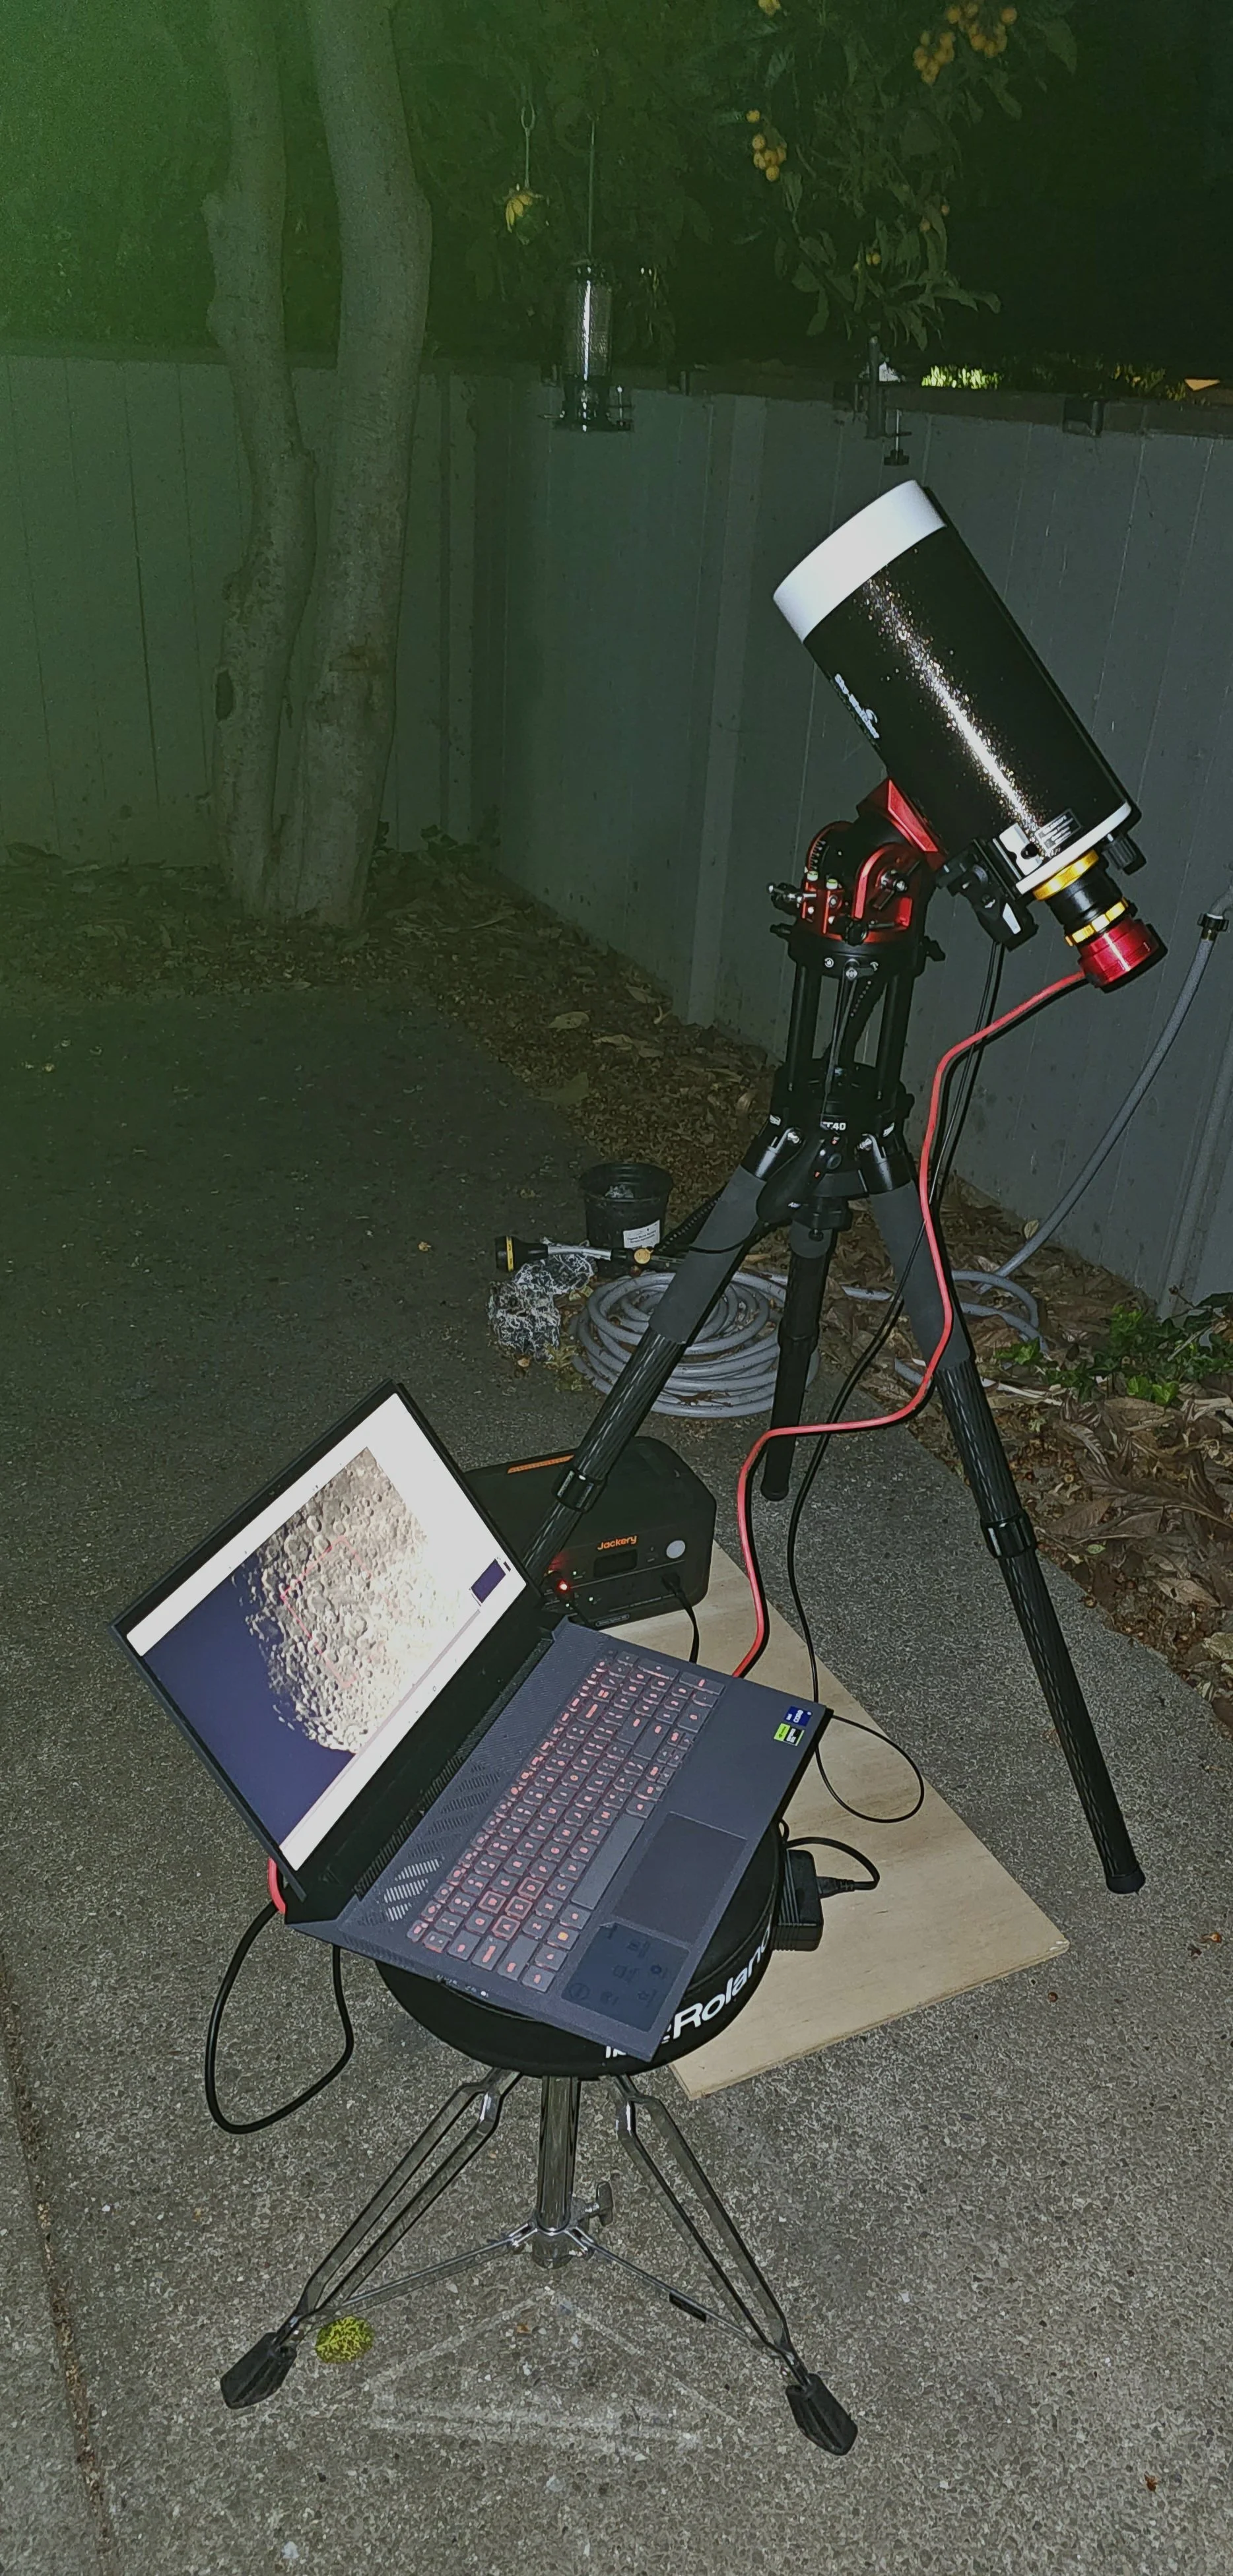
Entire Shooting Setup
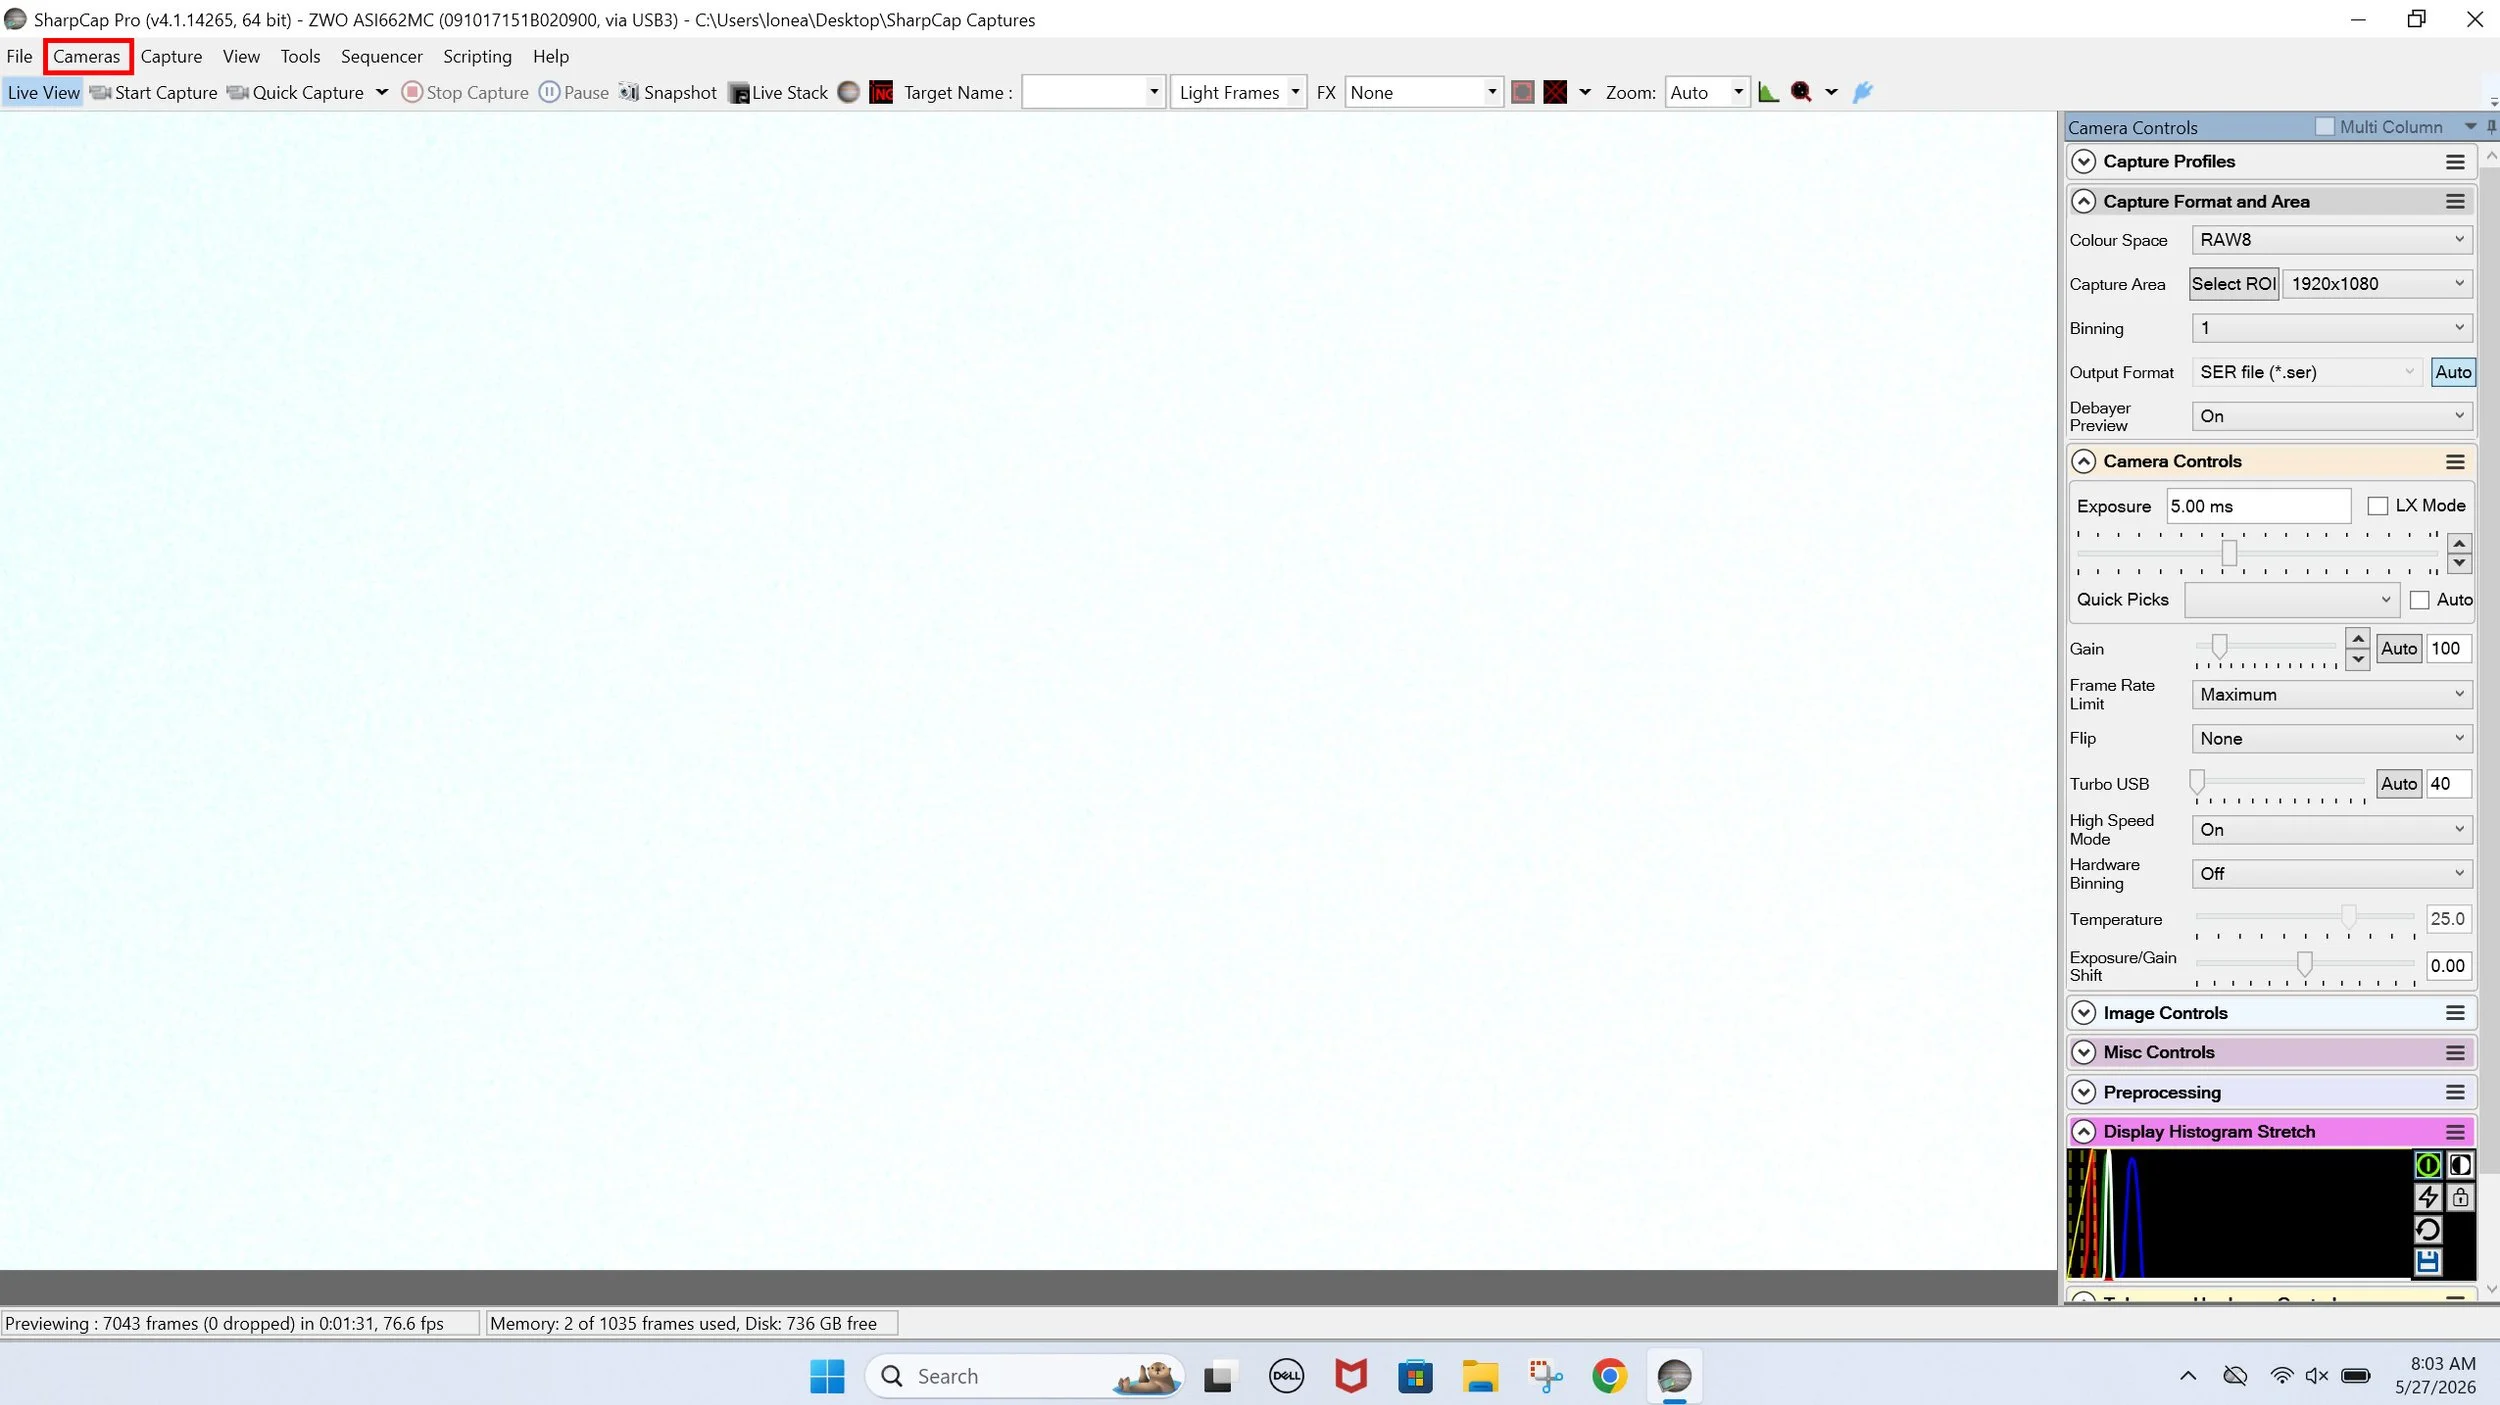
SharpCap - Step 1: Choose Cameras
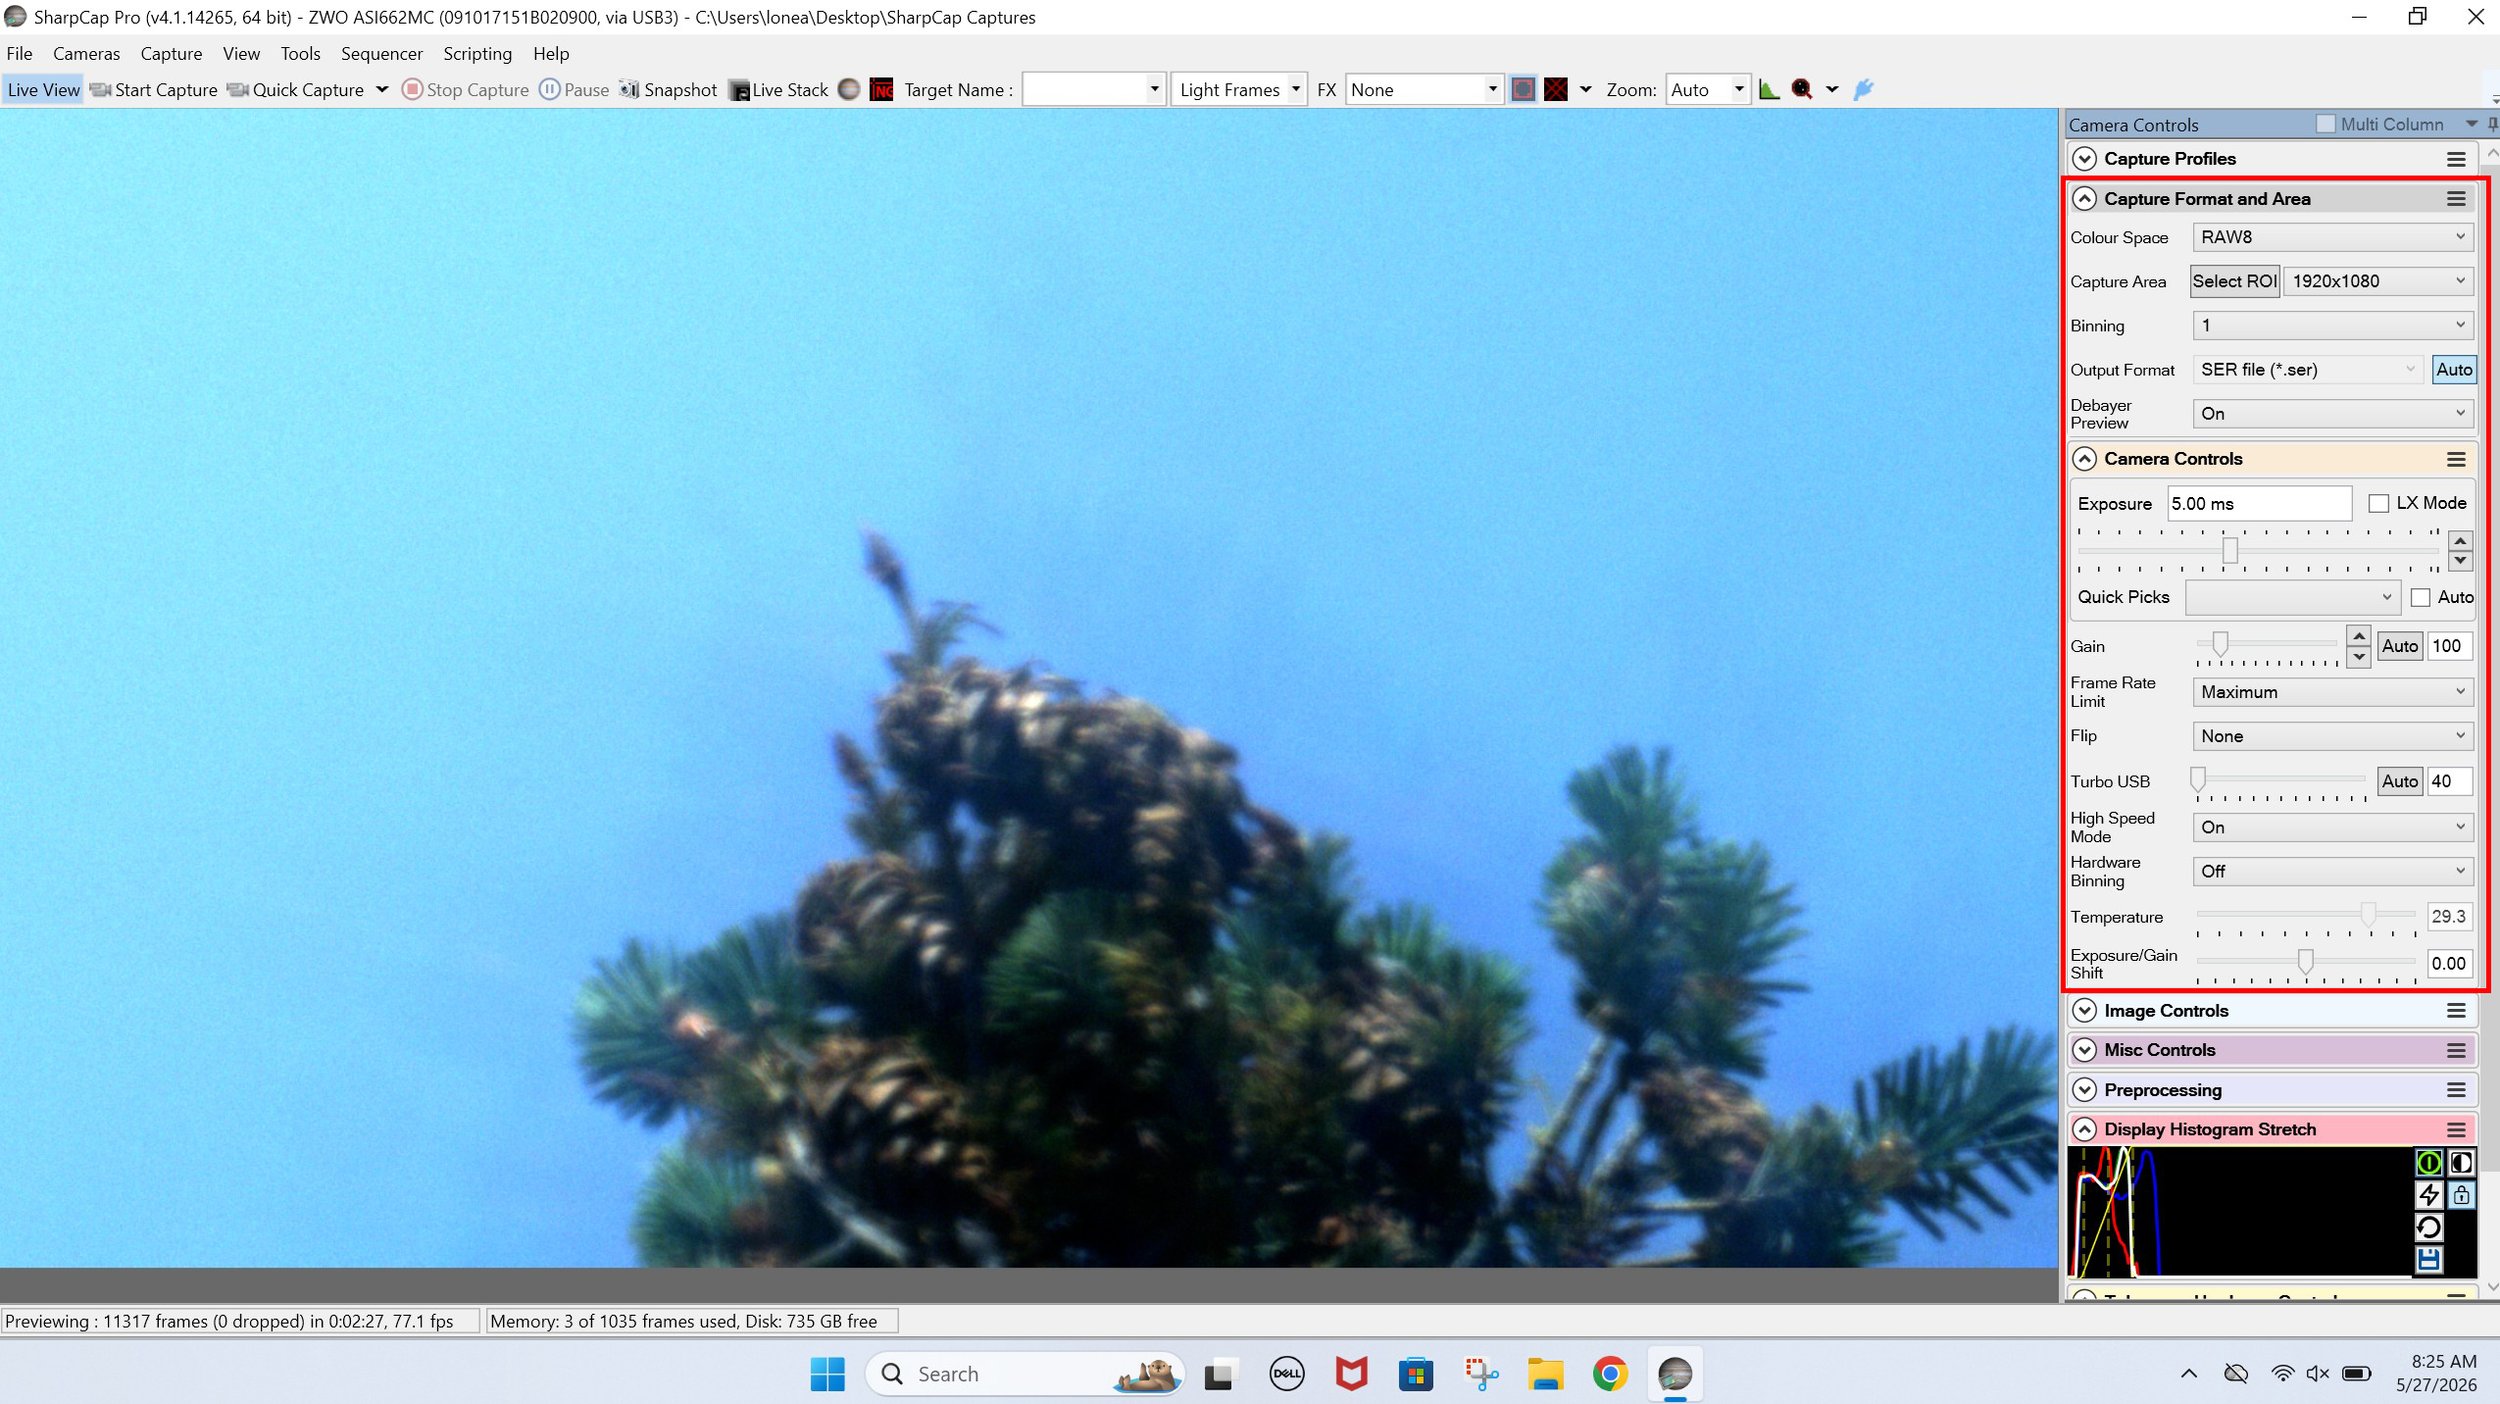
SharpCap - Step 2: Capture Format and Area Setup

SharpCap - Step 3: Display Histogram Stretch Setup
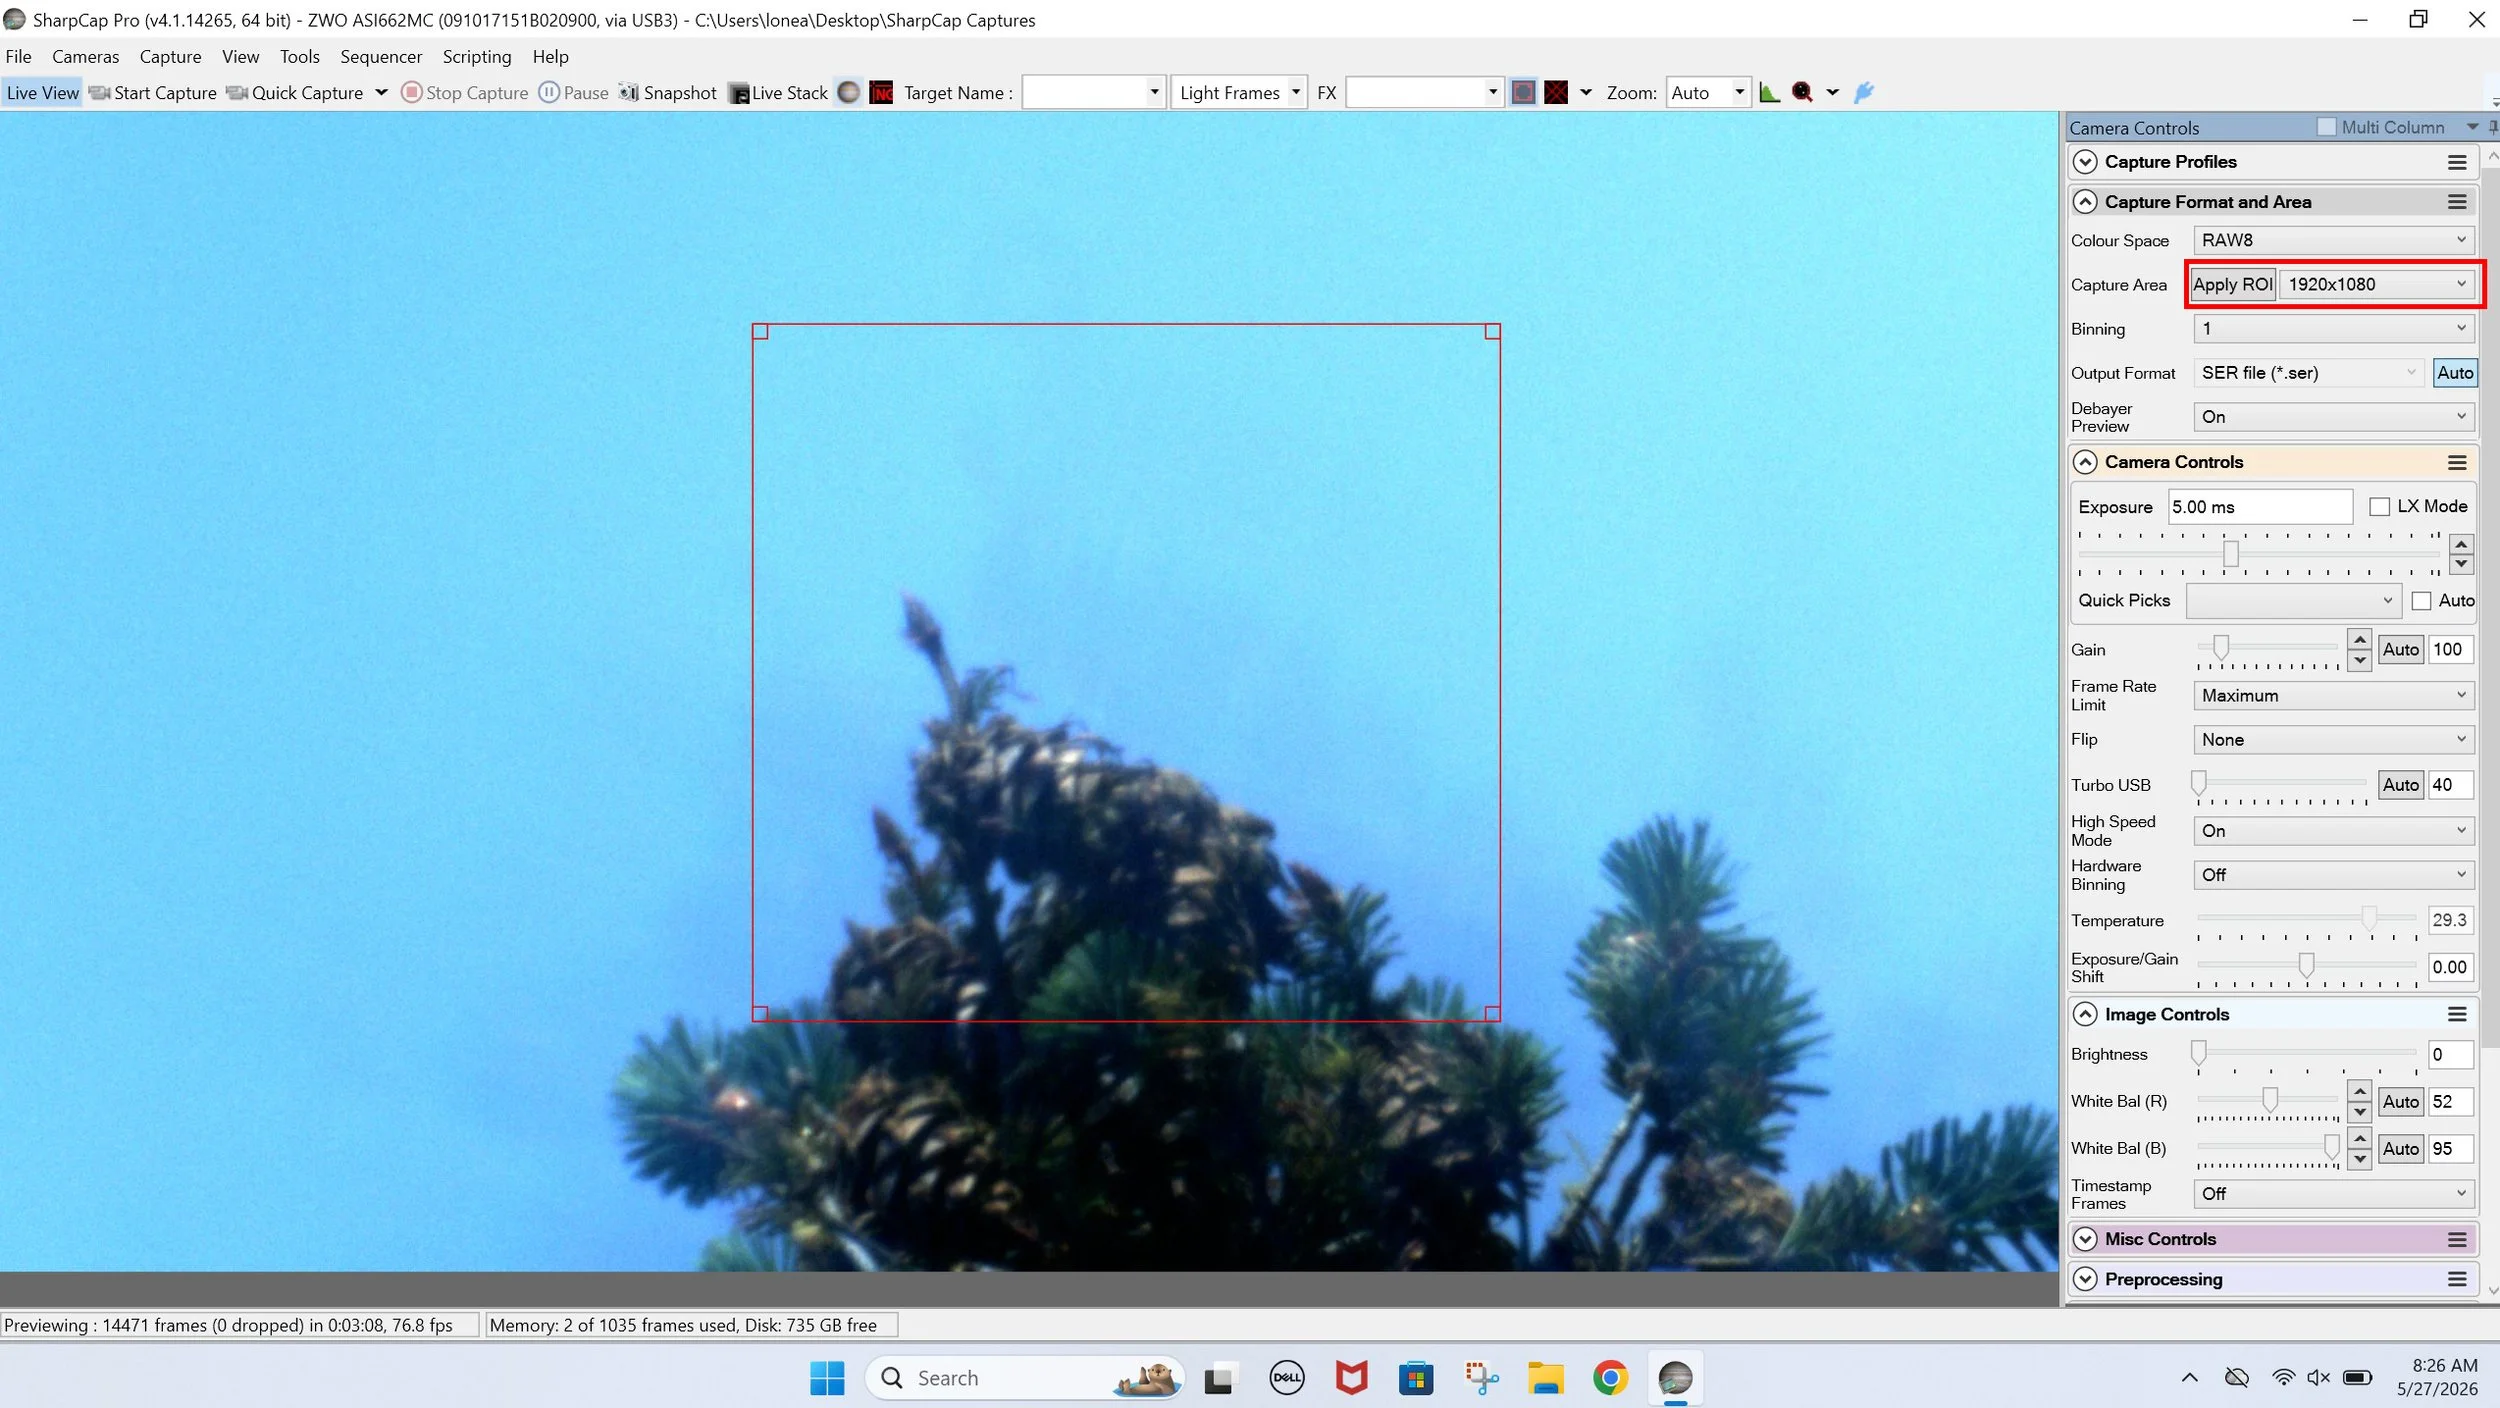
SharpCap - Step 4: Resolutions Area Setup (Cropped Resolutions)
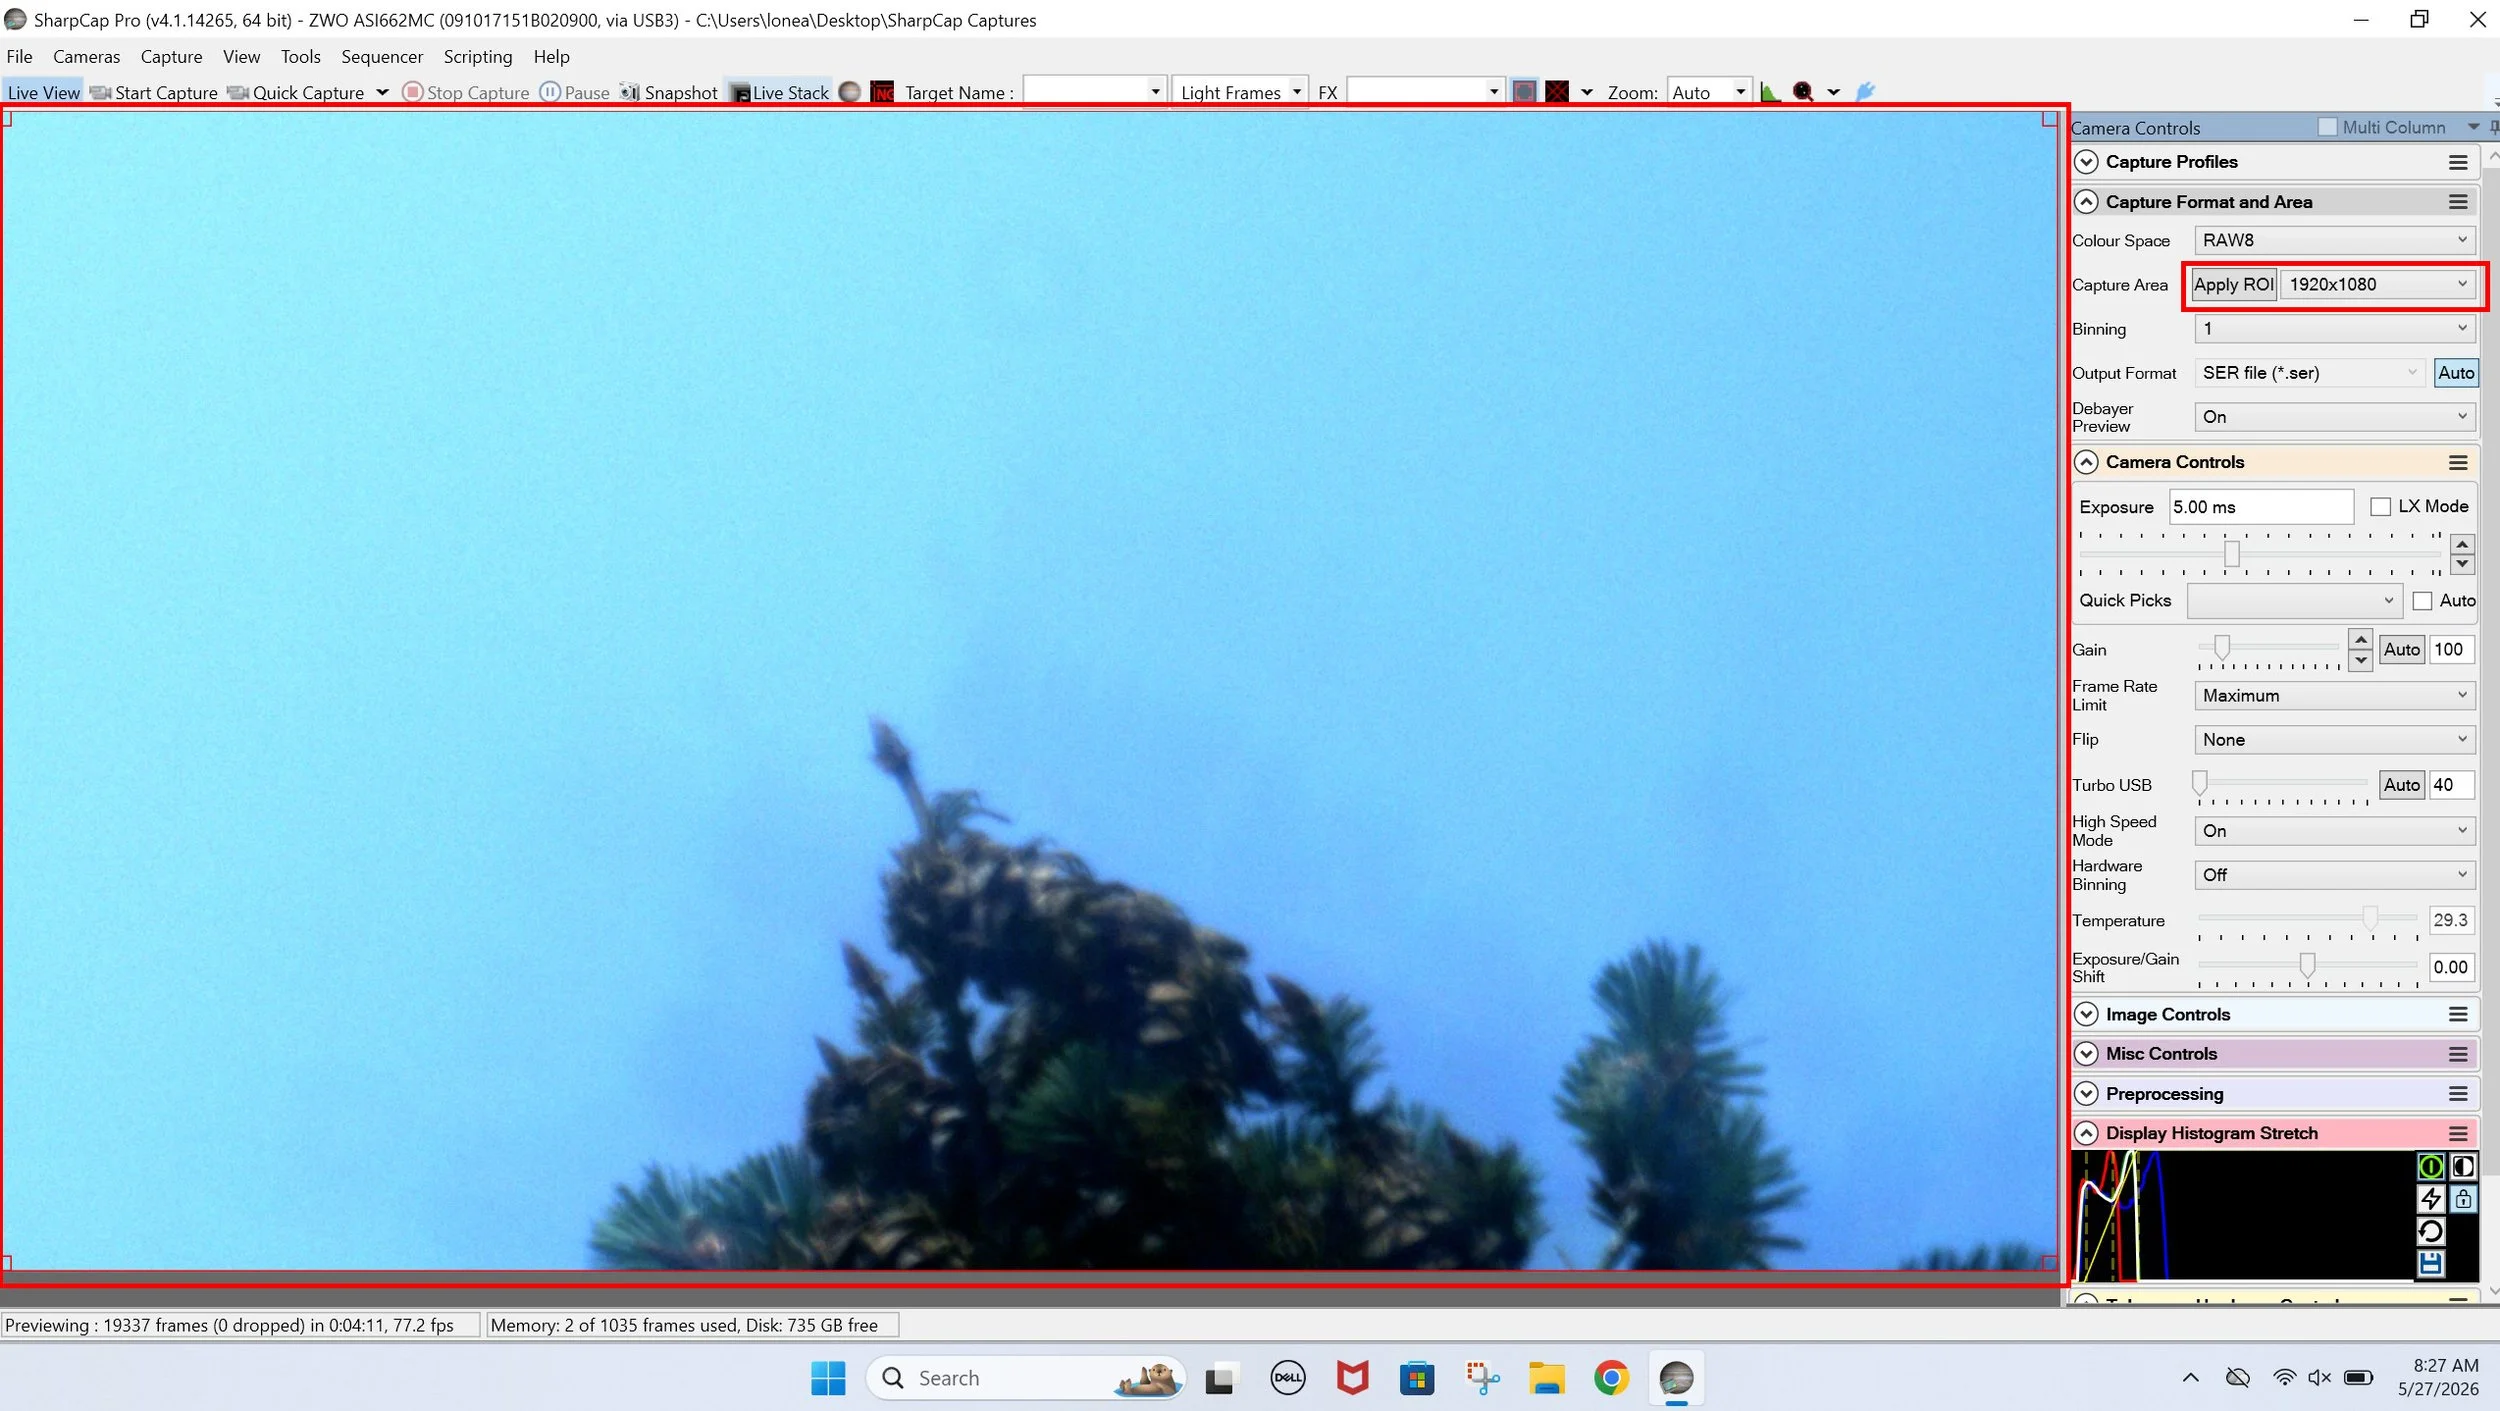
SharpCap - Step 4: Resolutions Area Setup (Full Resolutions)
AutoStakkert Application Software for Stacking
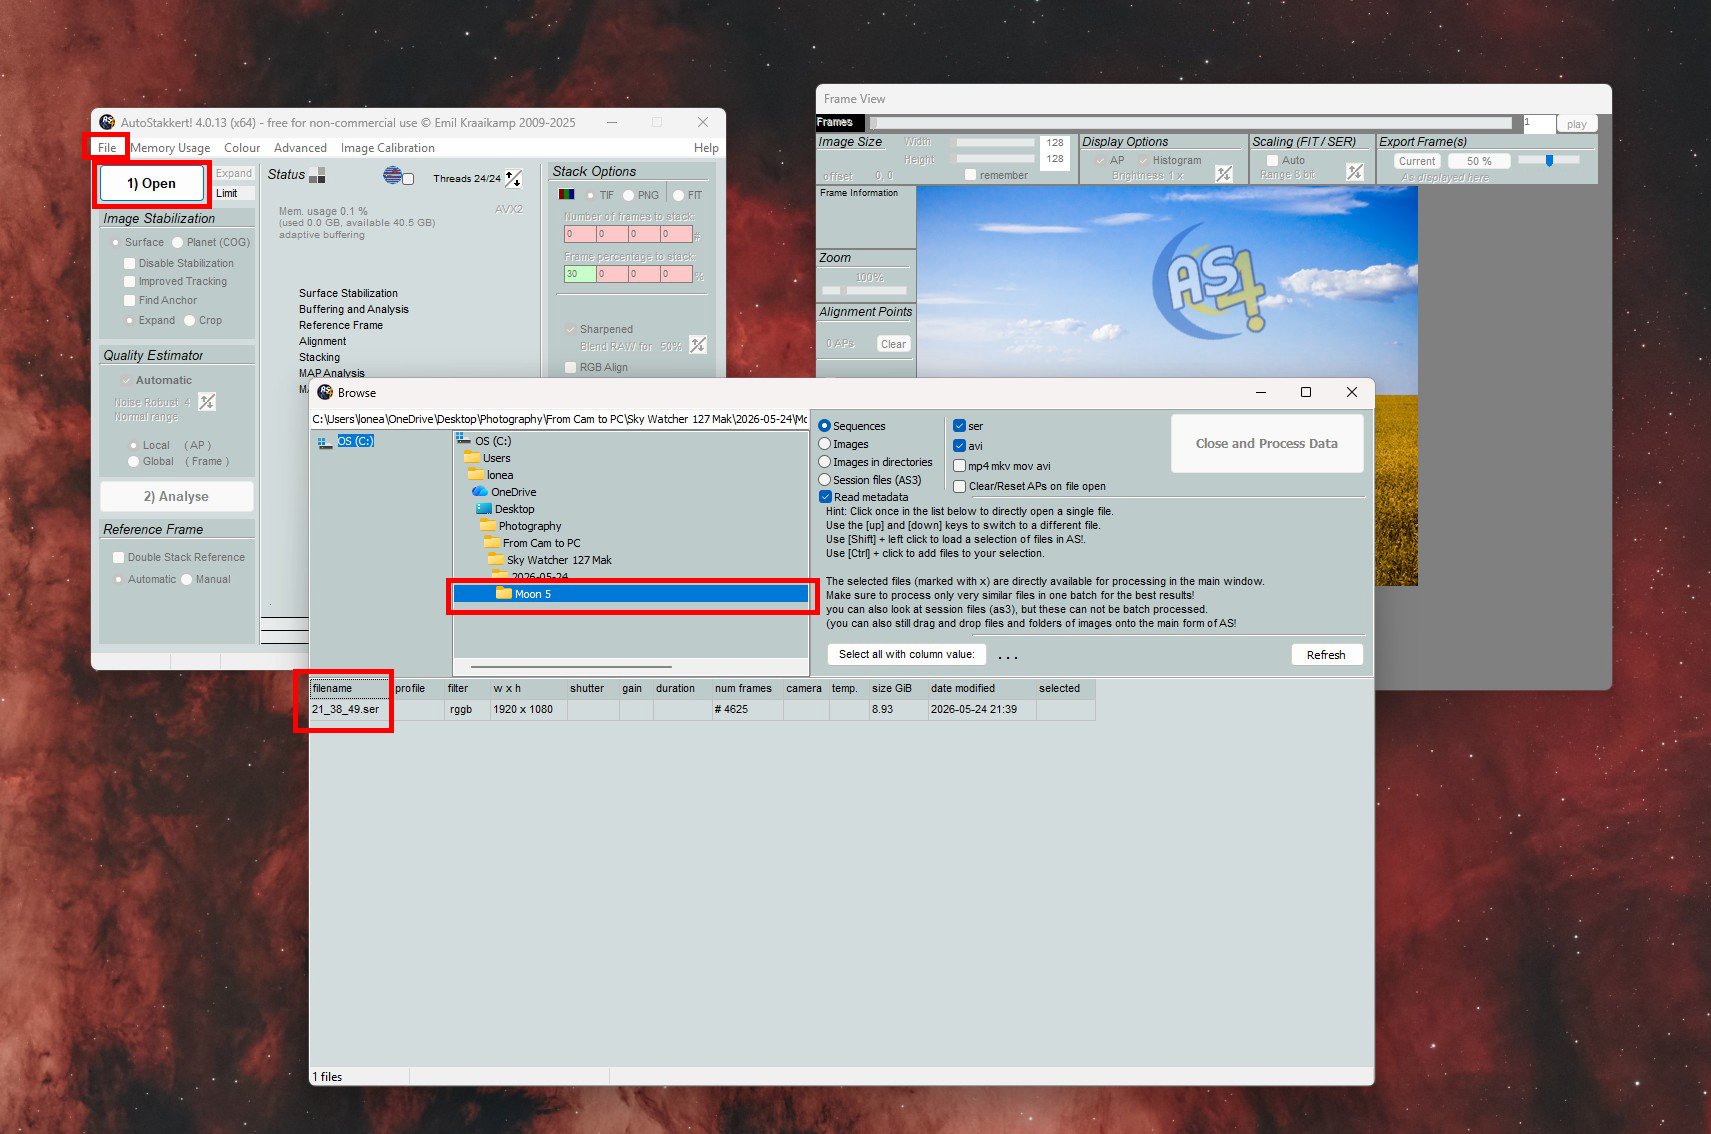
AutoStakkert - Step 1: Open the files
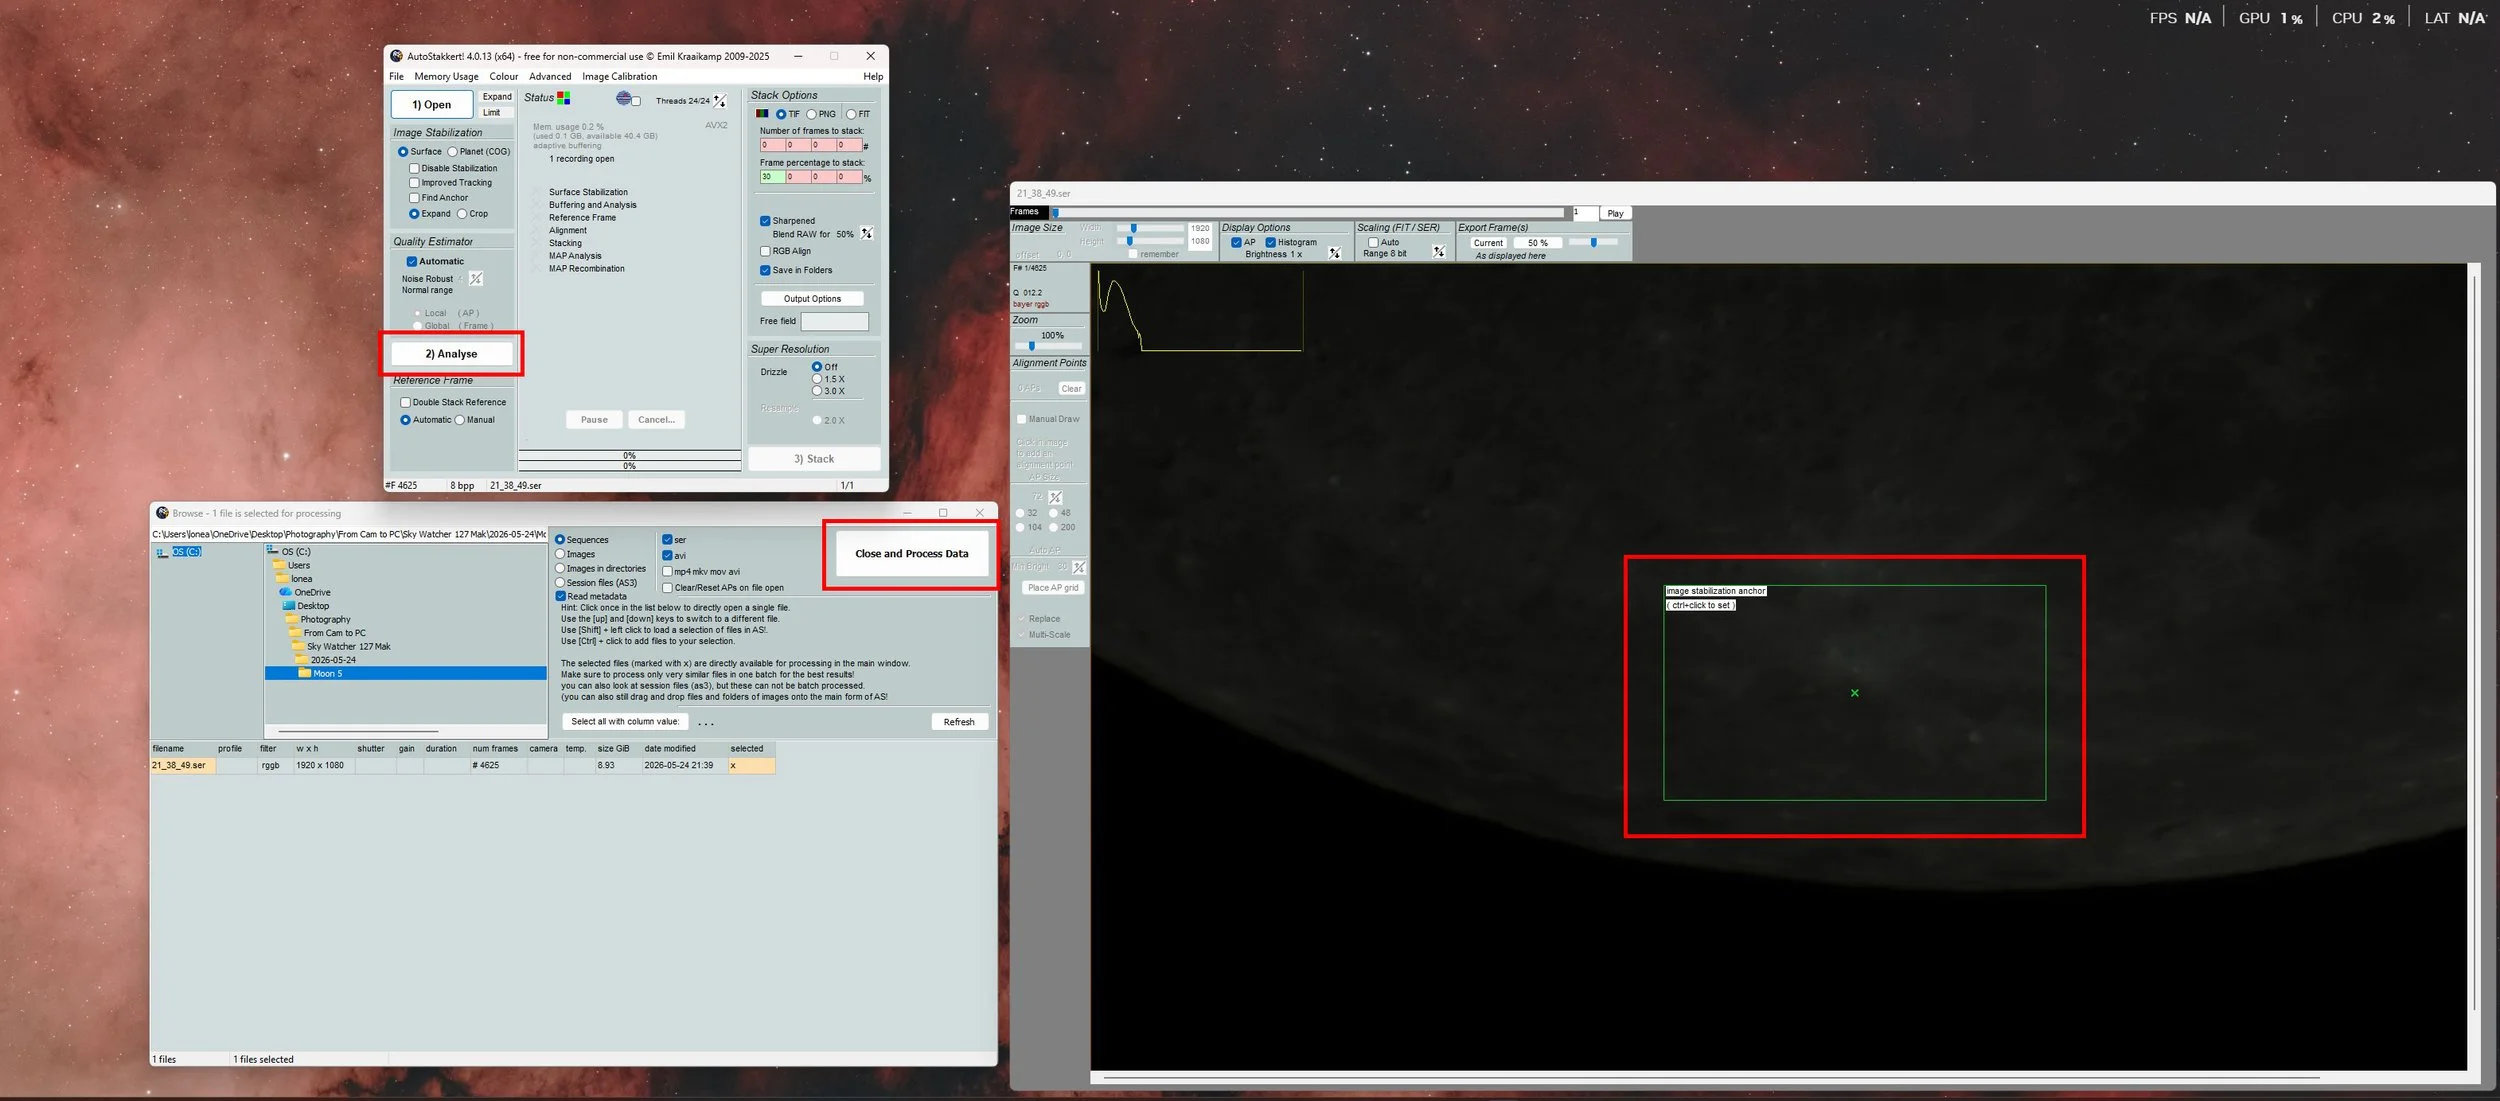
AutoStakkert - Step 2: Choose “Close and Process Data”
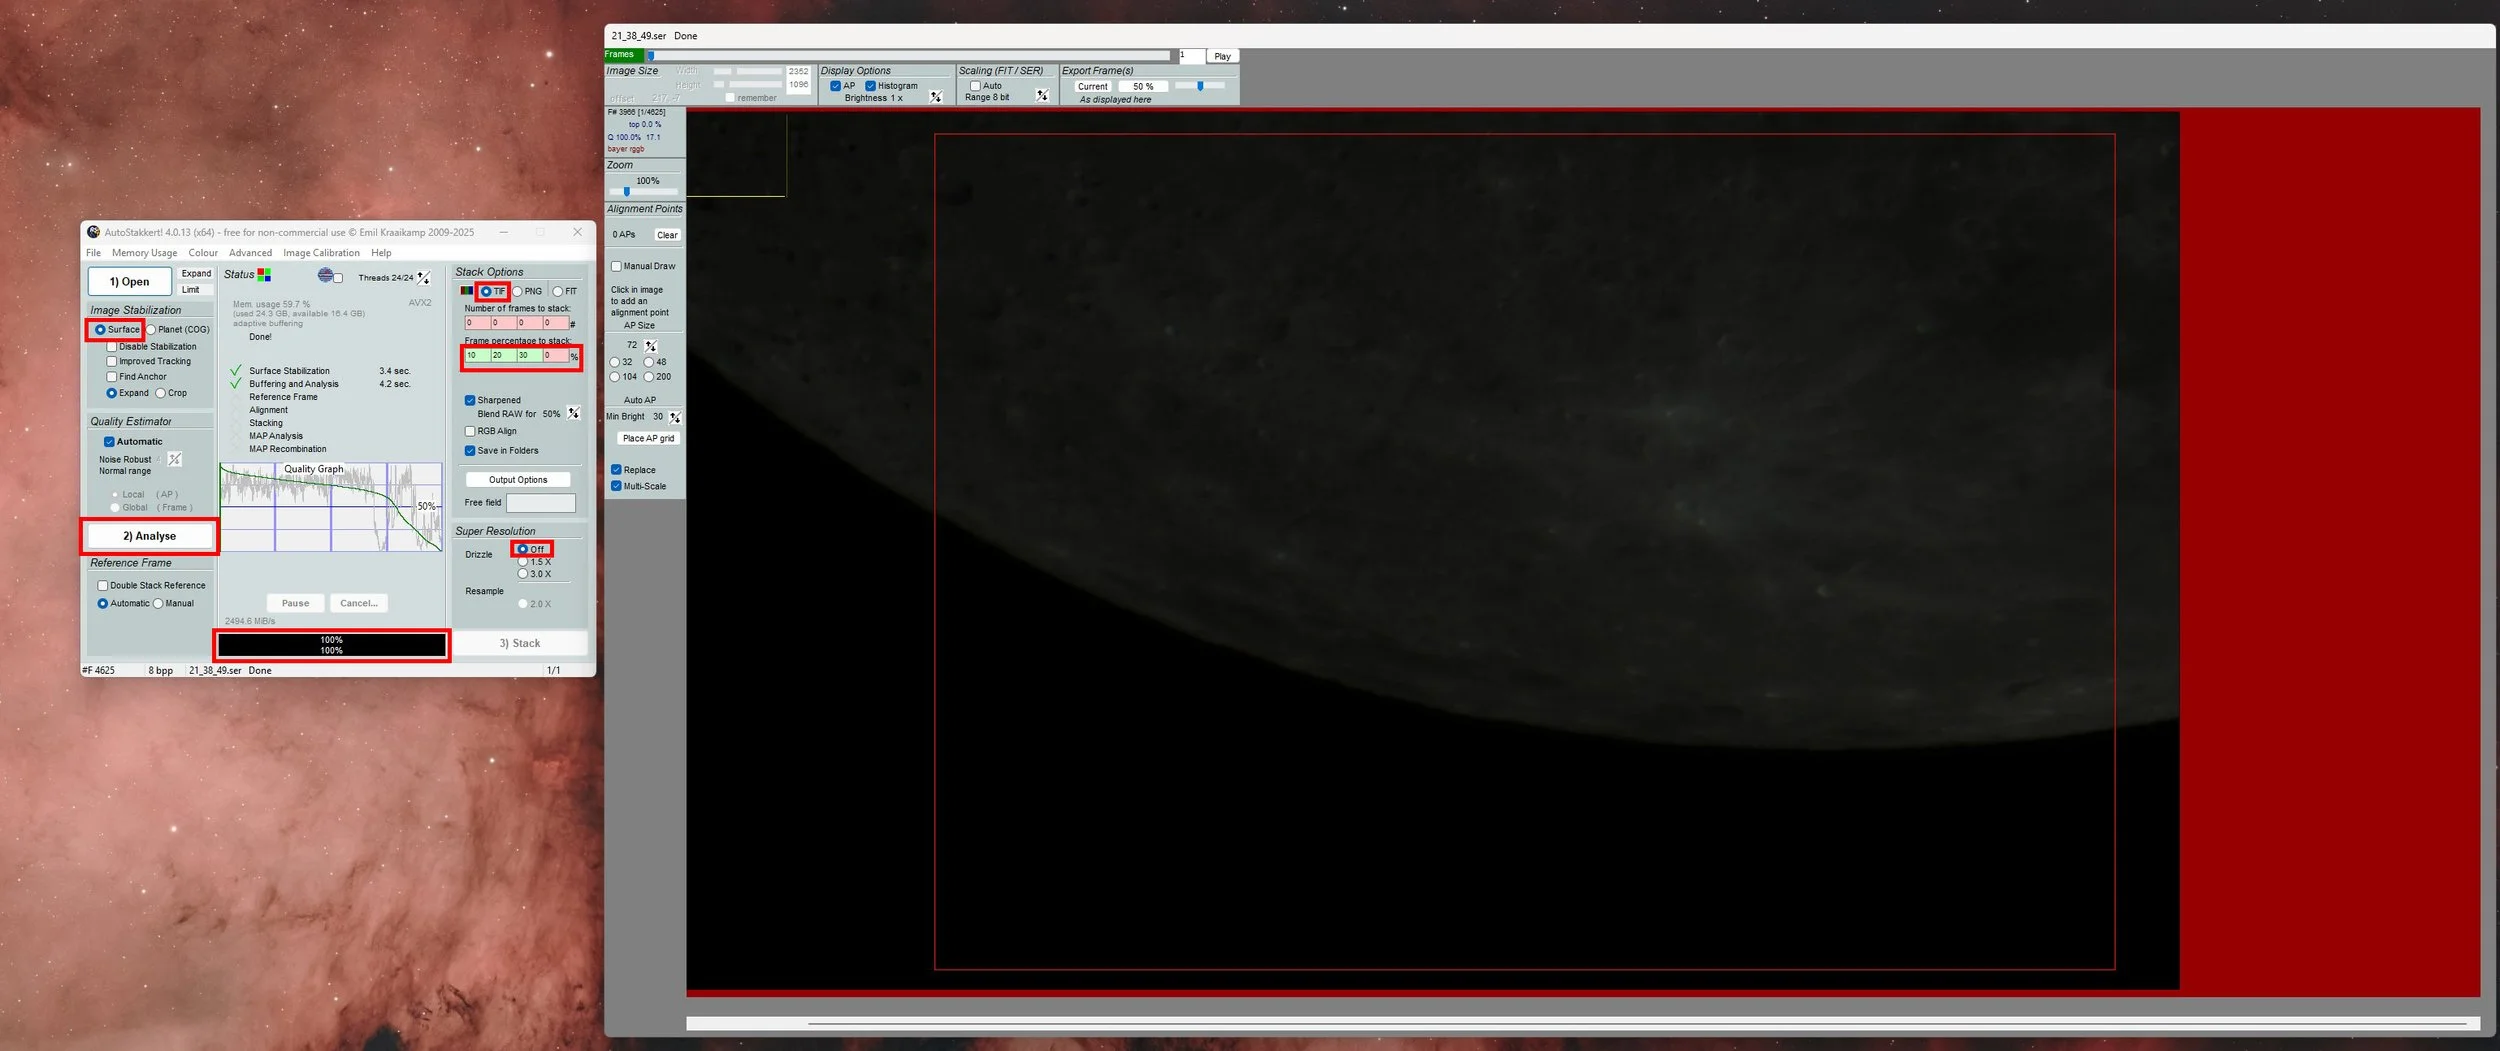
AutoStakkert - Step 3: Setup for Analyse
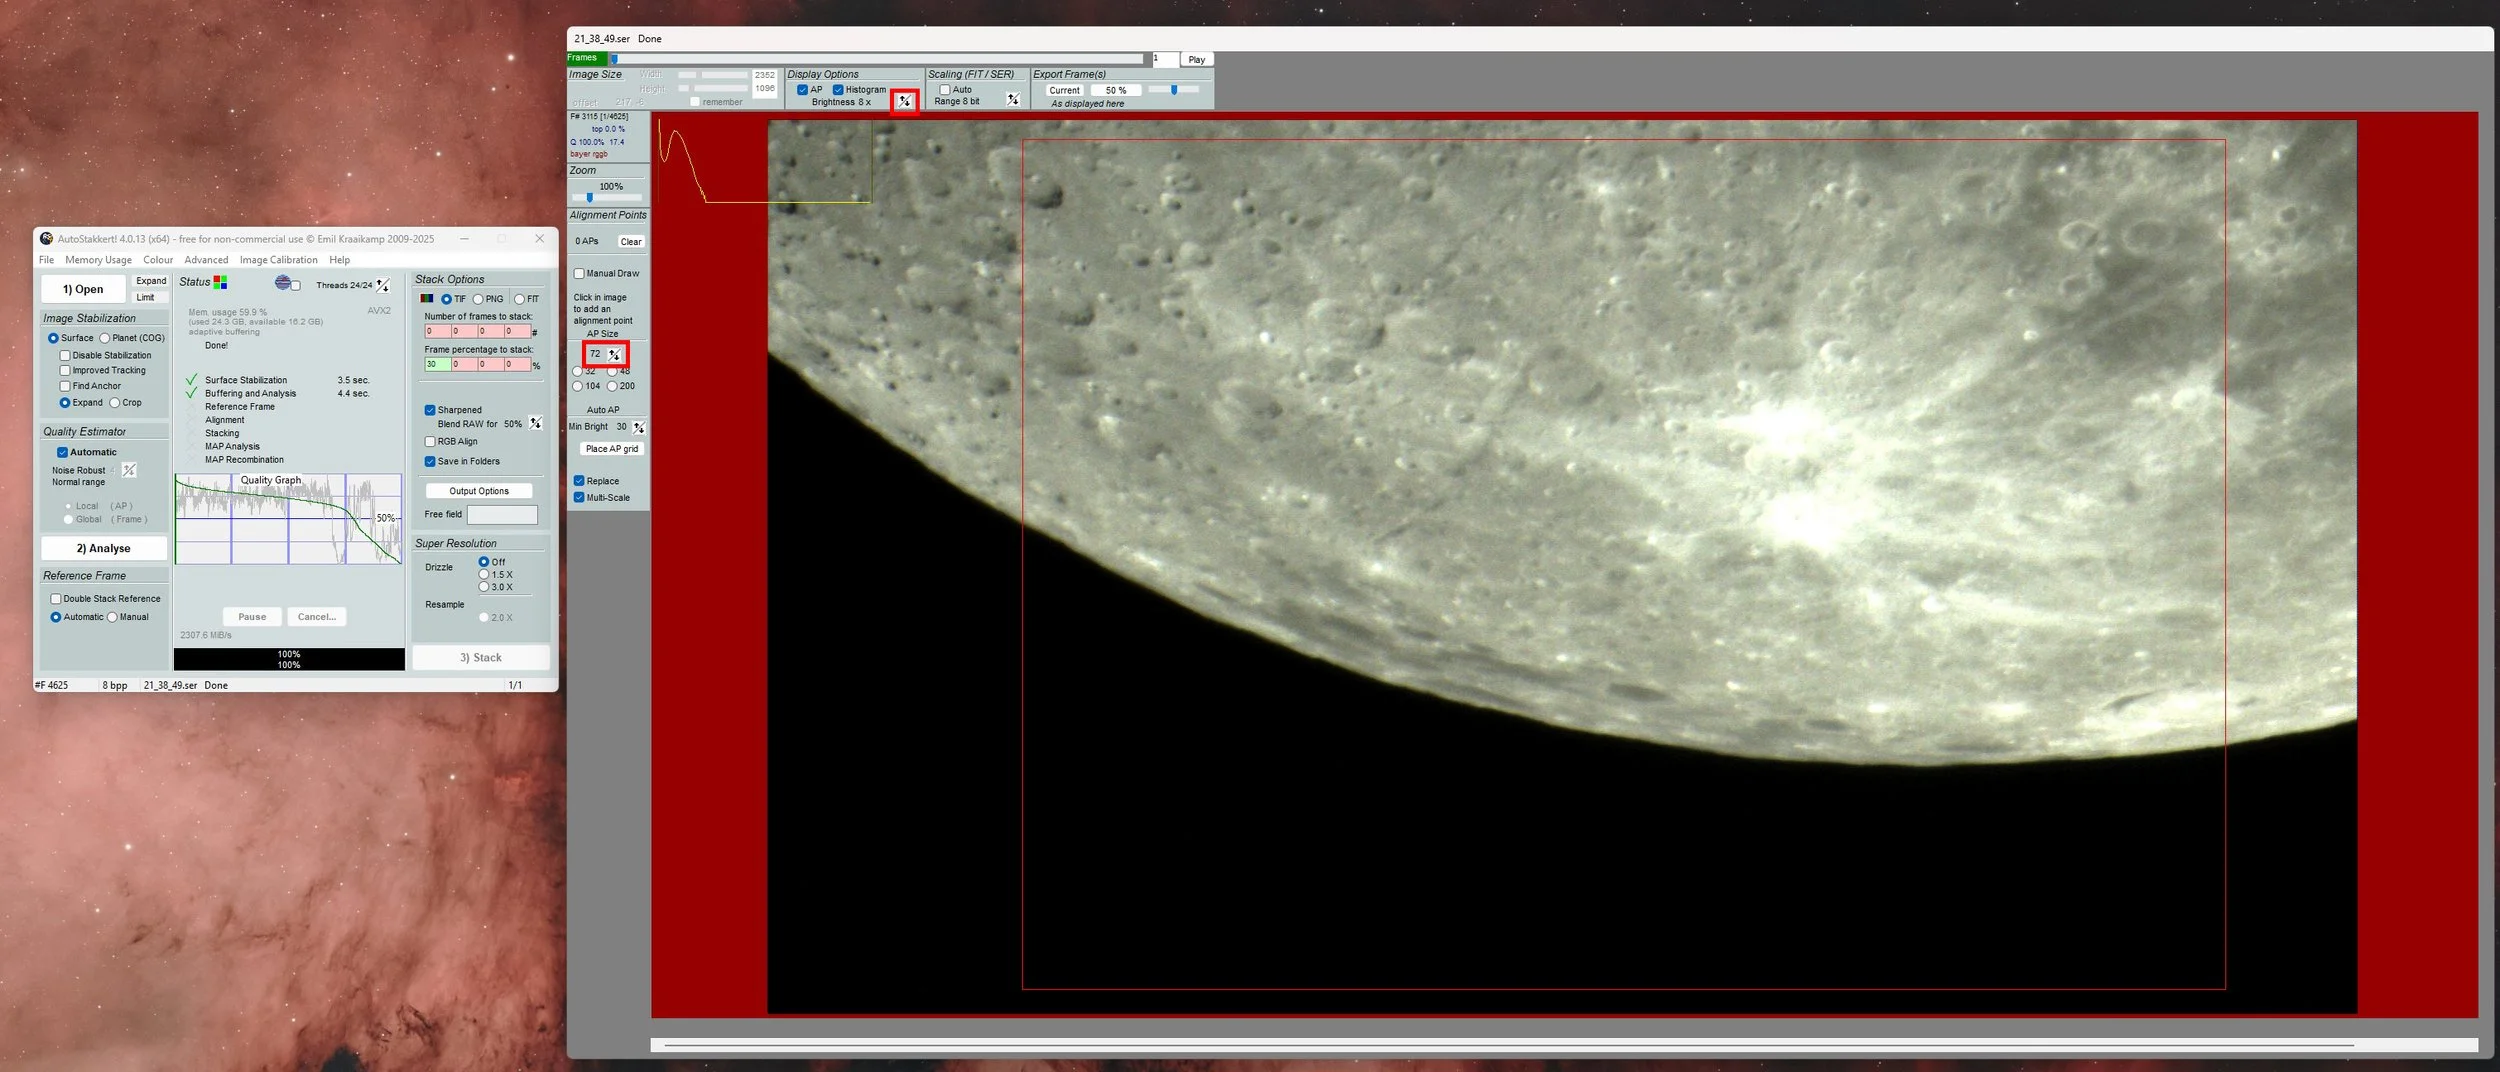
AutoStakkert - Step 4: Setup for AP grip
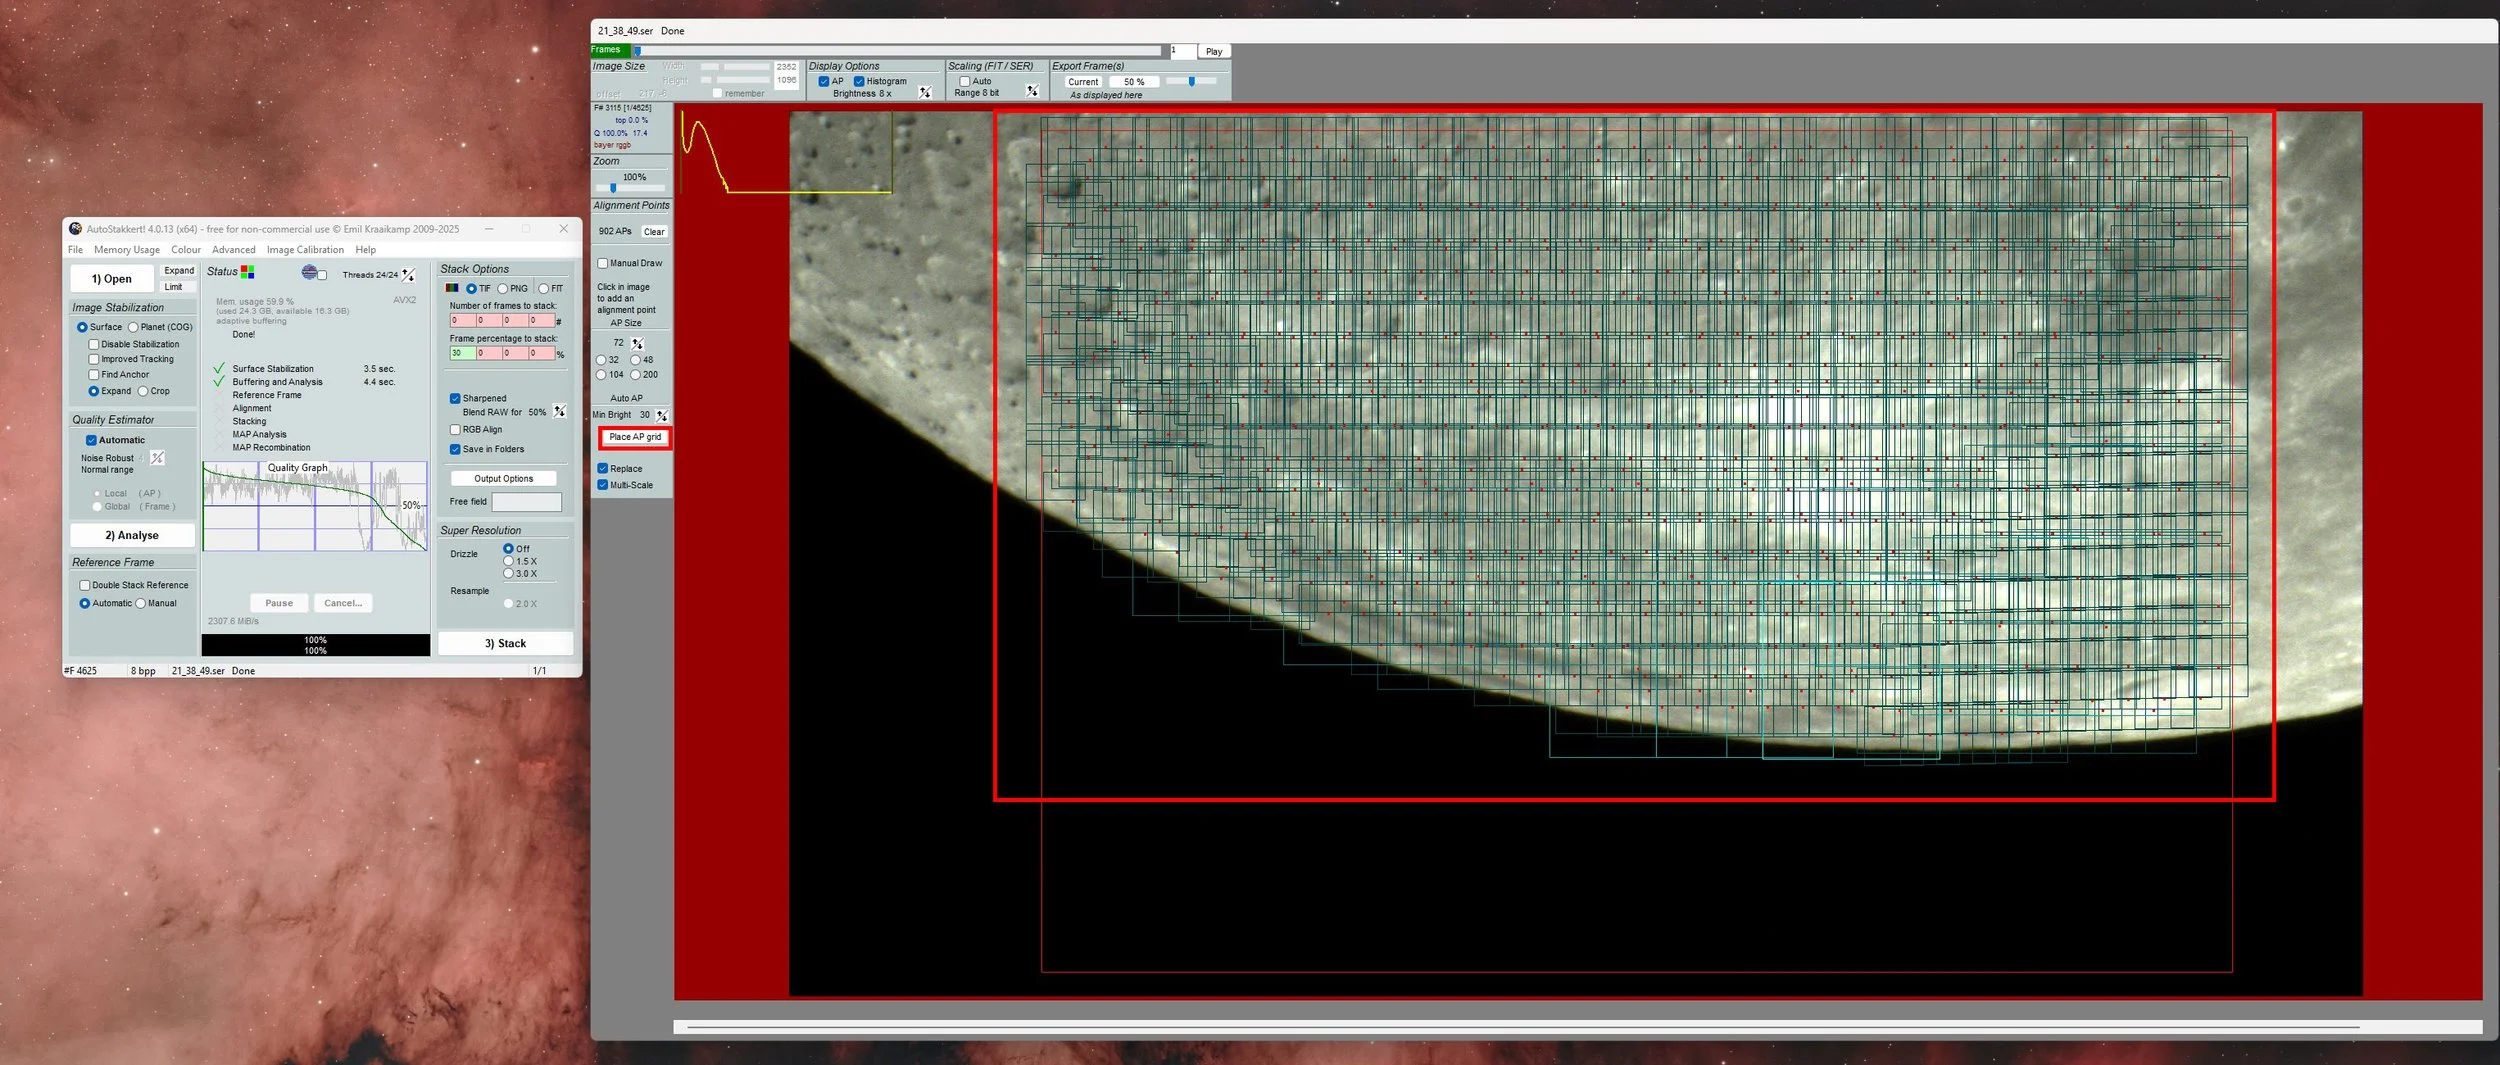
AutoStakkert - Step 5: Place AP grip (can add more grips by manually)

Registax Application Software for Image Wavelet Sharpening
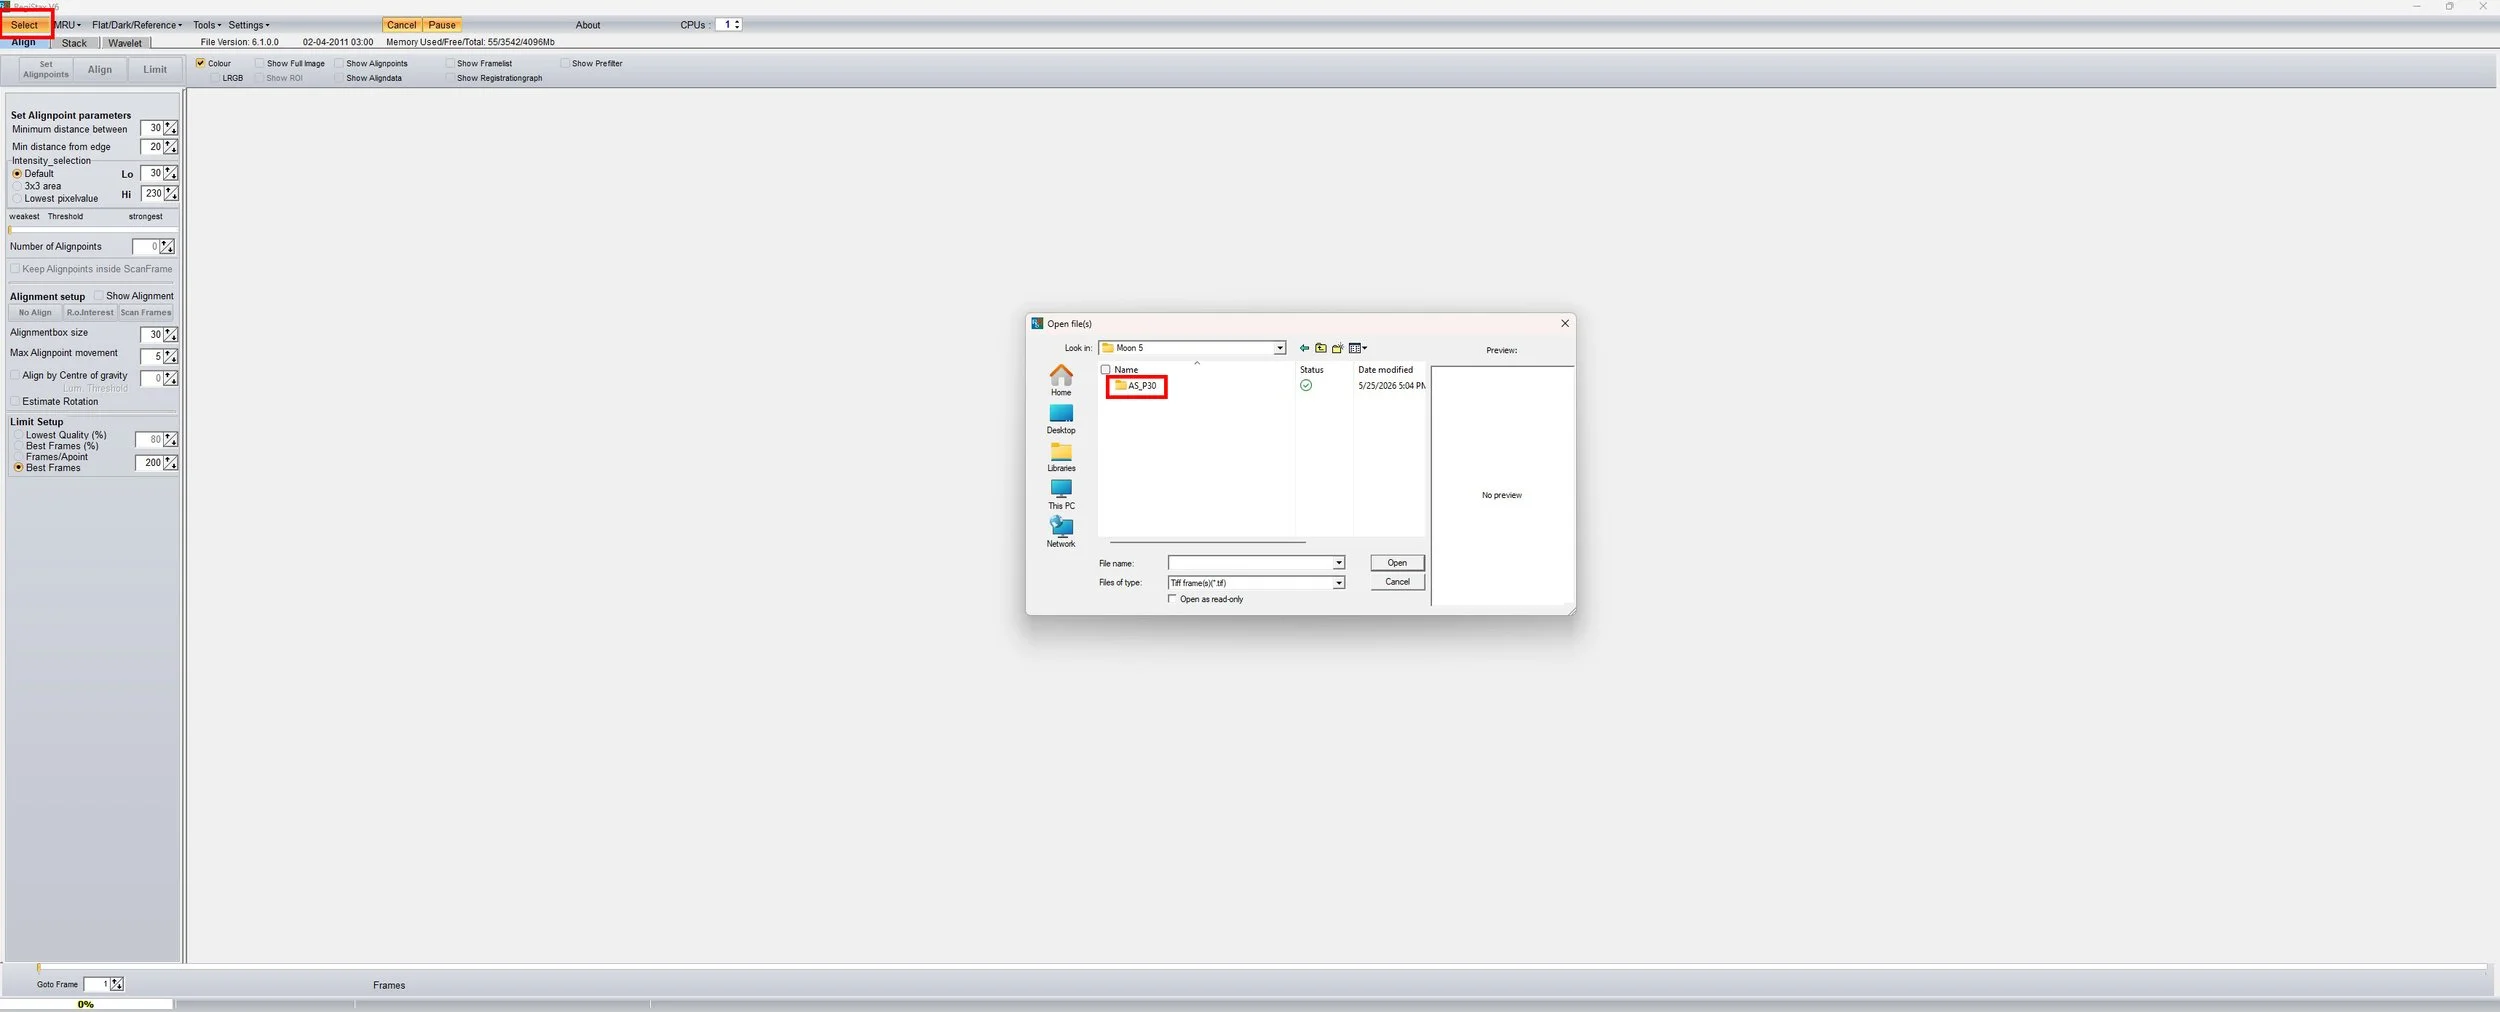
Registax - Step 1: Open the files
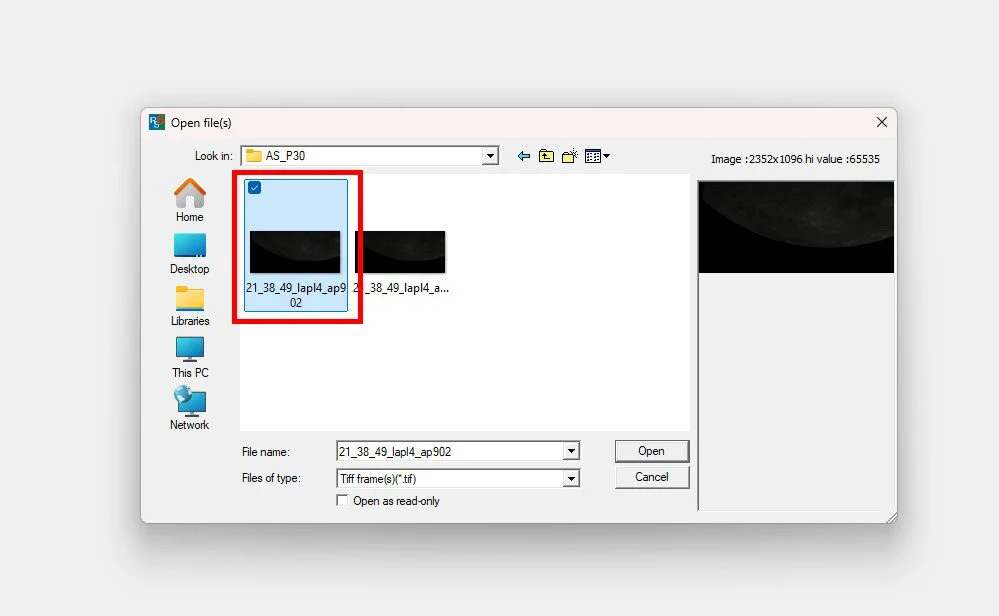
Registax - Step 2: Choose “Non-Converted” file only

Registax - Step 3: Choose “Yes”
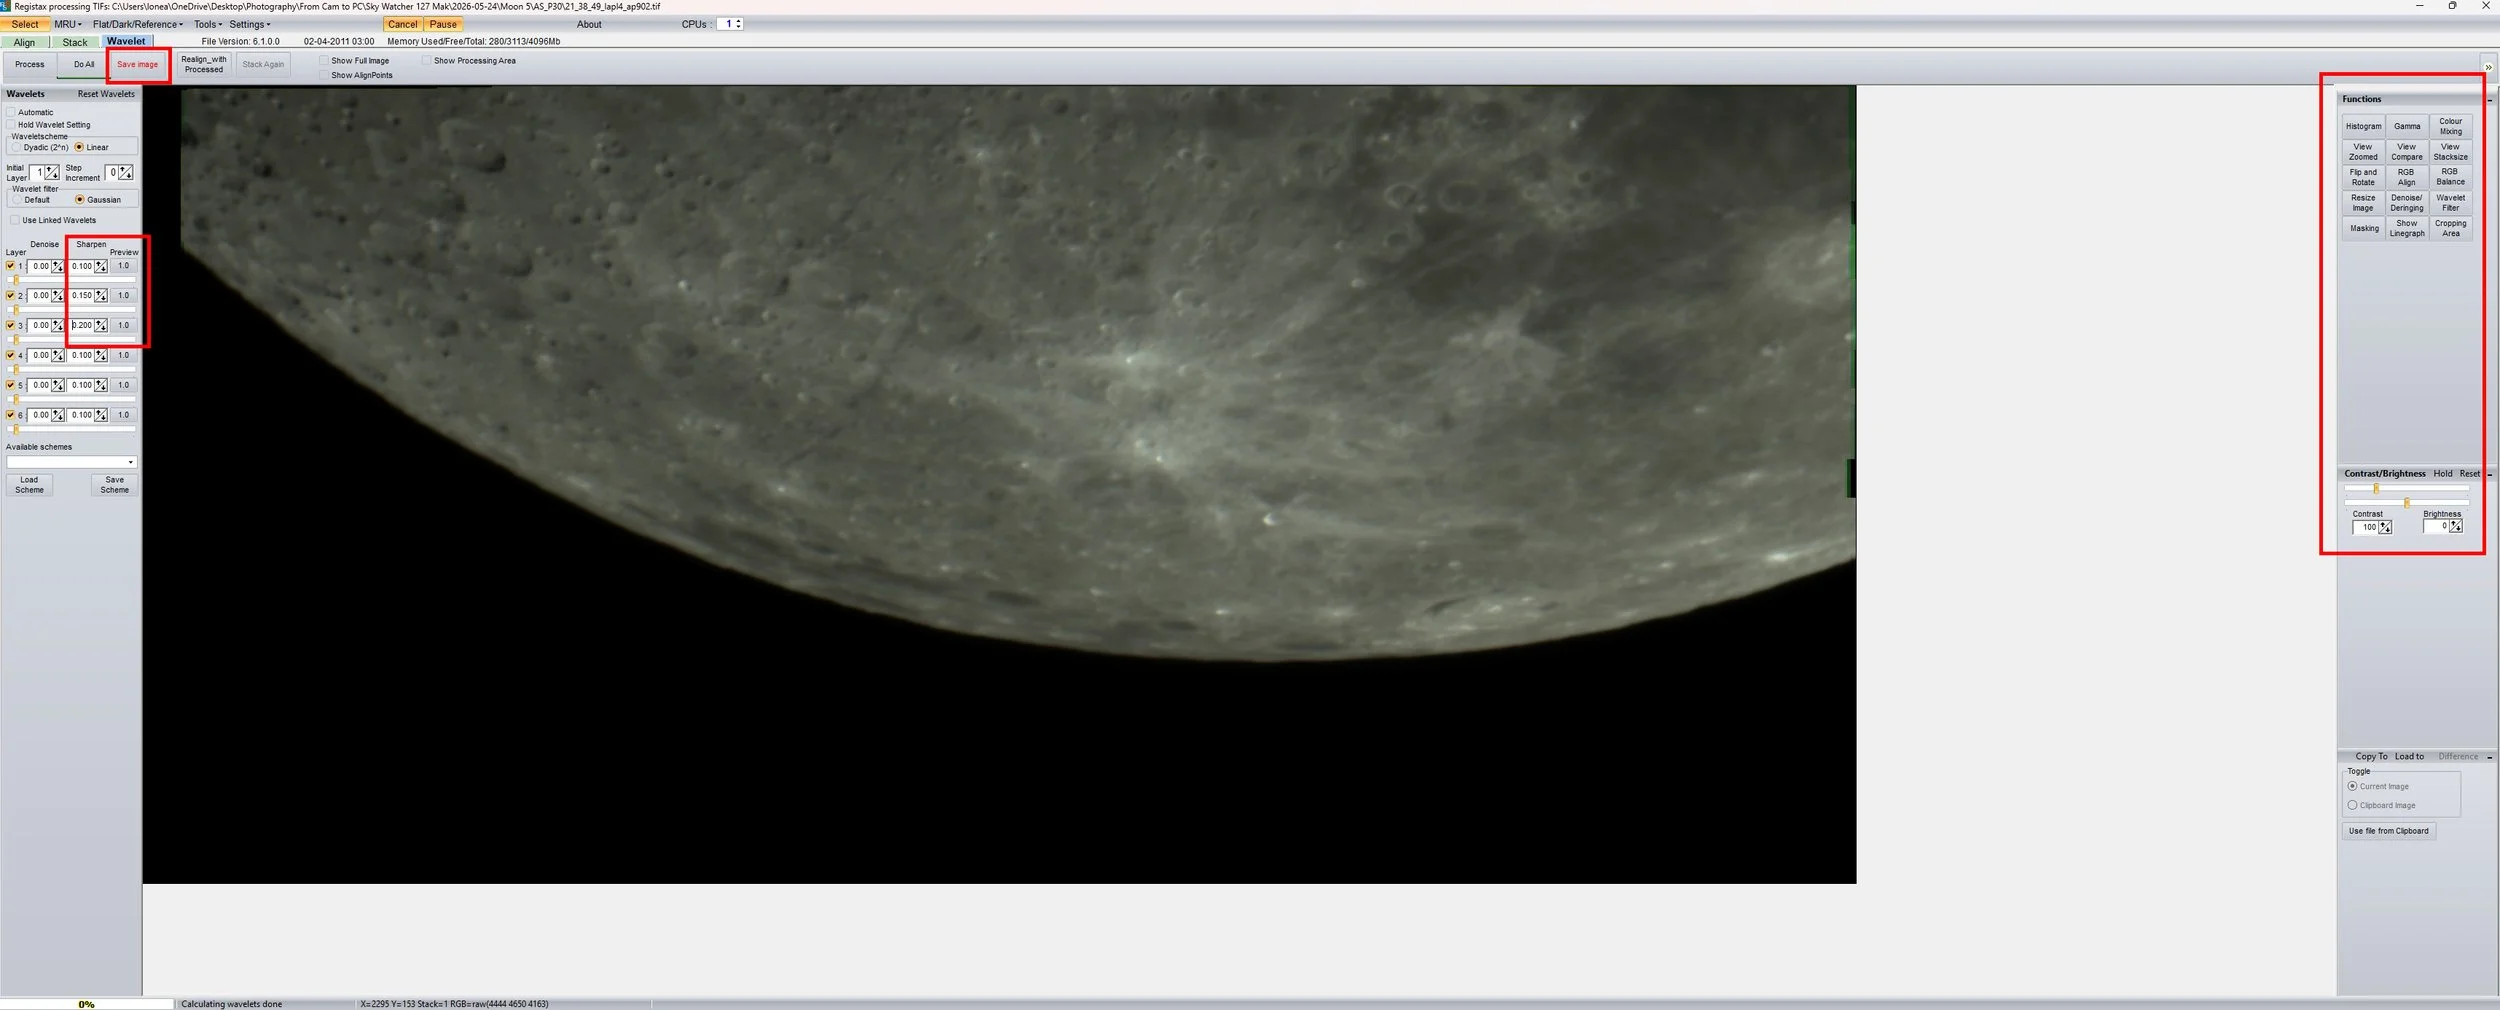
Registax - Step 3: Setup for Wavelet process
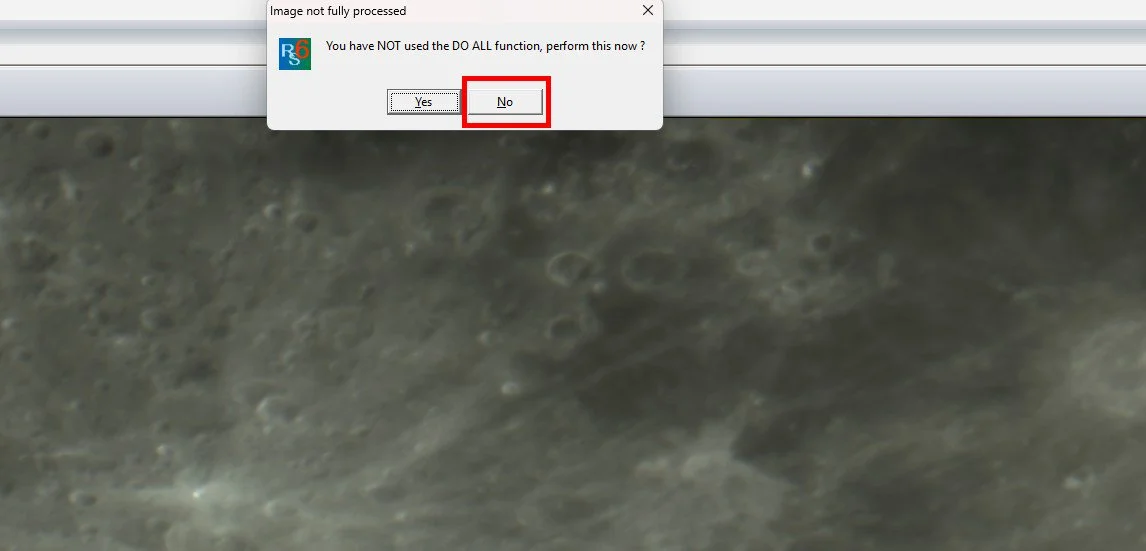
Registax - Step 4: Choose “No”
အစောပိုင်းကာလက "လ" ကို smart telescope တွေနဲ့ပဲရိုက်ကူးခဲ့ဖူးတာ။ Smart telescope နဲ့ဆိုတော့ resolutions ကကိုယ့်စိတ်တိုင်းကျတော့မရဘူးပေါ့လေ။ နောက်ပြီး ဘယ်ဓာတ်ပုံ genre ကိုပဲရိုက်ရိုက် close up ပုံတွေကိုသဘောကျတယ့်သူမို့လို့ "လ" ကိုအနီးကပ်ပုံတွေလိုချင်ခဲ့ပေမယ့်လည်း ကိုယ့်မှာရှိတယ့် smart telescope နဲ့ကဘယ်လိုမှမဖြစ်နိုင်လို့ မရိုက်ဖြစ်ခဲ့ဘူး။ Astrophotography ကိုစပြီးရိုက်ကတည်းက ကိုယ့်ရဲ့အဓိက favourite က nebula တွေမို့လို့ သူတို့ကိုပဲဦးစားပေးနေလို့ "လ" ကိုတစ်ခါတစ်ရံလောက်ပဲရိုက်ကူးဖြစ်တော့ပေမယ့် စိတ်ထဲမှာတော့တနေ့ကြရင် အနီးကပ်ပုံတော့ရအောင်ရိုက်မယ်ဆိုပြီး တေးထားခဲ့တာပါ။ Telescopes တွေရဲ့လုပ်ဆောင်ချက်နဲ့ဘယ်လိုအသုံးပြုရသလဲဆိုတာတွေကို အရင်သိအောင်လေ့လာချင်တာကလည်း အဓိကပေါ့ခင်ဗျာ။ ဘာဖြစ်လို့လဲဆိုတော့ ရိုက်ရမယ့် categories တွေအပေါ်မူတည်ပြီး သုံးရတယ့် telescopes တွေနဲ့ accessories တွေကကွဲပြားမှုရှိလို့ပါပဲခင်ဗျ။ ဒီပိုစ့်မှာတော့ "လ" ကိုဘယ်လိုရိုက်ကူးရသလဲဆိုတယ့်အကြောင်းကိုပဲ ရေးသွားမှာပါ။
"လ"တစ်ခုလုံးကို frame အထဲမှာအပြည့်ဝင်အောင်ရိုက်ဖို့အတွက်ကတော့ focal length 250 mm လောက်နဲ့ဆိုအဆင်ပြေနေပါပြီ။ ဒါပေမယ့် အနီးကပ်ပုံတွေအတွက်ကတော့ အနည်းဆုံး focal length 1500 mm လောက်ကနေစသင့်တယ်လို့တော့ယူဆပါတယ်။ ကျွန်တော်ကတော့ focal length 1500 mm ရှိတယ့် Sky Watcher company ကထုတ်တယ့် Sky-Watcher 127 Maksutov-Cassegrain telescope အမျိုးအစားကိုအသုံးပြုပါတယ်။ ပိုပြီးအနီးကပ်ပုံတွေလိုချင်တယ့်အခါကြရင်တော့ Tele Vue 2x Barlow နဲ့တွဲပြီးအသုံးပြုဖို့စီစဥ်ထားပါတယ်ခင်ဗျ။ အခုဒီပိုစ့်ရေးနေတယ့်အချိန်အထိတော့ 2x Barlow ကိုအသုံးမပြုရသေးပါဘူး။ လက်ရှိ 1500 mm နဲ့တောင် ရိုက်ကူးရတာနည်းနည်းတိုင်ပတ်နေသေးလို့ 3000 mm နဲ့မရိုက်ခင် နည်းနည်းအသားကျသွားအောင်လေ့ကျင့်ပြီးတော့မှပဲ 2x Barlow နဲ့ "လ" ရဲ့ချိုင့်ဝှမ်းတွေကိုအနီးကပ်ရိုက်မယ်လို့ဆုံးဖြတ်ထားပါတယ်။ "လ" ကိုရိုက်ကူးရတယ့်အဆင့်တွေက nebula တွေကိုရိုက်ကူးရတာနဲ့မတူပါဘူး။ Nebula တွေကိုရိုက်ကူးရာမှာ ရိုက်ကူးတယ့်အဆင့်အားလုံးကို asiair application အထဲကနေ အလုံးစုံထိန်းချုပ်ပြီး အသုံးပြုကြပေမယ့် "လ" ကိုရိုက်ကူးတာကြတော့ SkyAtlas application ကို harmonic mount နဲ့ tracking လုပ်ဖို့အတွက်အသုံးပြုကြပါတယ်။ Camera ကတော့ planetary တွေကိုအဓိကရိုက်ကူးဖို့အတွက်ထုတ်လုပ်ထားတယ့် ZWO ASI662MC ပါ။ Planetary တွေကိုရိုက်ကူးတာက nebula, galaxy တွေကိုရိုက်ကူးသလို single high-resolution photo မဟုတ်ပဲ high-speed video stacking မို့လို့ megapixels ကတော့ 2.07 megapixels ပဲပါရှိပါတယ်။ နောက်ပြီး ကင်မရာက very high FPS (frame per second) ဖြစ်နေဖို့လည်းလိုအပ်ပါတယ်။ ဘာဖြစ်လို့လဲဆိုတော့ ကင်မရာနဲ့ "လ" ရဲ့အကြားကလေထုက အမြဲလှုပ်ရှားနေတာမို့လို့ ဖမ်းယူတယ့် frames တွေမှာ တစ်ချို့က blur ဖြစ်ပြီး တစ်ချို့က sharp ဖြစ်တာမို့လို့ frames များများနဲ့ရိုက်ကူးမှသာ ကိုယ့်အတွက်ပုံကောင်းရနိုင်ဖို့ အခွင့်အရေးပိုများတာကြောင့် frame rate များတယ့်ကင်မရာတွေနဲ့ရိုက်ကူးရခြင်းဖြစ်ပါတယ်။ ဒါကြောင့်လည်း single high-resolution photo အစား high-speed video stacking ကိုအသုံးပြုကြတာပါခင်ဗျ။
ကျွန်တော်ရိုက်ကူးတယ့်အဆင့်တွေကို တစ်ဆင့်ခြင်းရှင်းပြရမယ်ဆိုရင် ပထမဆုံး harmonic mount တပ်ဆင်ထားတယ့် tripod ကိုမြောက်အရပ်ဖက်ကိုမျက်နှာမူပြီး နေရာချပါတယ်။ Nebula နဲ့ galaxy တို့ကိုရိုက်သလိုမျိုး Polaris (ဓူဝံကြယ်) ကိုမျက်နှာမူပြီး polar alignment လုပ်စရာမလိုဘူးဆိုပေမယ့် harmonic mount ရဲ့ home position ကိုတော့ initial step မှာမြောက်အရပ်ဖက်ကိုလှည့်ပေးထားဖို့တော့ လိုပါတယ်။ ကျွန်တော့်တုန်းကဆို polar alignment မလုပ်ရဘူးဆိုတာနဲ့ပဲ harmonic mount home position ကို "လ" ရှိတယ့်တောင်ဖက်အရပ်ကိုလှည့်ထားပြီး search target လုပ်တာ mount ကဆန့်ကျင်ဖက်အရပ်ဖက်ကိုပဲလှည့်လှည့်သွားလို့ နာရီဝက်လောက်တိုင်ပတ်နေခဲ့တာလေ။ ဘာဖြစ်လို့အဲဒီလိုဖြစ်တာလဲသိလား harmonic mount ရဲ့ home position memory က initial step မှာသူ့ကိုမြောက်အရပ်ဖက်ကိုပဲအမြဲလှည့်ထားပေးတယ့်လို့ မှတ်ထားလို့ပါပဲ။ ဒါကြောင့်ကိုယ်ကဘယ်ဖက်ကိုပဲလှည့်ထားလှည့်ထား လှည့်ထားတယ့်ဖက်ကို မြောက်အရပ်လို့သတ်မှတ်ပြီး search target လုပ်မှာမို့လို့ပါပဲခင်ဗျ။ Harmonic mount ကိုနေရာချပြီးပြီးဆိုရင် telescope, red dot sight, harmonic mount hand controller, laptop, camera, connector/power cables, portable battery power station စတာတွေကို assembly လုပ်ပါ။ အားလုံးတပ်ဆင်လို့ပြီးပြီဆိုရင် mount ကို SkyAtlas application ကိုအသုံးပြုပြီး Moon ကို target search လုပ်ပါ harmonic mount ရဲ့ tracking ကို Moon ဆိုပြီးချိန်းထားဖို့လည်းမမေ့ပါနဲ့။ Sidereal ကိုသုံးလို့ရပေမယ့် "လ" အတွက်ဆို Moon ကပိုပြီး accurate ပိုဖြစ်လို့ပါခင်ဗျ။ Target search လုပ်တယ့်အခါကြရင် scope က "လ" ကိုတည့်တည့်ကြီး align လုပ်ပေးမှာမဟုတ်တယ့်အတွက် telescope မှာတပ်ထားတယ့် red dot sight ကိုအသုံးပြုပြီး "လ" နဲ့ alignment မှန်အောင်ထပ်လုပ်ပေးရမှာပါ။ Red dot sight alignment အတွက်ကတော့ SkyAtlas ကိုမသုံးတော့ပဲ harmonic mount hand controller နဲ့လုပ်ပေးရမှာဖြစ်ပါတယ်။ ကျွန်တော်ဘာကြောင့် finder ကို original finder scope ဖြစ်တယ့် 6x30 finder scope အစား red dot sight ကိုအသုံးပြုရတာလဲဆိုတော့ red dot က finder scope ထက်သုံးရတာပိုလွယ်ကူလို့ပါပဲ။ Finder scope ကသူ့ချည်းသက်သက်သုံးရင် ပုံရိပ်က scope အထဲမှာ upside down (inverted/reversed image) အနေနဲ့ပြမှာဖြစ်ပြီး အဲ့ဒါကိုအတည့်အတိုင်းမြင်ချင်တယ်ဆိုရင်တော့ Correct Image Prism ကိုတပ်သုံးလို့ရမှာပါ။ ပုံရိပ် inverted/reversed ဖြစ်တယ်ဆိုတာကလည်း astronomical use အတွက်ကတော့ပုံမှန်ဆိုပေမယ့် ကျွန်တော်ကတော့သုံးရတာ comfortable မဖြစ်လို့သူ့အစား red dot sight ကိုအသုံးပြုရခြင်းဖြစ်ပါတယ်။ "လ" ကို red dot sight နဲ့ alignment လုပ်ပြီးတယ့်နောက် SkyAtlas အထဲမှာပြန်ကြည့်လိုက်ရင် telescope ရဲ့ target center က "လ" ရဲ့ center မှာမဟုတ်ပဲနည်းနည်းလွဲနေတာကို တွေ့ရမှာပါ။ ပြဿနာမရှိပါဘူး ကိုယ်ကသာ GoTo ဆိုတာကိုသွားမနှိပ်မိစေဖို့ပဲ သတိထားပေးပါ။ မဟုတ်ရင် red dot alignment ကိုအစအဆုံးပြန်လုပ်ပေးရမှာပါ။
ကြုံတုန်းအသိပေးချင်တာလေးတစ်ခုကတော့ harmonic mount ကို applications တွေနဲ့ချိတ်ဆက်တယ့်အခါကြရင် နည်းလမ်းနှစ်သွယ်နဲ့ဆက်သွယ်လို့ရပါတယ်။ အဲဒါတွေကတော့ Wifi နဲ့ Bluetooth တို့ပါပဲ။ တစ်ခုပဲသတိထားရမှာက Bluetooth နဲ့ချိတ်ဆက်မယ်ဆိုပြဿနာမရှိပေမယ့် Wifi ကိုအသုံးပြုပြီးချိတ်ဆက်မယ်ဆိုရင်တော့ hand controller ကို mount နဲ့ချိတ်ဆက်ထားမှသာ Wifi connection process အဆင်ပြေပါလိမ့်မယ်ဆိုတာပါပဲခင်ဗျ။ Hand controller လို မလို ဆိုတာကလည်း harmonic mount ကိုဘယ် workflow နဲ့တွဲသုံးမှာလည်းဆိုတယ့်အပေါ်မူတည်ပြီး အနည်းငယ်ကွဲပြားမှုတော့ ရှိပါလိမ့်မယ်။
"လ" ကို red dot နဲ့ alignment လုပ်တာပြီးသွားပြီဆိုရင်တော့ laptop ထဲက SharpCap သို့မဟုတ် FireCapture ဆိုတယ့် software application တွေကိုအသုံးပြုပြီး ရိုက်ကူးရေးစတင်လို့ရပါပြီ။ ကျွန်တော်ကတော့ ပိုပြီး user friendly ဖြစ်တယ့် SharpCap ကိုအသုံးပြုပါတယ်။ FireCapture ကပိုပြီး advanced ဖြစ်တာမို့လို့ နောက်ပိုင်း experience ပိုရှိလာတယ့်အချိန်ကြမှာသာသုံးမယ်လို့ ဆုံးဖြတ်ထားပါတယ်။ Record လုပ်ပြီးရင်တော့ AutoStakkert နဲ့ stacking လုပ်ပြီးတော့ RegiStax နဲ့ image တွေကို sharpness ဖြစ်အောင်ပြုပြင်ပေးပါတယ်။ SharpCap, AutoStakkert နဲ့ RegiStax တို့ရဲ့အသုံးပြုပုံအဆင့်ဆင့်ကတော့ images တွေနဲ့ပဲ step by step ရှင်းပြပေးထားပါတယ်.....
မိုးသားကင်းစင်ကြည်လင်သောညများ ဖြစ်ပါစေ — အမြင်ကောင်းများနှင့် အောင်မြင်သော observation များရရှိပါစေ.....